Sweet Thai Chilli Sauce: The Perfect Balance of Sweet, Spicy, and Tangy
When I first tasted authentic sweet Thai chilli sauce during my travels through Bangkok’s bustling street food markets, I knew I had discovered something truly special. This glossy, ruby-red condiment with its perfect balance of sweetness, heat, and tang has since become an absolute staple in my kitchen. Today, I’m sharing everything I’ve learned about this incredible sauce – from its fascinating origins to foolproof homemade recipes that rival any store-bought version.
Sweet Thai chilli sauce, known as “nam jim gai” in Thai, literally translates to “chicken dipping sauce.” However, don’t let that name fool you – this versatile condiment pairs beautifully with countless dishes beyond poultry. Its unique flavor profile combines the sweetness of palm sugar, the heat of fresh chilies, the tang of rice vinegar, and the umami depth of fish sauce, creating a harmonious blend that enhances rather than overwhelms your favorite foods.
Understanding Sweet Thai Chilli Sauce
Sweet Thai Chilli Sauce: A glossy, translucent condiment with a sweet-tangy flavor profile and moderate heat level, traditionally made with red chilies, sugar, vinegar, garlic, and fish sauce.
Nam Jim Gai: The authentic Thai name for sweet chilli sauce, literally meaning “chicken dipping sauce.”
Balance Profile: The ideal ratio that creates harmony between sweet, sour, salty, and spicy elements – the foundation of Thai cuisine.
Umami Enhancement: The savory depth provided by fish sauce that distinguishes authentic Thai versions from Western adaptations.
The Story Behind This Beloved Condiment
My fascination with sweet Thai chilli sauce began when I noticed how differently it was prepared across various regions of Thailand. In northern Thailand, I encountered versions with more garlic and less sugar, while southern preparations often featured additional lime juice and sometimes tamarind paste. This regional diversity taught me that there’s no single “correct” recipe – rather, the best version is the one that suits your personal taste preferences.
The sauce gained international popularity in the 1980s when Thai restaurants began expanding globally. However, many commercial versions available in Western supermarkets contain high fructose corn syrup and artificial preservatives, which significantly alter the authentic flavor profile. This realization motivated me to perfect my own homemade version, and I’m excited to share these techniques with you.
Essential Ingredients Breakdown
The beauty of sweet Thai chilli sauce lies in its simplicity, but each ingredient plays a crucial role in achieving that perfect balance:
Fresh Red Chilies form the foundation of authentic flavor. I prefer using a combination of bird’s eye chilies for heat and larger red chilies for color and mild spice. The seeds can be included or removed depending on your heat tolerance.
Palm Sugar provides the characteristic sweetness that distinguishes Thai cuisine. If unavailable, brown sugar works as a substitute, though the flavor will be slightly different. I’ve found that combining brown sugar with a touch of molasses creates a closer approximation to palm sugar’s complex sweetness.
Rice Vinegar contributes the essential tang that balances the sweetness. White vinegar can substitute, but rice vinegar offers a more mellow acidity that complements the other flavors better.
Garlic adds aromatic depth and a slight bite. Fresh garlic is non-negotiable – garlic powder simply won’t deliver the same flavor impact.
Fish Sauce provides the umami element that makes this sauce distinctly Thai. For vegetarian versions, I substitute with soy sauce mixed with a small amount of seaweed or mushroom powder.
Detailed Ingredient Comparison Table
| Ingredient | Authentic Option | Western Substitute | Flavor Impact | Notes |
|---|---|---|---|---|
| Red Chilies | Bird’s eye + Large red chilies | Fresno + Red bell pepper | Heat + Color | Remove seeds for less heat |
| Palm Sugar | Pure palm sugar | Brown sugar + molasses | Complex sweetness | 3:1 ratio brown sugar to molasses |
| Rice Vinegar | Thai rice vinegar | White rice vinegar | Mild tang | Avoid distilled white vinegar |
| Fish Sauce | Premium fish sauce | Light soy sauce + kelp powder | Umami depth | 2 tbsp soy + 1/4 tsp kelp powder |
| Garlic | Fresh Thai garlic | Regular fresh garlic | Aromatic bite | Use 50% more regular garlic |
| Water | Filtered water | Tap water | Consistency | Quality affects final taste |
My Foolproof Homemade Recipe
After countless experiments in my kitchen, I’ve developed this recipe that consistently produces restaurant-quality results:
Ingredients:
- 8-10 large red chilies, roughly chopped
- 4-6 bird’s eye chilies (adjust for heat preference)
- 6 cloves fresh garlic
- 1/2 cup palm sugar (or brown sugar substitute mix)
- 1/4 cup rice vinegar
- 2 tablespoons fish sauce
- 1 cup water
- 1 tablespoon cornstarch mixed with 2 tablespoons cold water
- 1/2 teaspoon salt
Method:
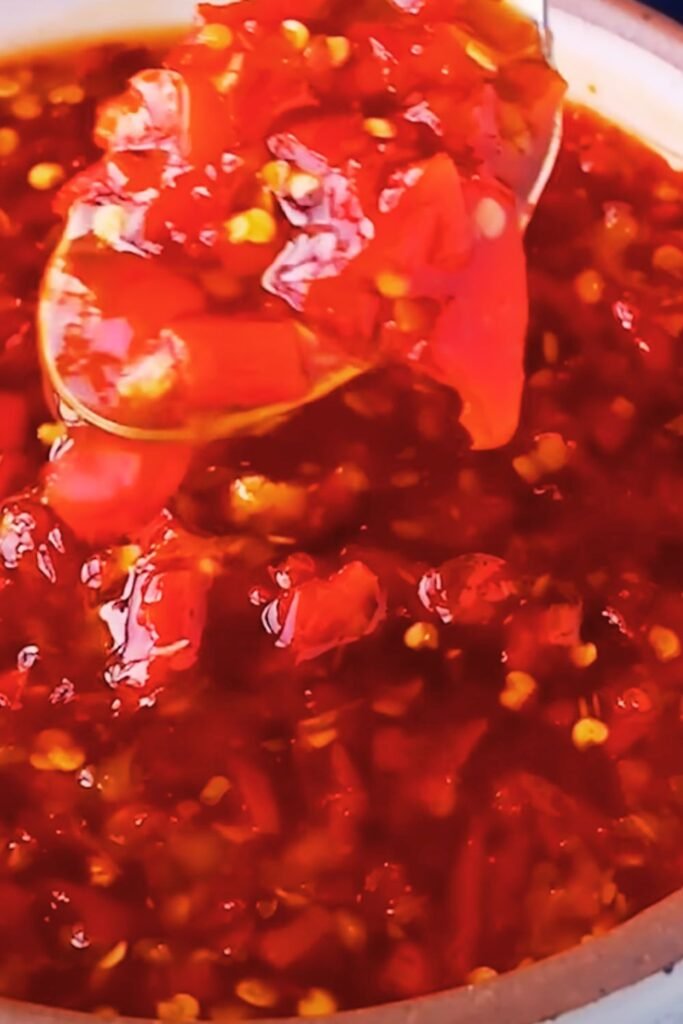
I start by preparing all my ingredients, as this sauce comes together quickly once cooking begins. In my food processor, I pulse the chilies and garlic until roughly chopped – not completely smooth, as I prefer some texture in my final sauce.
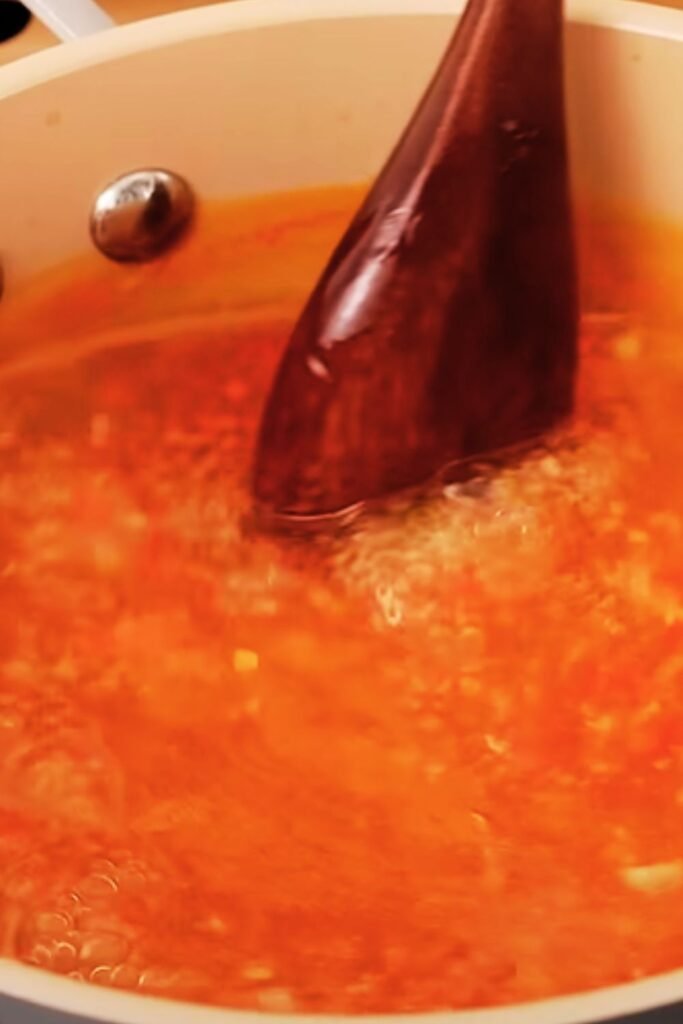
Next, I combine the water, palm sugar, rice vinegar, and fish sauce in a medium saucepan over medium heat. I stir constantly until the sugar completely dissolves, then add my chopped chili-garlic mixture. The mixture needs to simmer for about 10-12 minutes, allowing the flavors to meld and the chilies to soften.
The key moment comes when I add the cornstarch slurry. I stir it in gradually while the mixture simmers, watching as it transforms from a thin liquid to that characteristic glossy, thick consistency. This usually takes 2-3 minutes of constant stirring.
Finally, I taste and adjust the seasoning. Sometimes I add a pinch more salt, occasionally a splash more vinegar if I want extra tang, or even a bit more sugar if the chilies were particularly hot.
Texture and Consistency Mastery

Achieving the perfect consistency has been one of my biggest learning curves with this sauce. The ideal sweet Thai chilli sauce should coat the back of a spoon but still flow freely when poured. It should have a glossy, almost jewel-like appearance that makes it as visually appealing as it is delicious.
The cornstarch slurry technique I use creates this perfect consistency without the artificial thickness that some commercial versions have. I’ve experimented with other thickening agents, but cornstarch provides the cleanest flavor and most authentic texture.
Temperature plays a crucial role in consistency. The sauce will continue to thicken slightly as it cools, so I aim for a consistency that’s just slightly thinner than my desired final result while it’s still hot on the stove.
Flavor Balancing Techniques
The art of balancing sweet, sour, salty, and spicy elements is fundamental to Thai cuisine, and this sauce exemplifies that principle perfectly. I’ve developed a systematic approach to achieving this balance:
Sweetness Level: I start with less sugar than I think I need, as it’s easier to add more than to correct an overly sweet sauce. The sweetness should be prominent but not cloying.
Heat Management: I control heat through both chili selection and seed removal. For family-friendly versions, I remove all seeds and use primarily mild red chilies with just one or two bird’s eye chilies for depth.
Acid Balance: The vinegar’s tartness should cut through the sweetness without being sharp or harsh. I taste frequently during cooking and adjust accordingly.
Umami Depth: The fish sauce adds complexity that prevents the sauce from being one-dimensional. Even in small amounts, it provides a savory foundation that ties all other flavors together.
Nutritional Information and Health Benefits
| Nutrient | Per 2 Tablespoons | Daily Value % | Health Benefits |
|---|---|---|---|
| Calories | 45-50 | 2-3% | Low-calorie flavor enhancer |
| Carbohydrates | 11-12g | 4% | Quick energy source |
| Sugars | 10-11g | – | Natural fruit sugars from chilies |
| Sodium | 280-320mg | 12-14% | Moderate sodium content |
| Vitamin C | 15-20mg | 17-22% | Immune system support |
| Capsaicin | Variable | – | Metabolism boost, pain relief |
| Antioxidants | High | – | Anti-inflammatory properties |
The health benefits of homemade sweet Thai chilli sauce extend beyond just flavor enhancement. The capsaicin in chilies has been shown to boost metabolism and provide natural pain relief. Fresh garlic contributes antimicrobial properties and supports cardiovascular health. By making your own sauce, you control the sugar content and avoid artificial preservatives found in many commercial versions.
Storage and Preservation Tips
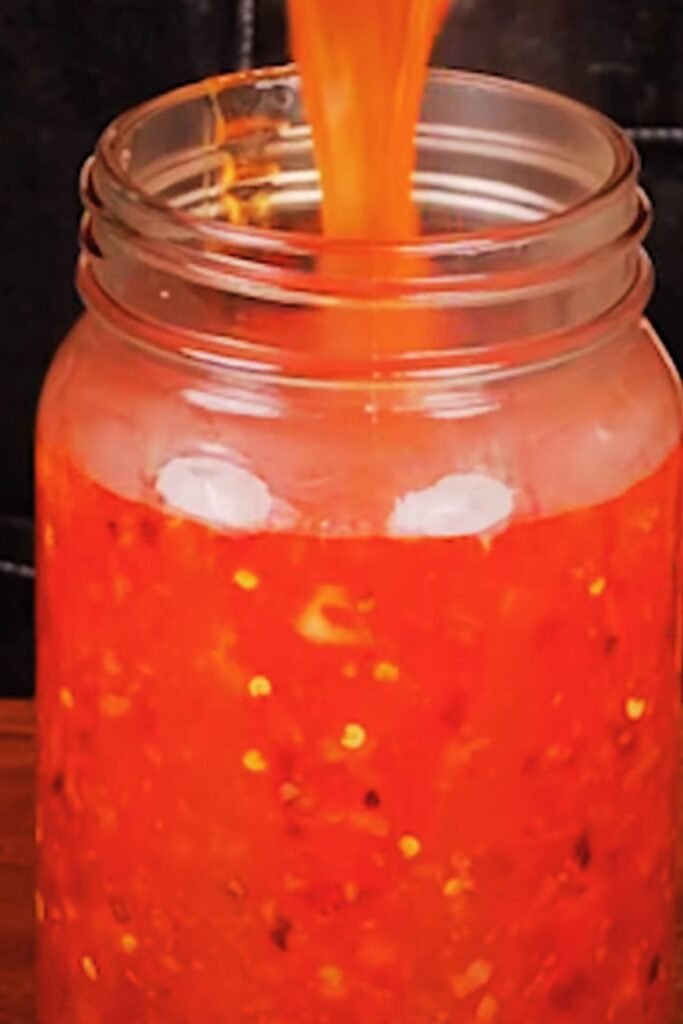
Proper storage has been crucial in my sauce-making journey. Homemade sweet Thai chilli sauce, when stored correctly, maintains its flavor and quality for several weeks. I always use sterilized glass jars with tight-fitting lids, which I prepare by boiling them for 10 minutes before use.
The sauce should be stored in the refrigerator, where it will keep for 4-6 weeks. I’ve noticed that the flavors actually improve after the first few days, as the ingredients have time to meld together fully. The sauce may thicken slightly in the refrigerator, but a gentle stir brings it back to the perfect consistency.
For longer storage, I portion the sauce into ice cube trays and freeze them. Once frozen solid, I transfer the cubes to freezer bags. This method allows me to thaw just the amount I need for individual meals, and the frozen sauce maintains its quality for up to 6 months.
Creative Serving Suggestions and Pairings
My experimentation with sweet Thai chilli sauce has led me to discover countless creative applications beyond traditional uses:
Appetizer Applications: I use it as a dipping sauce for spring rolls, pot stickers, and coconut shrimp. It also makes an excellent glaze for chicken wings when mixed with a little soy sauce and sesame oil.
Main Course Enhancement: The sauce works beautifully as a marinade for grilled meats, particularly pork and chicken. I also stir it into stir-fries during the last minute of cooking for an instant flavor boost.
Fusion Creations: I’ve incorporated it into Western dishes with surprising success. It makes an excellent pizza sauce base when mixed with tomato sauce, and I’ve used it to glaze roasted vegetables with fantastic results.
Breakfast Innovation: Mixed with scrambled eggs or used as a condiment for breakfast sandwiches, it adds an unexpected but delightful kick to morning meals.
Troubleshooting Common Issues
Through my years of making this sauce, I’ve encountered and solved numerous common problems:
Too Thin Consistency: If your finished sauce is too thin, create another cornstarch slurry (1 teaspoon cornstarch with 1 tablespoon cold water) and stir it in while the sauce simmers. Allow it to cook for another 2-3 minutes.
Overly Spicy Results: If the sauce turns out too hot, I add more sugar and a splash of rice vinegar to balance the heat. In extreme cases, I’ll make a second batch without chilies and combine them.
Lack of Glossy Finish: A dull appearance usually indicates either insufficient cooking time or problems with the cornstarch slurry. Make sure to cook the sauce long enough for the cornstarch to fully activate.
Flavor Imbalance: When the flavor seems off, I return to the basic principle of Thai cooking – adjusting sweet, sour, salty, and spicy elements one at a time until balance is achieved.
Advanced Variations and Regional Styles
My travels through different regions of Thailand have inspired several variations of the basic recipe:
Northern Style (Nam Jim Jeaw): I increase the garlic content and add a touch of tamarind paste for extra tang. This version pairs exceptionally well with grilled meats.
Southern Style: I incorporate lime juice and sometimes a small amount of shrimp paste for additional umami depth. This creates a more complex flavor profile.
Vegetarian Version: I replace fish sauce with a combination of soy sauce and mushroom powder, maintaining the umami element while keeping it plant-based.
Fruit-Enhanced Version: Adding finely minced pineapple or mango creates interesting tropical notes that work particularly well with seafood dishes.
Pairing Guide for Different Cuisines
| Cuisine Type | Best Applications | Flavor Harmony | Serving Tips |
|---|---|---|---|
| Thai | Spring rolls, satay, larb | Natural complement | Serve at room temperature |
| Chinese | Dumplings, dim sum, stir-fries | Balances rich flavors | Mix with soy sauce for depth |
| Vietnamese | Fresh rolls, grilled meats | Enhances fresh herbs | Dilute slightly with lime juice |
| Western Fusion | Chicken wings, pizza, burgers | Adds exotic sweetness | Use sparingly as accent |
| Seafood | Shrimp, fish cakes, crab | Complements natural sweetness | Serve chilled |
| Vegetarian | Tofu, tempeh, vegetables | Adds missing umami | Mix with sesame oil |
Quality Assessment and Selection Guide
When purchasing commercial sweet Thai chilli sauce, I look for specific quality indicators that signal an authentic product. The ingredient list should be short and recognizable, with chilies listed as the first or second ingredient. Avoid products with high fructose corn syrup, artificial colors, or excessive preservatives.
The color should be a natural red, not overly bright or artificial-looking. Consistency-wise, it should flow smoothly but have enough body to coat foods effectively. The aroma should be fresh and fragrant, with clear chili and garlic notes.
For homemade versions, I assess quality through appearance (glossy and clear), aroma (balanced and fresh), taste (harmonious sweet-spicy-tangy balance), and texture (smooth but with some visible chili pieces).
Questions and Answers
Q: How long does homemade sweet Thai chilli sauce last in the refrigerator? When stored properly in sterilized glass containers, my homemade sweet Thai chilli sauce maintains its quality for 4-6 weeks in the refrigerator. I always check for any signs of mold or off-odors before using, and I’ve found that the flavor actually improves during the first week of storage.
Q: Can I make sweet Thai chilli sauce without fish sauce for vegetarian diets? Absolutely! I substitute fish sauce with a combination of light soy sauce and mushroom powder or seaweed powder. Use 2 tablespoons of soy sauce mixed with 1/4 teaspoon of mushroom powder to replace 2 tablespoons of fish sauce. The umami depth remains very similar.
Q: Why does my homemade sauce separate or become watery after storage? Separation usually occurs when the cornstarch isn’t fully cooked or when the sauce wasn’t brought to a proper simmer. To fix this, I gently reheat the sauce while stirring constantly. If it’s still too thin, I add a fresh cornstarch slurry and cook for another 2-3 minutes.
Q: What’s the best way to adjust the heat level in sweet Thai chilli sauce? I control heat through chili selection and seed removal. For milder versions, I use mostly large red chilies with seeds removed and add just 1-2 bird’s eye chilies for color and depth. For extra heat, I include more bird’s eye chilies with seeds intact. You can always add more heat, but it’s difficult to reduce it once it’s too spicy.
Q: Can sweet Thai chilli sauce be frozen for long-term storage? Yes, I regularly freeze portions in ice cube trays for convenient single-serving sizes. Once frozen solid, I transfer the cubes to freezer bags where they keep for up to 6 months. The texture remains excellent after thawing, though I recommend stirring well before use.
Q: What’s the difference between sweet Thai chilli sauce and sriracha? While both are chili-based condiments, they have distinctly different flavor profiles. Sweet Thai chilli sauce emphasizes sweetness and balance, with a glossy, thick consistency. Sriracha is more vinegar-forward with a paste-like texture and focuses primarily on heat and tang rather than sweetness.
Q: Is it safe to can sweet Thai chilli sauce for shelf-stable storage? Due to the low acidity and sugar content, I don’t recommend home canning this sauce without proper pH testing. The combination of ingredients doesn’t create a sufficiently acidic environment for safe water bath canning. I stick to refrigerator and freezer storage for food safety.
Q: How can I make my sauce more authentic to Thai flavors? The key to authenticity lies in using proper ingredients and achieving the right balance. I always use palm sugar when possible, Thai fish sauce (which tends to be less salty than Vietnamese versions), and fresh Thai chilies. The sauce should taste equally sweet, tangy, and spicy with a underlying umami depth from the fish sauce.
Sweet Thai chilli sauce has become more than just a condiment in my kitchen – it’s a gateway to exploring the beautiful complexity of Thai cuisine. Whether you’re drizzling it over spring rolls, using it as a marinade, or discovering your own creative applications, this versatile sauce brings a perfect balance of flavors that can transform any meal. The satisfaction of creating your own version, tailored to your exact taste preferences, makes the effort absolutely worthwhile. I encourage you to experiment with the recipe, adjust the flavors to suit your palate, and discover the endless possibilities this remarkable sauce offers.
Leave a Reply