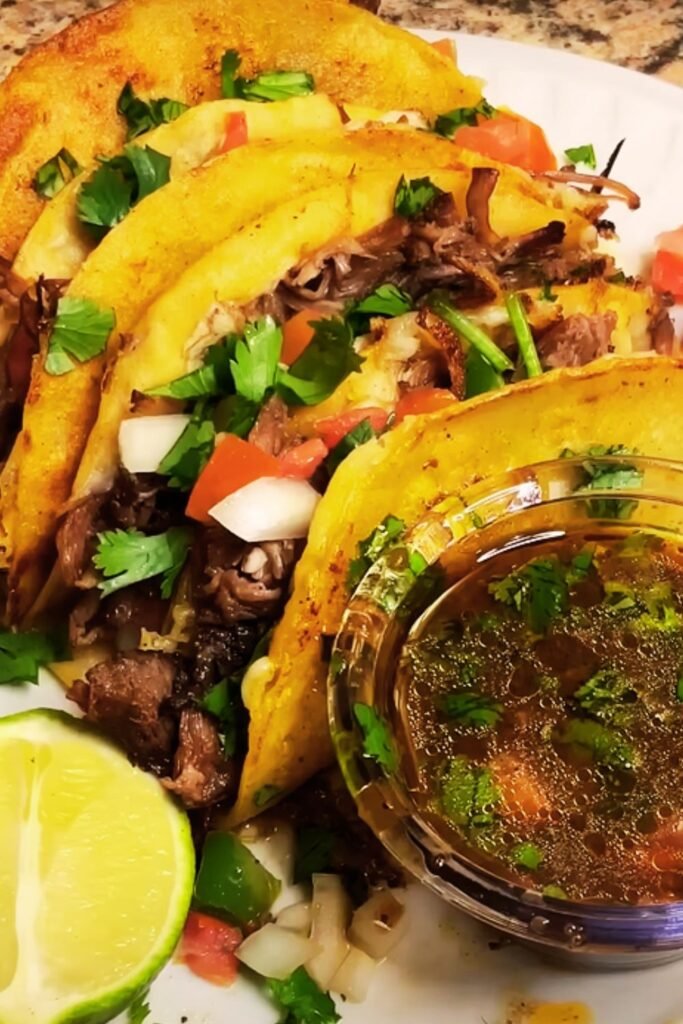
Honey Chipotle Shredded Beef Tacos: The Ultimate Guide to Sweet Heat Perfection
When I first discovered the magic of combining smoky chipotle peppers with golden honey, my taco game changed forever. These Honey Chipotle Shredded Beef Tacos represent everything I love about Mexican-inspired cuisine – bold flavors, tender textures, and that perfect balance of sweet and spicy that keeps you coming back for more.
I’ve spent years perfecting this recipe, and I’m excited to share every detail with you. Whether you’re cooking for a weeknight dinner or hosting a taco party, these tacos will become your new obsession. The secret lies in the slow-cooked beef that falls apart at the touch of a fork, combined with a sauce that balances the smoky heat of chipotle with the natural sweetness of honey.
Understanding the Key Components
Before we dive into the cooking process, let me break down the essential elements that make these tacos extraordinary:
Chipotle Peppers: These are jalapeño peppers that have been smoked and dried, typically packed in adobo sauce. They provide a deep, smoky heat that’s more complex than regular hot peppers.
Honey Selection: The type of honey you choose matters. I prefer wildflower honey for its robust flavor, but clover honey works beautifully too. The key is using real honey, not corn syrup substitutes.
Beef Cut: Chuck roast is my go-to choice for this recipe. It’s well-marbled with fat and connective tissue that breaks down during slow cooking, creating incredibly tender, shreddable meat.
Adobo Sauce: This is the thick, dark red sauce that chipotle peppers are packed in. It’s a combination of ground chiles, vinegar, garlic, and spices that adds incredible depth to our dish.
The Complete Ingredient Breakdown
| Ingredient | Quantity | Purpose | Substitution Options |
|---|---|---|---|
| Chuck roast | 3-4 lbs | Main protein | Beef brisket, pork shoulder |
| Chipotle peppers in adobo | 3-4 peppers | Heat and smoke | Smoked paprika + cayenne |
| Adobo sauce | 2 tablespoons | Flavor base | Tomato paste + spices |
| Honey | 1/3 cup | Sweetness balance | Maple syrup, brown sugar |
| Beef broth | 2 cups | Cooking liquid | Vegetable broth, water |
| Yellow onion | 1 large | Flavor foundation | White onion, shallots |
| Garlic cloves | 6 cloves | Aromatic base | Garlic powder (1 tsp) |
| Lime juice | 1/4 cup | Acidity | Lemon juice, vinegar |
| Cumin | 2 teaspoons | Earthy warmth | Chili powder |
| Paprika | 1 teaspoon | Color and mild heat | Smoked paprika |
| Salt | 2 teaspoons | Seasoning | Sea salt, kosher salt |
| Black pepper | 1 teaspoon | Spice balance | White pepper |
| Corn tortillas | 16-20 pieces | Taco base | Flour tortillas |
Equipment You’ll Need
Having the right tools makes this recipe much easier to execute:
Slow Cooker or Dutch Oven: For the long, gentle cooking process that creates perfectly tender beef
Sharp Knives: Essential for proper vegetable prep and meat trimming
Cutting Board: Preferably separate boards for meat and vegetables
Measuring Cups and Spoons: Precision matters in achieving the perfect flavor balance
Large Skillet: For searing the beef and sautéing aromatics
Fine-Mesh Strainer: To remove any unwanted bits from the cooking liquid
Step-by-Step Cooking Process
Phase 1: Preparing the Beef
I always start by trimming excess fat from the chuck roast, leaving about 1/4 inch for flavor. Cut the roast into large chunks – about 3-4 inches each. This allows for better seasoning penetration and more even cooking.
Season the beef generously with salt and pepper at least 30 minutes before cooking. This gives the seasoning time to penetrate the meat, resulting in better flavor throughout.
Heat a large skillet over medium-high heat with a tablespoon of oil. Sear the beef chunks on all sides until they develop a beautiful brown crust. This step is crucial – it’s where we build the foundation of flavor through the Maillard reaction.
Phase 2: Creating the Flavor Base
In the same skillet, add your diced onion and cook until softened and slightly caramelized, about 5-7 minutes. The fond (brown bits) from the beef will add incredible depth to this base.
Add minced garlic and cook for another minute until fragrant. Be careful not to burn the garlic, as it can become bitter.
Phase 3: Building the Honey Chipotle Sauce
This is where the magic happens. In a small bowl, I combine the honey with finely chopped chipotle peppers and adobo sauce. The key is balancing the heat level to your preference – start with fewer peppers and add more as needed.
Add the cumin and paprika to this mixture, creating a paste-like consistency. This concentrated flavor bomb will transform your beef into something extraordinary.
Phase 4: Slow Cooking Process
Transfer the seared beef to your slow cooker, followed by the onion and garlic mixture. Pour the honey chipotle sauce over everything, then add the beef broth.
Cook on low for 6-8 hours or high for 3-4 hours. The beef is ready when it shreds easily with a fork. The long, slow cooking process breaks down the tough connective tissues, creating incredibly tender meat.
Phase 5: Final Seasoning and Shredding
Once the beef is fork-tender, remove it from the slow cooker and shred it using two forks. The meat should fall apart effortlessly.
Strain the cooking liquid and return it to the slow cooker or a saucepan. Simmer until it reduces by half, creating a concentrated sauce that coats the shredded beef beautifully.
Add the lime juice and taste for seasoning. Adjust salt, pepper, or add more honey if needed. The flavor should be balanced – smoky, sweet, with a gentle heat that builds gradually.
Nutritional Information Table
| Nutrient | Per Serving (2 tacos) | % Daily Value |
|---|---|---|
| Calories | 485 | 24% |
| Total Fat | 18g | 28% |
| Saturated Fat | 6g | 30% |
| Cholesterol | 95mg | 32% |
| Sodium | 890mg | 39% |
| Total Carbohydrates | 42g | 15% |
| Dietary Fiber | 6g | 21% |
| Sugars | 12g | – |
| Protein | 35g | 70% |
| Vitamin C | 15mg | 17% |
| Iron | 4.2mg | 23% |
| Calcium | 180mg | 14% |
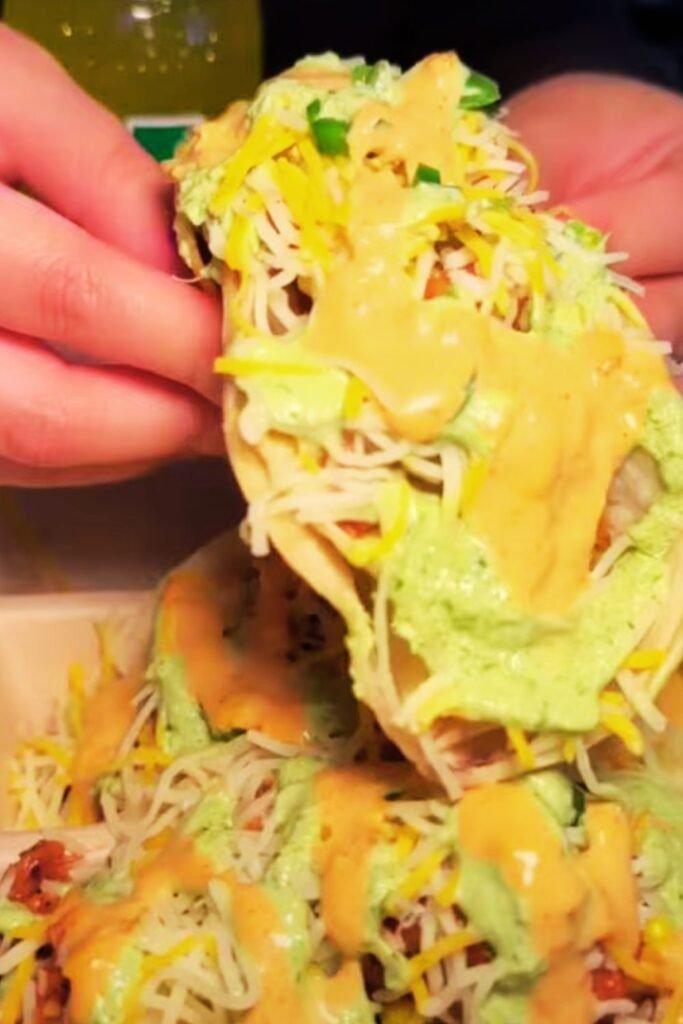
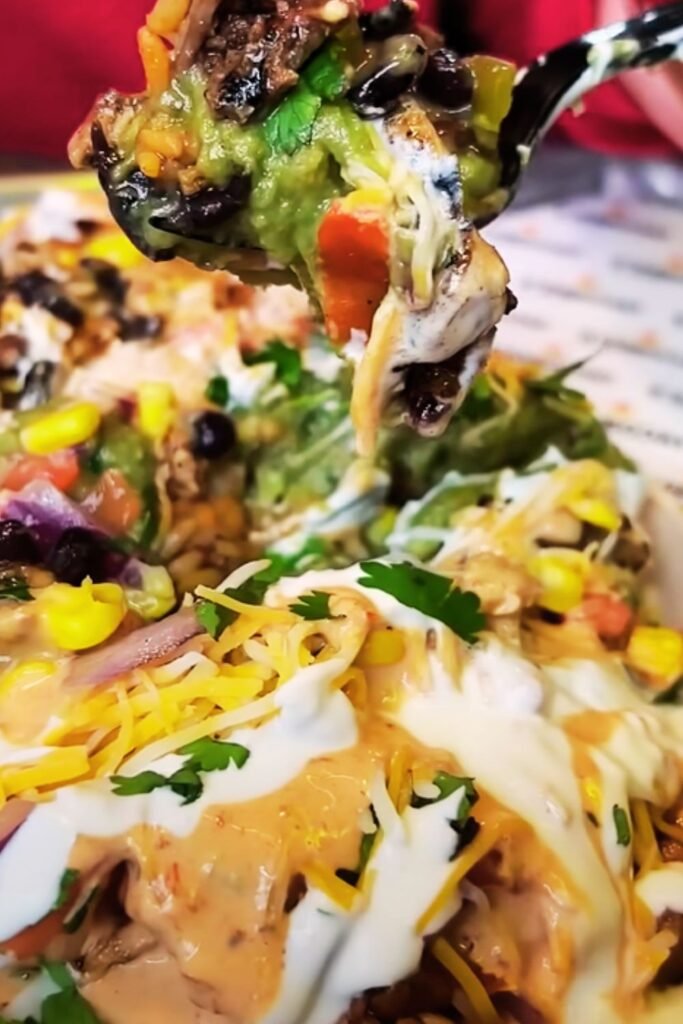
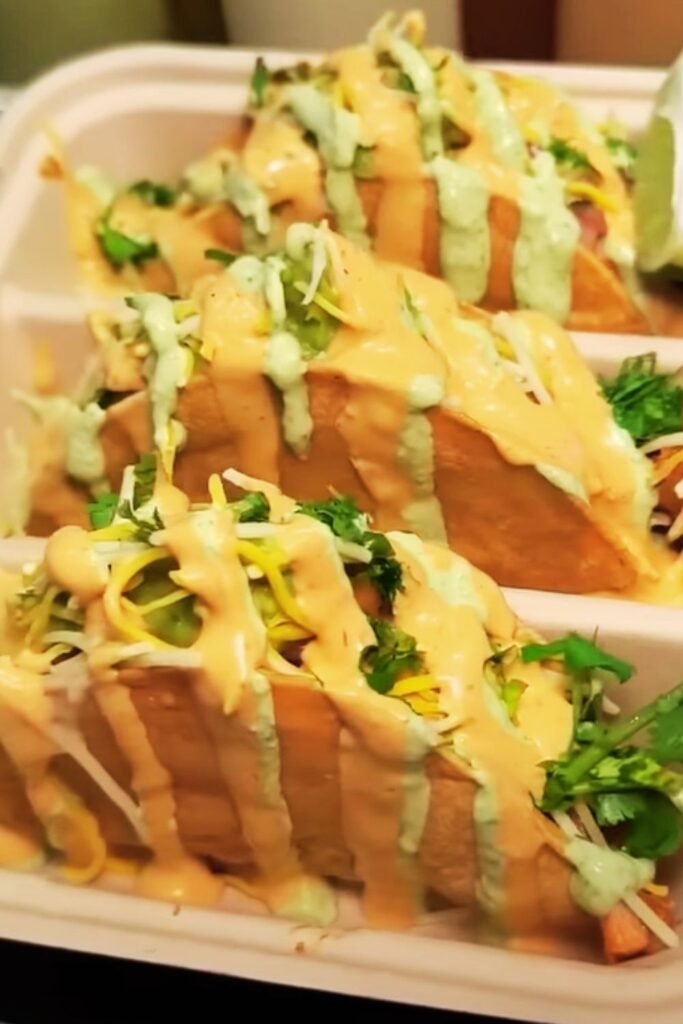
Toppings and Garnish Options
The beauty of these tacos lies not just in the perfectly seasoned beef, but in the variety of toppings that complement the honey chipotle flavors:
Classic Fresh Options: Diced white onions, chopped cilantro, and lime wedges provide brightness that cuts through the rich beef.
Creamy Elements: Mexican crema, sour cream, or a homemade cilantro-lime crema adds cooling contrast to the spicy beef.
Cheese Varieties: Queso fresco, Monterey Jack, or sharp cheddar all work wonderfully. I particularly love the salty tang of cotija cheese.
Vegetable Additions: Pickled red onions, fresh corn kernels, diced avocado, or a crisp slaw made with cabbage and carrots.
Heat Builders: For those who want extra spice, fresh jalapeños, serrano peppers, or a dash of hot sauce.
Serving Suggestions and Meal Planning
These tacos pair beautifully with traditional Mexican sides. My go-to combinations include:
Mexican Rice: The neutral flavor of cilantro-lime rice balances the bold taco flavors perfectly.
Refried Beans: Creamy, protein-rich beans make the meal more substantial and satisfying.
Fresh Salsa: A bright pico de gallo or salsa verde adds freshness and acidity.
Elote (Mexican Street Corn): Grilled corn with mayo, cheese, and chili powder complements the smoky flavors.
Agua Frescas: Refreshing fruit waters like horchata, tamarind, or hibiscus provide cooling contrast.
For meal planning, this recipe is incredibly versatile. The shredded beef keeps well in the refrigerator for up to 5 days and freezes beautifully for up to 3 months. I often make double batches and use the leftovers for:
- Loaded nachos with melted cheese and jalapeños
- Hearty breakfast burritos with scrambled eggs
- Stuffed quesadillas with peppers and onions
- Rice bowls with black beans and avocado
- Sandwich filling for tortas or regular sandwiches
Advanced Techniques and Tips
After making these tacos countless times, I’ve discovered several techniques that elevate the final result:
Pepper Preparation: Instead of using whole chipotle peppers, I often puree them with a small amount of adobo sauce. This creates a more even distribution of heat and smoke throughout the beef.
Browning the Aromatics: Don’t skip the step of sautéing onions and garlic in the beef drippings. This layer of flavor makes a noticeable difference in the final dish.
Reduction Technique: Always reduce the cooking liquid after removing the beef. This concentrates the flavors and creates a sauce that clings to the meat rather than making it watery.
Resting Time: Let the finished beef rest for 10-15 minutes before serving. This allows the flavors to meld and the meat to reabsorb some of the cooking liquid.
Tortilla Warming: Properly warmed tortillas make all the difference. I char mine directly over a gas flame for about 30 seconds per side, or heat them in a dry skillet until they’re pliable and slightly toasted.
Troubleshooting Common Issues
Even with a straightforward recipe like this, I’ve encountered a few challenges over the years:
Tough Beef: If your beef isn’t tender enough, it simply needs more time. Continue cooking until it shreds easily – this can vary based on the specific cut and size of your roast.
Too Spicy: If you’ve added too much chipotle heat, balance it with additional honey or a splash of beef broth. You can also add a dollop of sour cream to individual servings.
Bland Flavor: This usually means you need more salt or acidity. Add lime juice gradually and taste as you go.
Watery Sauce: Always reduce the cooking liquid after removing the beef. The concentrated sauce should coat the meat, not pool in the bottom of the container.
Dry Meat: If your beef seems dry, add some of the reduced cooking liquid back to the shredded meat gradually until it reaches the desired consistency.
Storage and Reheating Guidelines
Proper storage ensures you can enjoy these tacos for days after cooking:
Refrigeration: Store the shredded beef in an airtight container for up to 5 days. Keep it with some of the cooking liquid to prevent drying out.
Freezing: The beef freezes beautifully for up to 3 months. Portion it into meal-sized containers for easy thawing.
Reheating: The best method is gentle reheating in a skillet with a splash of broth or water. Avoid microwaving if possible, as it can make the meat rubbery.
Tortilla Storage: Keep tortillas wrapped in a damp paper towel in the refrigerator for up to a week, or freeze them for longer storage.
Variations and Adaptations
One of the things I love most about this recipe is its adaptability:
Protein Variations: While chuck roast is my favorite, this recipe works wonderfully with pork shoulder, chicken thighs, or even jackfruit for a vegetarian version.
Heat Level Adjustments: Control the spice by varying the number of chipotle peppers. One pepper provides mild heat, while four or more deliver serious spice.
Sweetness Modifications: Experiment with different sweeteners like maple syrup, brown sugar, or agave nectar. Each brings its own unique flavor profile.
Cooking Method Alternatives: While I prefer slow cooking, you can make this in a pressure cooker (45 minutes on high pressure) or even in the oven at 275°F for 3-4 hours.
Questions and Answers
Q: Can I make these tacos ahead of time for a party? The beef actually improves in flavor when made a day ahead. Cook the beef completely, then reheat gently before serving. Warm the tortillas and set up a taco bar with all the toppings – your guests will love customizing their own tacos.
Q: What’s the best way to adjust the spice level for kids? I recommend starting with just one chipotle pepper and no additional adobo sauce. You can always add more heat to adult portions, but you can’t take it away. The honey helps balance any remaining heat for younger palates.
Q: Can I use a different cut of beef? Absolutely! Beef brisket works wonderfully, though it may take longer to cook. Short ribs create incredibly rich tacos, and even ground beef can work if you’re short on time – just adjust the cooking time accordingly.
Q: How do I know when the beef is properly cooked? The beef is ready when it shreds easily with a fork. If you can pull it apart without any resistance, it’s perfect. Undercooked beef will be tough and chewy, while properly cooked beef will fall apart naturally.
Q: Can I make this recipe in a regular pot instead of a slow cooker? Yes! Use a heavy-bottomed Dutch oven and cook at 275°F for 3-4 hours, or simmer on the stovetop over very low heat for 2-3 hours. Check occasionally and add liquid if needed.
Q: What should I do if my sauce is too thin? Remove the beef and simmer the cooking liquid until it reduces by half or more. You want it to coat the back of a spoon. If it’s still too thin, mix a tablespoon of cornstarch with cold water and stir it in.
Q: How long will the leftover beef keep in the freezer? The beef will maintain its best quality for up to 3 months in the freezer. I like to portion it into meal-sized containers before freezing for easy thawing and reheating.
Q: Can I double this recipe? Absolutely! This recipe doubles beautifully. Just make sure your slow cooker is large enough to accommodate the increased volume, or use two smaller slow cookers.
Q: What’s the best way to reheat frozen beef? Thaw overnight in the refrigerator, then reheat gently in a skillet with a splash of broth or water. Avoid microwaving if possible, as it can make the texture rubbery.
Q: Can I make this recipe dairy-free? The beef itself is naturally dairy-free! Just choose dairy-free toppings like avocado, salsa, and dairy-free cheese alternatives or skip the cheese entirely.
These Honey Chipotle Shredded Beef Tacos represent everything I love about home cooking – bold flavors, simple techniques, and the satisfaction of creating something truly special. The combination of smoky chipotle heat and natural honey sweetness creates a complexity that keeps people coming back for more. Whether you’re cooking for your family or entertaining friends, these tacos are guaranteed to impress.
The beauty of this recipe lies in its flexibility and the way it improves with time. The flavors meld beautifully as the beef rests, making it perfect for meal prep or entertaining. I hope you enjoy making these tacos as much as I do – they’ve become a staple in my kitchen and I’m confident they’ll become one in yours too.
Leave a Reply