Cacio e Pepe Pasta Pie: Transforming Italy’s Beloved Classic into a Showstopping Centerpiece
When I first encountered the idea of turning the iconic Roman pasta dish cacio e pepe into a pie, I’ll admit I was skeptical. How could something so pure and simple—just pasta, cheese, and pepper—translate into a completely different format while maintaining its soul? After months of experimentation in my kitchen, I’ve discovered that not only is it possible, but it creates something truly magical that honors the original while offering an entirely new dining experience.
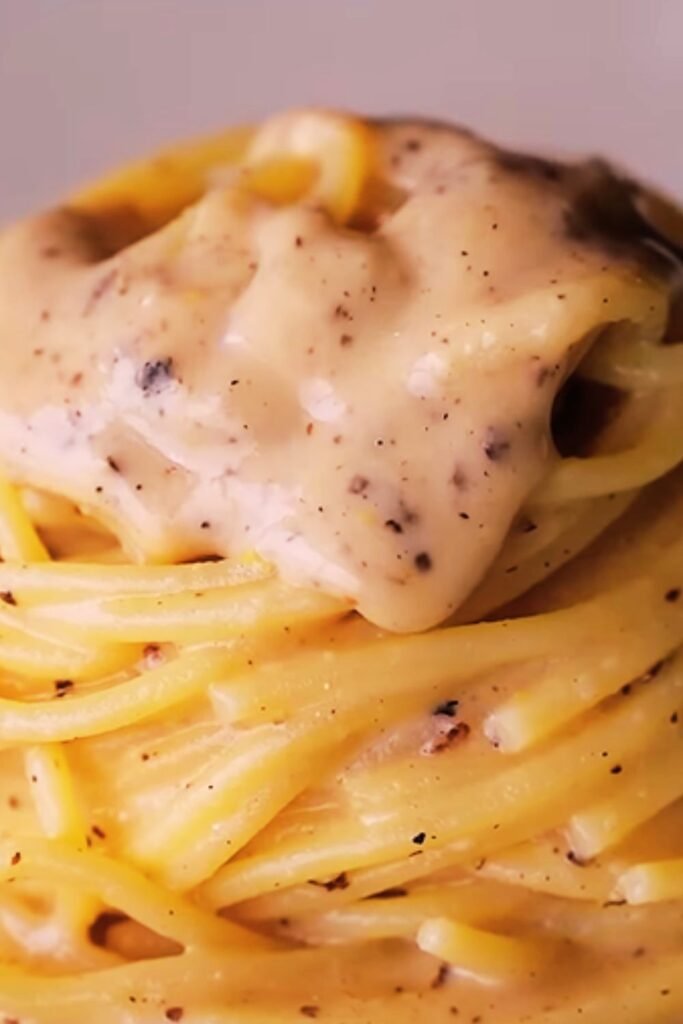
The traditional cacio e pepe, which literally means “cheese and pepper,” has been gracing Roman tables for centuries. This humble dish relies on just three ingredients: pasta (typically tonnarelli or spaghetti), Pecorino Romano cheese, and freshly cracked black pepper. The magic happens in the technique—creating a silky emulsion that coats each strand of pasta without becoming gluey or broken.
My pasta pie version takes these same principles but transforms them into a stunning centerpiece that’s perfect for entertaining. Instead of individual portions, you get a gorgeous golden wheel that slices beautifully, revealing layers of perfectly cooked pasta bound together with that signature creamy cheese mixture.
Understanding the Foundation: Traditional Cacio e Pepe
Before diving into the pie version, I think it’s crucial to understand what makes authentic cacio e pepe so special. The dish represents the pinnacle of Roman cooking philosophy: maximum flavor from minimal ingredients through perfect technique.
Pecorino Romano: This isn’t just any cheese—it’s a hard, aged sheep’s milk cheese with a sharp, salty flavor that’s absolutely essential. I’ve tried substituting with Parmesan, but it simply doesn’t deliver the same punch.
Black Pepper: Freshly cracked black pepper isn’t just seasoning here; it’s a main ingredient. I use a coarse grind that provides both heat and texture.
Pasta Water: The starchy cooking liquid becomes the binding agent that creates the creamy texture without any cream.
Technique: The cheese must be gradually incorporated off the heat with pasta water to create an emulsion, not a clumpy mess.
The Evolution to Pasta Pie
Transforming this classic into a pie form presented several challenges that I had to work through. The main issue was maintaining that signature creamy texture while creating something that would hold its shape when sliced. After numerous attempts, I developed a method that uses eggs as a binding agent—something that might make purists cringe, but hear me out.
The eggs don’t mask the flavor; instead, they provide just enough structure to hold everything together while still allowing the cheese and pepper to shine. I treat them like a gentle custard base that supports rather than dominates the dish.
Essential Ingredients and Their Roles
| Ingredient | Quantity | Purpose | Quality Notes |
|---|---|---|---|
| Spaghetti or Bucatini | 1 pound | Structure base | Use bronze-die pasta for better texture |
| Pecorino Romano | 2 cups grated | Primary flavor | Aged 12+ months preferred |
| Black Peppercorns | 2 tablespoons | Heat and aroma | Freshly cracked coarse |
| Large Eggs | 4 whole | Binding agent | Room temperature works best |
| Pasta Cooking Water | 1-2 cups | Emulsion base | Reserve before draining |
| Butter | 4 tablespoons | Richness | European-style preferred |
| Olive Oil | 2 tablespoons | Pan coating | Extra virgin |

Step-by-Step Preparation Process
Preparing the Pasta Base
I start by bringing a large pot of water to a rolling boil. The key here is using plenty of water—at least 6 quarts for one pound of pasta. I salt it generously until it tastes like seawater. This isn’t just for flavor; the salt helps create the right environment for the starch to release properly.
When adding the pasta, I stir immediately and frequently during the first few minutes to prevent sticking. For the pie, I actually undercook the pasta slightly—about 1 minute less than the package directions suggest. It will finish cooking in the oven, and this prevents it from becoming mushy.
Before draining, I reserve at least 2 cups of the starchy cooking water. This liquid gold is what makes the magic happen.
Creating the Cheese Mixture
While the pasta cooks, I prepare my cheese mixture. I grate the Pecorino Romano using the finest holes of my box grater. Pre-grated cheese doesn’t work well here because it contains anti-caking agents that interfere with the emulsion.
In a large mixing bowl, I whisk together the eggs until smooth, then gradually add the grated cheese while continuing to whisk. The mixture should be thick and paste-like. Then comes the pepper—I crack it fresh and add it generously. The pepper should be visible throughout the mixture.
The Critical Emulsion Step
Here’s where technique becomes everything. I add the drained pasta to the cheese mixture along with the butter, then gradually incorporate the hot pasta water. I start with about 1/2 cup and work it in thoroughly before adding more. The goal is a creamy, flowing consistency that coats the pasta beautifully.
The temperature is crucial here. The pasta needs to be hot enough to help melt the cheese, but not so hot that it scrambles the eggs. If things start looking clumpy, I add more pasta water and whisk vigorously.
Assembly and Baking Techniques
Preparing the Pan
I use a 10-inch springform pan for the best results, though a deep pie dish works too. The key is thorough greasing—I use butter followed by a light dusting of grated Pecorino. This creates a beautiful golden crust and prevents sticking.

Layering for Success
I transfer half the pasta mixture to the prepared pan, creating an even layer. Then I add a generous sprinkle of additional cheese and pepper before adding the remaining pasta. The top layer gets smoothed gently—I don’t want to compress it too much, but it should be relatively even.
Baking Process
The oven temperature is critical. I preheat to 375°F (190°C) and bake for 45-55 minutes until the top is golden brown and set. The center should feel firm when gently pressed, not jiggly.
I let it rest for at least 15 minutes before removing from the springform pan. This resting period allows the structure to set properly and makes slicing much cleaner.
Troubleshooting Common Issues
Problem-Solution Reference Table
| Issue | Likely Cause | Solution | Prevention |
|---|---|---|---|
| Scrambled eggs appearance | Too much heat during mixing | Add more pasta water, whisk vigorously | Let pasta cool slightly before mixing |
| Dry, crumbly texture | Not enough pasta water | Add warm stock or pasta water | Reserve more cooking liquid |
| Won’t hold shape | Insufficient eggs or cheese | Add extra beaten egg | Use room temperature eggs |
| Bland flavor | Under-seasoned or poor cheese | Add more Pecorino, taste mixture | Use aged Pecorino Romano only |
| Burnt bottom | Oven too hot | Lower temperature, use pie shield | Place on lower oven rack |
Texture Troubleshooting
If my pasta pie turns out too dry, I’ve learned to make a quick sauce using butter, pasta water, and extra cheese. I warm these together in a small pan until creamy and serve alongside the pie slices.
For overly wet results, I increase the baking time by 10-15 minutes and ensure my oven is properly calibrated. Sometimes what looks done isn’t actually set in the center.
Nutritional Profile and Serving Information
Understanding the nutritional aspects helps with meal planning and dietary considerations:
Nutritional Breakdown Per Serving (8 servings)
| Nutrient | Amount | % Daily Value | Notes |
|---|---|---|---|
| Calories | 485 | 24% | Based on 2000-calorie diet |
| Protein | 22g | 44% | High-quality complete protein |
| Carbohydrates | 48g | 16% | Complex carbs from pasta |
| Fat | 24g | 37% | Mostly from cheese and eggs |
| Sodium | 890mg | 39% | Primarily from Pecorino Romano |
| Calcium | 425mg | 32% | Excellent source |
| Iron | 2.1mg | 12% | From enriched pasta |
The high protein content makes this surprisingly satisfying, and the calcium content is impressive thanks to the generous amount of cheese.
Serving Suggestions and Accompaniments
I’ve found that this pasta pie works beautifully as either a main course or as part of a larger Italian spread. For main course service, I typically cut it into 6-8 wedges, depending on appetite and what else I’m serving.
Complementary Side Dishes
My favorite accompaniments include a simple arugula salad dressed with lemon and olive oil. The peppery greens echo the black pepper in the pie while providing a fresh contrast to the rich pasta. I also love serving roasted vegetables—especially broccoli rabe or asparagus—which add color and nutritional balance.
For a more substantial meal, I sometimes prepare a light tomato salad with fresh basil. The acidity cuts through the richness beautifully, and the colors are stunning together.
Leftover Magic
Cold leftover pasta pie is actually delicious—it reminds me of a sophisticated pasta salad. I often cube leftovers and toss them with fresh herbs and a drizzle of good olive oil for lunch the next day.
For reheating, I prefer using a low oven (300°F) rather than the microwave. I cover individual slices with foil and warm them for about 15 minutes. This preserves the texture much better than microwave reheating.
Seasonal and Regional Variations
While I’m usually a purist about cacio e pepe, the pie format opens up some interesting variation possibilities that I’ve explored over the years.
Spring Variation
In spring, I sometimes fold in blanched asparagus tips or peas just before baking. The vegetables should be barely cooked—still bright green and crisp—so they finish perfectly in the oven.
Fall/Winter Enhancement
During colder months, I’ve experimented with adding a small amount of pancetta or guanciale, crisped and cooled before folding into the pasta. This moves the dish closer to carbonara territory, but it’s absolutely delicious.
Regional Cheese Explorations
While Pecorino Romano is traditional, I’ve made successful versions using aged Manchego or even a good aged Asiago. Each cheese brings its own character while maintaining the dish’s integrity.

Equipment and Tools for Success
Having the right tools makes this recipe much more manageable and consistent:
Essential Equipment List
- Large pasta pot (6+ quarts): Critical for proper pasta cooking
- Fine-mesh grater: For achieving the right cheese texture
- Large mixing bowl: Needs to accommodate all ingredients comfortably
- Whisk: Essential for creating smooth emulsions
- 10-inch springform pan: Makes removal and serving much easier
- Digital kitchen scale: For accurate cheese measurements
- Pepper mill: Fresh cracking is non-negotiable
Nice-to-Have Tools
A pasta fork makes mixing much easier, and a bench scraper helps with transferring the mixture cleanly. I also appreciate having a kitchen thermometer to check that my pasta water is at the right temperature for the emulsion.
Storage and Make-Ahead Strategies
This pasta pie is excellent for entertaining because it can be partially prepared ahead of time. I often mix everything except the final pasta water incorporation up to 4 hours in advance. I keep the mixture covered at room temperature and add the final liquid just before baking.
Storage Guidelines
| Storage Method | Duration | Quality Notes | Reheating Instructions |
|---|---|---|---|
| Refrigerated (covered) | 3-4 days | Best quality first 2 days | 300°F oven, 15 minutes covered |
| Frozen (wrapped well) | 2-3 months | Texture slightly affected | Thaw overnight, then reheat |
| Room temperature | 2 hours max | Food safety concern beyond this | Not recommended |
For freezing, I wrap individual slices in plastic wrap, then aluminum foil. This prevents freezer burn and makes it easy to reheat single portions.
The Cultural Significance and My Personal Journey
Creating this pasta pie has taught me so much about the flexibility of traditional recipes while respecting their essence. When I first served it to my Italian friend Marco, I was nervous about his reaction. His initial skepticism melted away after the first bite, and he admitted that while it wasn’t traditional cacio e pepe, it captured the spirit perfectly.
This recipe represents something beautiful about Italian cooking—it’s not about rigid rules but about understanding flavors and techniques well enough to adapt them thoughtfully. The pie format makes cacio e pepe accessible for different occasions while maintaining everything I love about the original dish.
I’ve served this at dinner parties, potluck gatherings, and quiet family dinners. Each time, it sparks conversation and brings people together around the table, which is really what good food is all about.
Professional Tips from My Kitchen
After making this recipe countless times, I’ve developed some professional techniques that ensure consistent results:
Temperature Management: I use an instant-read thermometer to ensure my pasta water is between 180-190°F when I add it to the cheese mixture. This prevents scrambling while maintaining emulsification.
Timing Coordination: I start heating my oven when I begin cooking the pasta. This ensures everything is ready simultaneously and prevents the pasta from sitting and cooling too much.
Quality Assessment: The mixture is ready when it coats a spoon but still flows easily. If I can draw a line through it with my finger and it holds for 2-3 seconds before flowing back together, it’s perfect.
Presentation Excellence: I run a thin knife around the edges before cooling to prevent cracking, and I always use a sharp chef’s knife for clean slices.
Q&A Section
Q: Can I make this pasta pie without eggs?
I understand dietary restrictions, but the eggs are really crucial for structure here. Without them, the pie won’t hold together when sliced. You might try using a commercial egg replacer, but I can’t guarantee the same results since I haven’t tested this variation extensively.
Q: Why does my cheese sometimes get clumpy instead of creamy?
This usually happens when the temperature is wrong or you’re adding liquid too quickly. Make sure your pasta has cooled slightly after draining, and add the pasta water gradually while whisking constantly. If it does clump, don’t panic—add more warm pasta water and whisk vigorously.
Q: Can I use a different type of pasta shape?
Absolutely! I’ve made this successfully with penne, rigatoni, and even shells. The key is using something that will nest together well in the pan. Avoid very small shapes like orzo, as they don’t create the same textural interest.
Q: How do I know when the pie is properly baked?
The top should be golden brown and feel set when gently pressed in the center. If you insert a knife into the center and it comes out with just a few moist crumbs (not wet mixture), it’s ready. The internal temperature should reach about 165°F.
Q: Can I double this recipe for a larger crowd?
Yes, but I recommend making two separate pies rather than one enormous one. The cooking time becomes unpredictable with a much thicker pie, and it’s harder to achieve even cooking throughout.
Q: What’s the best way to slice this cleanly?
Let it rest for at least 15 minutes after baking, then use a sharp chef’s knife and clean it between cuts. I sometimes run the knife under warm water and dry it between slices for the cleanest presentation.
Q: Can I prepare this ahead for a dinner party?
You can assemble it completely and refrigerate for up to 4 hours before baking. Add about 10 extra minutes to the baking time if starting from cold. I don’t recommend baking it completely ahead, as it’s best served warm.
Q: Why is my pie sometimes watery on the bottom?
This can happen if the pasta wasn’t drained well enough or if you used too much pasta water in the mixture. Make sure to shake the colander vigorously after draining, and add pasta water gradually until you reach the right consistency.
This cacio e pepe pasta pie has become one of my signature dishes, and I hope it brings as much joy to your table as it has to mine. The beauty lies in taking something familiar and beloved, then presenting it in a completely new way that still honors the original. It’s a perfect example of how traditional techniques can be adapted creatively while maintaining their essential character.
Whether you’re looking to impress dinner guests or simply want to try something new with ingredients you probably already have on hand, this pasta pie delivers on all fronts. The golden, crusty exterior gives way to creamy, pepper-flecked layers that taste exactly like the best cacio e pepe you’ve ever had—just in an entirely different format.
Remember, cooking is about more than following recipes exactly. It’s about understanding ingredients, respecting techniques, and adding your own touch along the way. This pasta pie is my interpretation of a classic, and I encourage you to make it your own as well.
Leave a Reply