Cinnamon Roll Cheesecake: The Ultimate Dessert Fusion That Will Transform Your Kitchen
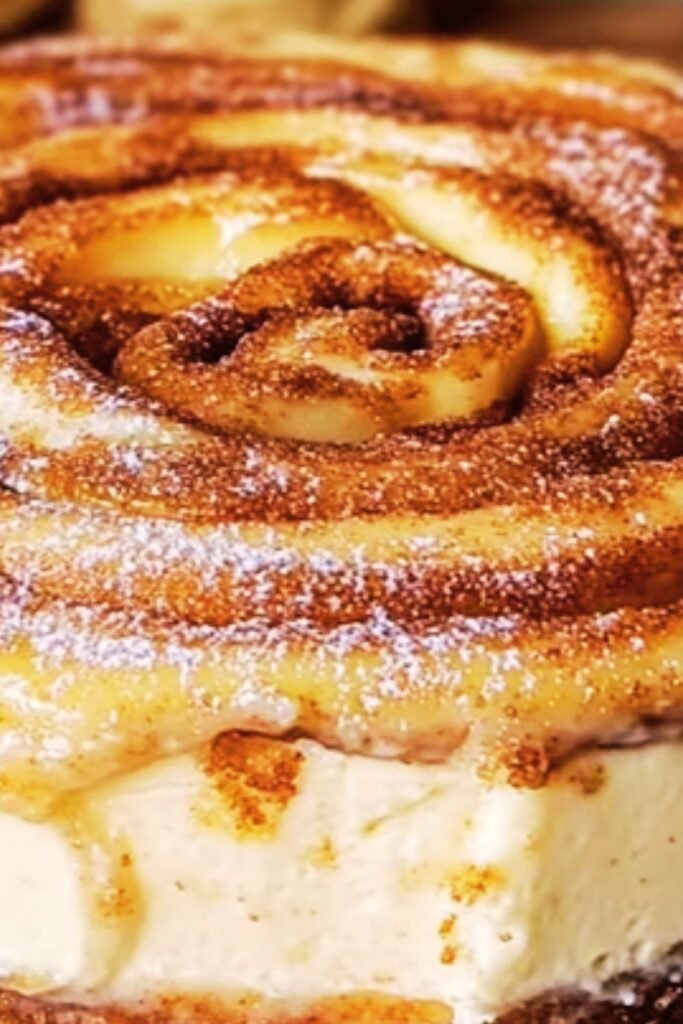
When I first stumbled upon the concept of combining two of my absolute favorite desserts – cinnamon rolls and cheesecake – I knew I had discovered something magical. The result? A show-stopping dessert that captures the warm, spiced comfort of cinnamon rolls while delivering the rich, creamy luxury of New York-style cheesecake. After perfecting this recipe through countless kitchen experiments, I’m thrilled to share every detail that will help you create this extraordinary dessert in your own home.
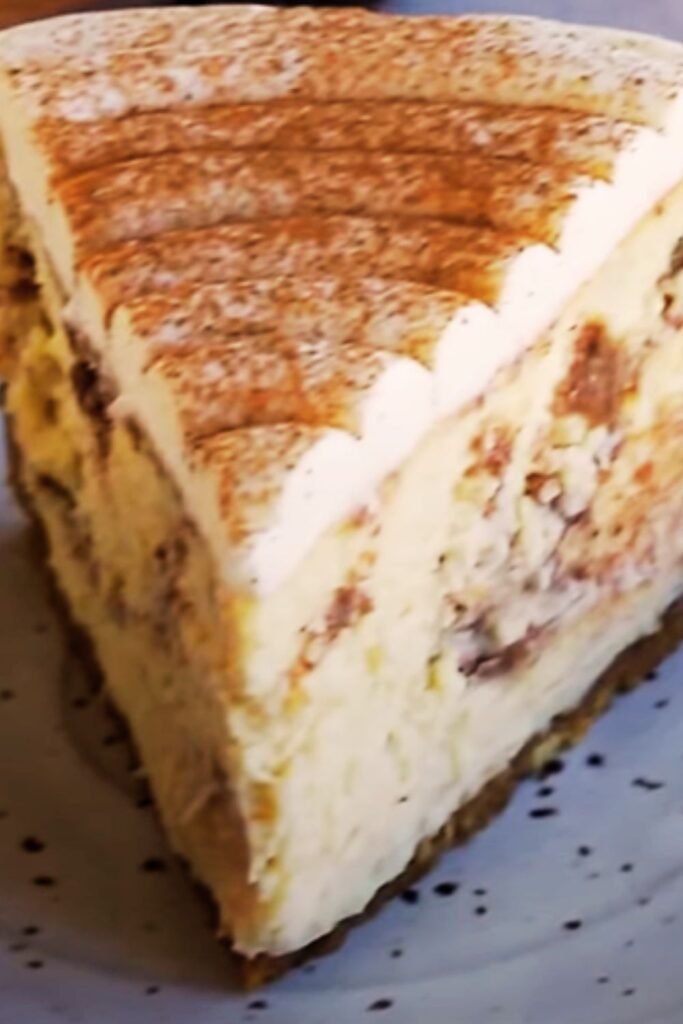
This isn’t just another dessert recipe – it’s a culinary adventure that combines technique, flavor science, and pure indulgence. The beauty of cinnamon roll cheesecake lies in its perfect balance: the tangy richness of cream cheese filling, the warm spice of cinnamon swirls, and the comforting familiarity of sweet dough, all harmoniously united in one spectacular creation.
Understanding the Foundation: Key Components Defined
Cheesecake Base : The foundation layer consisting of cream cheese, eggs, sugar, and vanilla that provides the signature tangy-sweet flavor and creamy texture characteristic of traditional cheesecake
Cinnamon Swirl : A mixture of butter, brown sugar, and ground cinnamon that creates marbled patterns throughout the cheesecake while infusing warm spice notes
Graham Cracker Crust : A pressed mixture of crushed graham crackers, melted butter, and sugar that forms the sturdy base supporting the entire dessert
Water Bath (Bain-Marie) : A baking technique where the cheesecake pan sits in a larger pan filled with hot water, ensuring gentle, even cooking and preventing cracks
Tempering : The process of gradually bringing cold ingredients to room temperature, crucial for achieving smooth, lump-free cheesecake batter
Essential Ingredients and Their Roles
Understanding each ingredient’s purpose transforms good bakers into great ones. Here’s my breakdown of what makes this dessert extraordinary:
| Ingredient | Quantity | Purpose | Quality Tips |
|---|---|---|---|
| Cream Cheese | 32 oz (4 packages) | Primary base, provides tang and richness | Must be room temperature, choose full-fat brands |
| Large Eggs | 4 whole | Structure and binding | Room temperature prevents curdling |
| Granulated Sugar | 1 cup | Sweetness and texture | Superfine dissolves better than regular |
| Sour Cream | 1/2 cup | Adds tang and prevents cracking | Full-fat only, no substitutions |
| Vanilla Extract | 2 teaspoons | Flavor enhancement | Pure extract, not imitation |
| Brown Sugar | 3/4 cup | Cinnamon swirl base | Light brown sugar works best |
| Ground Cinnamon | 2 tablespoons | Signature spice flavor | Ceylon cinnamon for superior taste |
| Unsalted Butter | 6 tablespoons | Cinnamon swirl binding | European-style for richness |
| Graham Crackers | 1.5 sleeves | Crust foundation | Honey grahams add complexity |
The Science Behind Perfect Texture
Creating the perfect cinnamon roll cheesecake requires understanding the science behind each component. The cream cheese provides structure through its protein content, while eggs act as both binders and leaveners. The key lies in achieving the right balance of moisture and stability.
Temperature control represents perhaps the most critical factor. When ingredients are too cold, they won’t incorporate smoothly, leading to lumpy batter. Conversely, overmixing warm ingredients can incorporate too much air, causing the cheesecake to rise and then collapse, creating cracks.
The cinnamon swirl component requires careful attention to consistency. I’ve learned that the butter must be soft enough to blend easily with the brown sugar and cinnamon, but not so melted that it creates soggy pockets in the finished dessert.
Step-by-Step Preparation Method
Preparing Your Kitchen and Equipment
Before beginning, I always ensure my kitchen is properly set up for success. This dessert demands attention to detail, and preparation prevents problems.
- Remove all dairy ingredients from refrigeration 2-3 hours before baking
- Preheat oven to 325°F (163°C)
- Wrap the bottom of a 9-inch springform pan with heavy-duty aluminum foil
- Prepare a roasting pan large enough to hold the springform pan
- Set a large pot of water to boil for the water bath
Creating the Graham Cracker Crust
The foundation of any great cheesecake starts with its crust. I’ve refined this technique over years of baking:
- Crush 1.5 sleeves of graham crackers into fine crumbs using a food processor
- Mix crumbs with 1/4 cup melted butter and 2 tablespoons sugar
- Press mixture firmly into the bottom of the prepared springform pan
- Use the bottom of a measuring cup to ensure even distribution
- Bake for 10 minutes until set and lightly golden
The secret to preventing a soggy crust lies in this pre-baking step. It creates a barrier that keeps the creamy filling from seeping into the crust during the long baking process.
Crafting the Cinnamon Swirl
While the crust bakes, I prepare the cinnamon swirl mixture that will create those beautiful marbled patterns throughout the cheesecake:
- Combine 6 tablespoons softened butter with 3/4 cup light brown sugar
- Mix in 2 tablespoons ground cinnamon until smooth
- Set aside at room temperature to maintain spreadable consistency
The key to successful swirling lies in the mixture’s consistency. It should be smooth and spreadable but not runny. If too thick, warm slightly; if too thin, chill for a few minutes.
Preparing the Cheesecake Batter
This stage requires patience and attention to detail. Rushing leads to lumpy batter and compromised texture:
- Beat room-temperature cream cheese with an electric mixer until completely smooth (3-4 minutes)
- Gradually add sugar, beating until well combined
- Add eggs one at a time, mixing just until incorporated after each addition
- Blend in sour cream and vanilla extract until smooth
- Scrape bowl sides frequently to ensure uniform mixing
The golden rule here: mix until just combined. Overmixing incorporates excess air, leading to cracks and uneven texture. I’ve learned to stop the mixer frequently and check consistency rather than relying solely on time.
Assembly and Baking Techniques
Creating the Marbled Effect
The visual appeal of cinnamon roll cheesecake comes from its beautiful swirled appearance. Here’s my proven method:
- Pour half the cheesecake batter over the prepared crust
- Dot with half the cinnamon mixture using a spoon
- Add remaining batter, then dot with remaining cinnamon mixture
- Use a knife to create swirl patterns, moving in figure-eight motions
- Avoid over-swirling, which mudies the distinct patterns
Water Bath Technique
The water bath method ensures gentle, even cooking that prevents the dreaded cracks that plague many home bakers:
- Place the foil-wrapped springform pan in the roasting pan
- Pour boiling water into the roasting pan until it reaches halfway up the sides of the springform pan
- Carefully transfer to the preheated oven
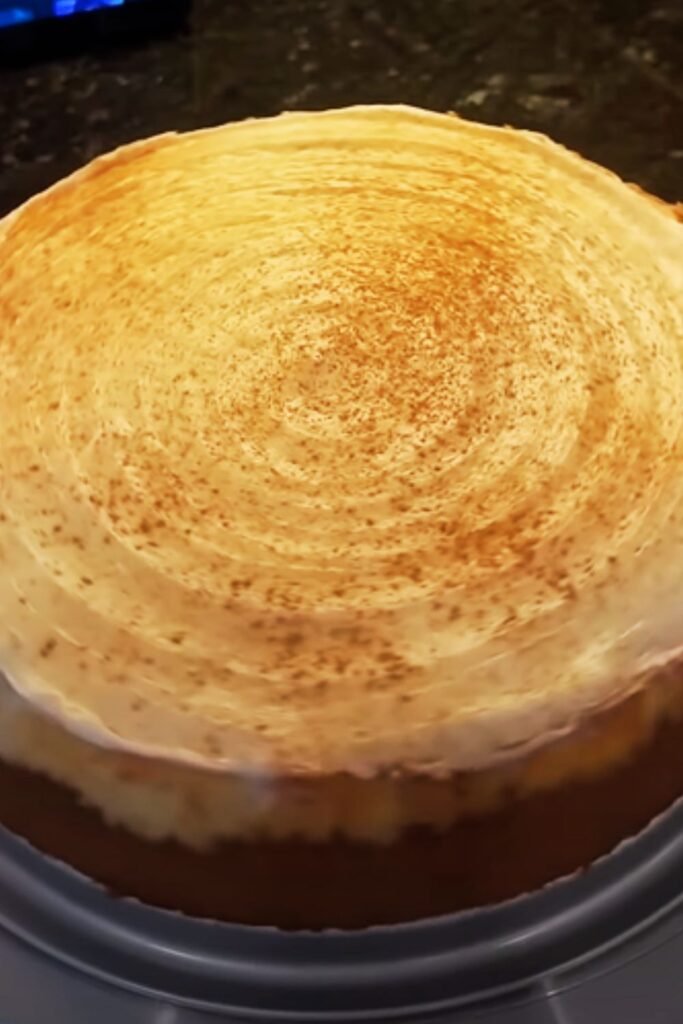
- Bake for 60-70 minutes until center is almost set but still slightly jiggly
Temperature and Timing Guidelines
Understanding proper doneness indicators has taken me years to master. Here’s what I look for:
| Stage | Time | Temperature | Visual Cue |
|---|---|---|---|
| Crust Pre-bake | 10 minutes | 325°F | Lightly golden |
| Main Bake | 60-70 minutes | 325°F | Center slightly jiggly |
| Cooling Phase 1 | 1 hour | Oven door cracked | Gradual temperature drop |
| Cooling Phase 2 | 2 hours | Room temperature | Completely cool |
| Chilling | 4+ hours | 35-40°F | Fully set |
The gradual cooling process prevents thermal shock, which causes cracks. I never rush this stage, no matter how eager I am to taste the results.
Troubleshooting Common Issues
Through my years of perfecting this recipe, I’ve encountered and solved virtually every problem that can arise:
Cracked Surface
- Cause: Temperature changes too rapid, overbaking, or overmixing
- Prevention: Use water bath, gradual cooling, gentle mixing
- Fix: Cover with sour cream topping or cinnamon glaze
Soggy Crust
- Cause: Insufficient pre-baking or moisture penetration
- Prevention: Properly wrap pan, pre-bake crust completely
- Fix: Next time, extend pre-baking time by 2-3 minutes
Lumpy Texture
- Cause: Cold ingredients or insufficient mixing of cream cheese
- Prevention: Ensure all ingredients reach room temperature
- Fix: Strain batter through fine-mesh sieve before baking
Sunken Center
- Cause: Overbaking or too rapid cooling
- Prevention: Monitor doneness carefully, cool gradually
- Fix: Fill depression with whipped cream or fruit topping
Flavor Variations and Creative Adaptations
Once you’ve mastered the basic technique, endless variations become possible. I’ve experimented with numerous adaptations that maintain the dessert’s integrity while offering exciting new flavor profiles:
Maple Pecan Variation
- Substitute maple syrup for half the brown sugar in the swirl
- Add 1/2 cup chopped toasted pecans
- Drizzle finished cheesecake with maple glaze
Apple Pie Fusion
- Add 1 cup diced, pre-cooked apples to the cinnamon swirl
- Include 1/4 teaspoon nutmeg and 1/8 teaspoon allspice
- Top with caramelized apple slices
Chocolate Cinnamon Delight
- Add 1/4 cup cocoa powder to the cinnamon swirl
- Include 1/2 cup mini chocolate chips
- Garnish with chocolate shavings
Professional Presentation Techniques
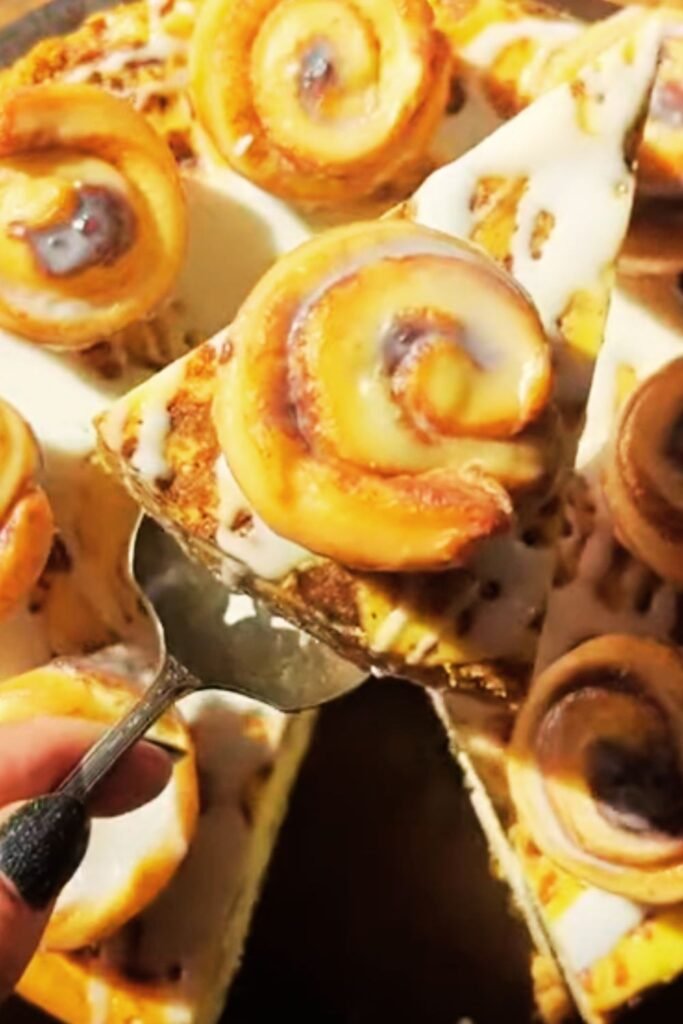
The visual presentation elevates this dessert from homemade treat to restaurant-quality masterpiece. Here are my signature finishing techniques:
Classic Cinnamon Glaze
- Combine 1 cup powdered sugar with 2-3 tablespoons milk
- Add 1/2 teaspoon vanilla extract and pinch of cinnamon
- Drizzle over completely cooled cheesecake in decorative patterns
Cream Cheese Frosting Border
- Beat 4 oz cream cheese with 1/4 cup butter until smooth
- Add 1 cup powdered sugar and 1/2 teaspoon vanilla
- Pipe rosettes around the edge using a star tip
Candied Cinnamon Stick Garnish
- Brush cinnamon sticks with simple syrup
- Roll in coarse sugar
- Arrange artfully on individual slices
Storage and Serving Guidelines
Proper storage ensures your masterpiece maintains its quality and food safety standards:
| Storage Method | Duration | Temperature | Notes |
|---|---|---|---|
| Refrigerator | 5-7 days | 35-40°F | Cover tightly with plastic wrap |
| Freezer (whole) | 2-3 months | 0°F | Wrap in plastic, then foil |
| Freezer (slices) | 1 month | 0°F | Individual wrapping prevents crystals |
| Room Temperature | 2 hours max | 65-70°F | For serving only |
Serving Temperature Optimization I’ve discovered that cheesecake tastes best when removed from refrigeration 15-20 minutes before serving. This brief tempering allows flavors to fully develop while maintaining the creamy texture.
Portion Control Guidelines Given the richness of this dessert, I recommend smaller portions than traditional cakes:
- Standard serving: 1/12 of 9-inch cheesecake
- Rich dessert course: 1/16 of 9-inch cheesecake
- Tasting portions: 1/20 of 9-inch cheesecake
Nutritional Considerations and Modifications
Understanding the nutritional profile helps in meal planning and accommodating dietary restrictions:
| Component | Calories per Slice | Protein | Fat | Carbs |
|---|---|---|---|---|
| Traditional Recipe | 485 | 8g | 32g | 42g |
| Light Version | 320 | 9g | 18g | 38g |
| Sugar-Free | 380 | 8g | 28g | 22g |
Dietary Modifications I’ve Successfully Tested
Reduced Fat Version
- Substitute 1/3-fat cream cheese for regular
- Replace sour cream with Greek yogurt
- Reduce butter in crust by half
Gluten-Free Adaptation
- Use gluten-free graham crackers for crust
- Verify all other ingredients are certified gluten-free
- Results are virtually indistinguishable from original
Sugar-Free Alternative
- Replace sugars with erythritol or stevia blend
- Adjust quantities according to sweetener conversion charts
- May require slight texture modifications
Seasonal and Holiday Adaptations
This versatile dessert adapts beautifully to seasonal celebrations and special occasions:
Fall Harvest Version
- Add 1/4 teaspoon each: nutmeg, ginger, cardamom
- Incorporate 1/2 cup pumpkin puree into batter
- Garnish with candied orange zest
Winter Holiday Special
- Include 1/4 teaspoon almond extract
- Add red food coloring for festive swirls
- Top with sugared cranberries
Spring Celebration
- Lighten with lemon zest in batter
- Create pastel-colored swirls with food coloring
- Garnish with fresh berries
Advanced Techniques for Experienced Bakers
For those ready to push their skills further, I’ve developed several advanced techniques that create truly spectacular results:
Layered Construction Method
- Create distinct layers of plain and cinnamon-spiced batter
- Results in more defined flavor zones
- Requires precise timing and temperature control
Individual Mini Cheesecakes
- Use muffin tins lined with paper cups
- Adjust baking time to 25-30 minutes
- Perfect for portion control and gifts
Deconstructed Presentation
- Serve cheesecake components separately
- Cinnamon tuile cookies instead of traditional crust
- Quenelle of cheesecake mousse with cinnamon soil
Q&A Section
Q: Can I make this cheesecake ahead of time for a party? A: Absolutely! In fact, I recommend making it at least one day ahead. The flavors meld beautifully overnight, and the texture becomes even more luxurious. You can make it up to three days in advance and store it covered in the refrigerator.
Q: Why did my cheesecake crack despite following the recipe exactly? A: Cracking usually results from rapid temperature changes. Ensure your oven temperature is accurate using a thermometer, avoid opening the oven door during baking, and follow the gradual cooling process I outlined. Also, check that your cream cheese was truly at room temperature before mixing.
Q: Can I substitute low-fat cream cheese to make it healthier? A: While possible, I don’t recommend using fat-free cream cheese as it significantly affects texture and flavor. Low-fat (Neufchâtel) can work but may result in a slightly less rich texture. For best results, stick with full-fat cream cheese and simply enjoy smaller portions.
Q: My cinnamon swirl sank to the bottom. What went wrong? A: This typically happens when the cinnamon mixture is too heavy or the batter is too thin. Ensure your cinnamon mixture has the right consistency – spreadable but not runny. Also, make sure not to overmix the cheesecake batter, which can thin it out.
Q: How do I know when the cheesecake is properly done? A: The center should still have a slight jiggle when you gently shake the pan, similar to set gelatin. The edges should appear set and slightly puffed. An instant-read thermometer should register 150-155°F in the center. Remember, it continues cooking from residual heat as it cools.
Q: Can I freeze leftover slices? A: Yes! Individual slices freeze beautifully for up to one month. Wrap each slice in plastic wrap, then place in freezer bags. Thaw in the refrigerator overnight before serving. The texture remains remarkably close to fresh.
Q: What’s the best way to get clean slices? A: Use a sharp, thin knife dipped in warm water and wiped clean between each cut. I keep a tall glass of hot water nearby and clean the knife after every slice. This prevents the creamy filling from sticking and dragging.
Q: My springform pan leaked during baking. How can I prevent this? A: Wrap the bottom and sides of your springform pan with heavy-duty aluminum foil, creating a watertight seal. Some bakers double-wrap for extra security. You can also place the wrapped pan inside a larger cake pan as an additional precaution.
Q: Can I make this without a water bath? A: While the water bath provides the most reliable results, you can bake without one. Place a shallow pan of hot water on the oven’s bottom rack, reduce temperature to 300°F, and extend baking time slightly. However, I strongly recommend the water bath method for best results.
Q: The recipe seems complicated. Are there any shortcuts? A: While this dessert does require attention to detail, you can prepare components ahead of time. Make the crust and cinnamon mixture the day before. The key is not to rush the process – each step builds upon the previous one for the best final result.
This cinnamon roll cheesecake represents the perfect marriage of two beloved desserts, creating something entirely new and spectacular. Through careful attention to technique, quality ingredients, and proper timing, you’ll create a dessert that not only impresses guests but also brings the warm, comforting flavors of cinnamon rolls together with the luxurious richness of cheesecake. The result is a show-stopping dessert that embodies the best of both worlds while creating memories that last long after the last bite is savored.
Leave a Reply