Easy, Oven-Roasted French Garlic Chicken with Herbs
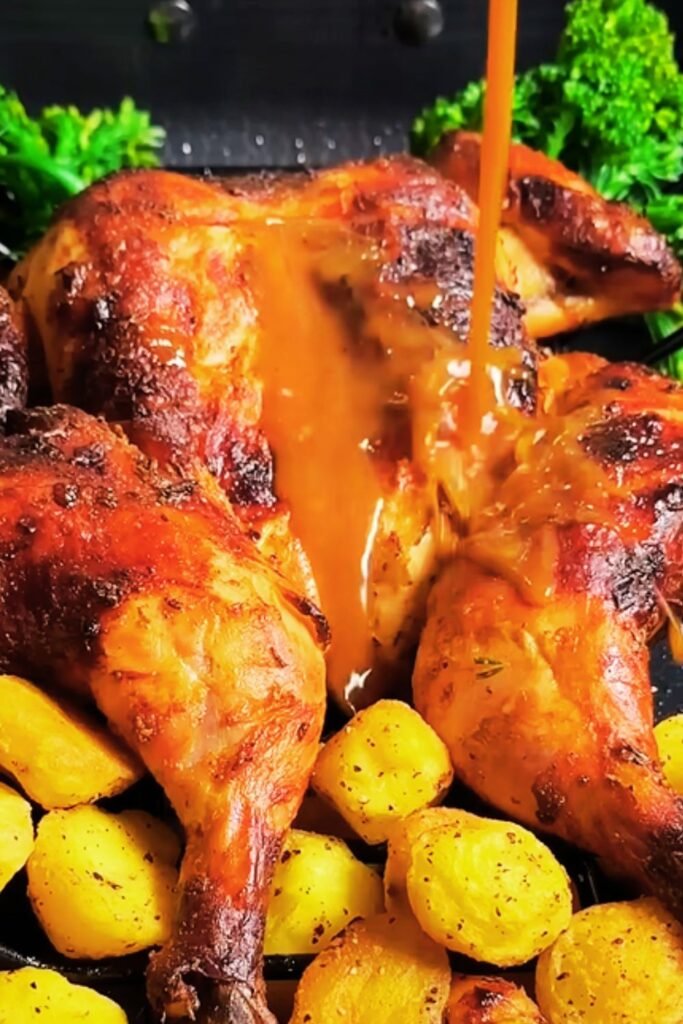
There’s something magical about walking into a kitchen filled with the aroma of garlic and herbs wafting from the oven. When I’m looking to impress guests or simply treat my family to a special dinner that doesn’t require hours of preparation, this French-inspired garlic chicken recipe is my go-to dish. The combination of fragrant garlic, aromatic herbs, and succulent chicken creates a meal that feels like a warm hug on a plate.
As someone who’s prepared this dish countless times, I can promise you this: despite its impressive results, this recipe is remarkably simple. By the end of this article, you’ll have mastered a dish that tastes like it came straight from a rustic French countryside kitchen, yet requires minimal effort from yours.
What Makes This French Garlic Chicken Special
Before we dive into the recipe, let me share why this dish deserves a permanent spot in your cooking repertoire. Traditional French cooking often gets a reputation for being complex and intimidating, but this recipe proves that French cuisine can be accessible to home cooks of all skill levels.
The magic of this dish lies in its simplicity – allowing quality ingredients to shine through gentle cooking techniques. The star players are:
- Garlic: Not just a few cloves, but an entire head (or two!) that transforms into sweet, buttery morsels during roasting
- Herbs de Provence: This classic French herb blend typically includes rosemary, thyme, oregano, and lavender, providing an authentic taste of the French countryside
- High-quality chicken: Preferably free-range or organic for the best flavor
- Minimal preparation: Just a few minutes of hands-on time before the oven does all the work
What makes this recipe truly special is how the chicken skin becomes golden and crispy while the meat remains juicy and tender. The garlic softens and caramelizes, becoming sweet and spreadable – perfect for smearing on crusty bread served alongside.
Ingredients You’ll Need
For a family-sized meal serving 4-6 people:
- 1 whole chicken (about 4-5 pounds), patted dry
- 2 whole heads of garlic, tops cut off to expose cloves
- 4 tablespoons unsalted butter, softened
- 3 tablespoons olive oil
- 2 tablespoons Herbs de Provence
- 1 lemon, halved
- 1 tablespoon fresh thyme leaves, plus 4-5 sprigs
- 1 tablespoon fresh rosemary, chopped, plus 2-3 sprigs
- 1 tablespoon sea salt
- 1 teaspoon freshly ground black pepper
- 1 cup chicken broth
- 2 shallots, quartered
- 1 pound baby potatoes, halved
- 2 medium carrots, cut into 2-inch pieces
- 1 tablespoon all-purpose flour (optional, for gravy)
Essential Equipment
While this recipe doesn’t require fancy gadgets, having the right tools makes preparation easier:
- Roasting pan with rack (preferred) or large cast-iron skillet
- Kitchen twine for trussing the chicken (optional but recommended)
- Meat thermometer
- Sharp kitchen knife
- Cutting board
- Small bowl for herb butter mixture
- Aluminum foil
Preparation Steps
Step 1: Prepare the Chicken
Before you begin handling the chicken, preheat your oven to 425°F (220°C). This higher initial temperature helps create that beautifully crispy skin.
I always take the chicken out of the refrigerator about 30 minutes before cooking. Room-temperature chicken cooks more evenly than cold chicken straight from the fridge. While it’s resting, pat the chicken dry with paper towels – this is crucial for achieving crispy skin.
Step 2: Create the Garlic-Herb Butter
In a small bowl, combine:
- 4 tablespoons softened butter
- 2 tablespoons olive oil
- 1 tablespoon fresh thyme leaves
- 1 tablespoon chopped rosemary
- 1 tablespoon Herbs de Provence
- 1 teaspoon salt
- 1/2 teaspoon black pepper
Mix until well combined. This fragrant mixture will be your secret weapon for infusing flavor throughout the chicken.
Step 3: Prepare the Garlic
Take your heads of garlic and slice off the top third, exposing the cloves inside. Don’t discard these tops – they’ll add flavor to the roasting pan. Peeling isn’t necessary; the garlic will roast in its papery skin and become easily squeezable later.
Step 4: Season the Chicken
This is where the magic happens! Gently loosen the skin over the chicken breast and thighs without tearing it. Using your fingers, spread about half of the herb butter mixture under the skin, distributing it as evenly as possible.
Rub the remaining herb butter all over the outside of the chicken. Don’t forget the underside! Season the cavity with additional salt and pepper, then stuff it with:
- Half a lemon
- A few sprigs of thyme and rosemary
- One of the garlic head tops
If you’re comfortable with trussing, tie the legs together with kitchen twine and tuck the wing tips under the body. This helps the chicken cook more evenly, but don’t worry if you skip this step – your chicken will still be delicious.
Step 5: Prepare the Roasting Pan
Pour the remaining olive oil into your roasting pan. Arrange the vegetables around the edge of the pan:
- Halved baby potatoes
- Carrot pieces
- Quartered shallots
Place the chicken in the center of the pan, breast-side up. Position the garlic heads (cut-side up) and remaining lemon half around the chicken. Pour the chicken broth into the bottom of the pan – this will keep everything moist and form the base for a delicious gravy later.
The Roasting Process
Initial High-Heat Roasting
Place the prepared pan in your preheated 425°F (220°C) oven. Roast for 25-30 minutes, until the skin begins to turn golden brown.
Lower and Slow
Reduce the oven temperature to 375°F (190°C) and continue roasting for approximately:
- 45-60 minutes for a 4-pound chicken
- 60-75 minutes for a 5-pound chicken
The exact time depends on your oven and the size of your chicken. The most reliable way to check doneness is with a meat thermometer inserted into the thickest part of the thigh (without touching bone). The chicken is done when it registers 165°F (74°C).
Basting for Extra Flavor
About halfway through the cooking time, take a moment to baste the chicken with the pan juices. This adds flavor and helps achieve that gorgeous golden skin. While you’re at it, give the vegetables a gentle stir to ensure they’re cooking evenly.
Let It Rest
Once the chicken reaches the proper temperature, remove the pan from the oven and transfer the chicken to a cutting board. This crucial step allows the juices to redistribute throughout the meat. Tent loosely with foil and let rest for 15 minutes before carving.
During this resting period, the vegetables and garlic can remain in the turned-off oven to stay warm.
Making a Simple Pan Gravy (Optional)
While the chicken rests, you can transform those flavorful pan drippings into a delicious gravy:
- Pour the pan juices into a measuring cup or fat separator
- Skim off excess fat
- Return about 1-2 tablespoons of fat to the roasting pan or a saucepan
- Add 1 tablespoon of flour and whisk over medium heat until lightly browned
- Gradually add the reserved pan juices, whisking constantly
- Simmer until thickened, about 3-5 minutes
- Season with salt and pepper to taste
Serving Suggestions
The beauty of this dish is its completeness – it’s essentially a one-pan meal with protein, vegetables, and amazing flavor. Here’s how I like to serve it:
- Carve the chicken into serving pieces
- Arrange on a platter with the roasted vegetables
- Place the roasted garlic heads on the platter
- Drizzle with pan gravy or pan juices
- Garnish with fresh herb sprigs
For a complete French-inspired meal, consider these accompaniments:
- Crusty baguette for spreading the roasted garlic
- Simple green salad with a light vinaigrette
- Steamed haricots verts (French green beans)
- Fresh fruit and cheese for dessert
Tips for Perfect Results Every Time
After making this dish countless times, I’ve gathered some insights that make a significant difference:
Chicken Selection Tips
- Quality matters: Whenever possible, choose organic or free-range chicken for superior flavor
- Size considerations: A 4-5 pound chicken is ideal for this recipe, cooking evenly without drying out
- Fresh is best: While frozen chicken can work, fresh will give you the best texture and flavor
Garlic Insights
- Don’t peel: The papery skins help protect the garlic while roasting
- Cut size matters: Cutting just the top third of the garlic head exposes cloves while keeping them intact
- Position properly: Place cut-side up in the roasting pan to prevent burning
Herb Variations
If you don’t have Herbs de Provence, create your own blend with:
- 1 teaspoon dried thyme
- 1 teaspoon dried rosemary
- 1/2 teaspoon dried oregano
- 1/2 teaspoon dried marjoram
- 1/4 teaspoon dried lavender (optional but authentic)
Checking for Doneness
Beyond the thermometer reading of 165°F (74°C), look for these signs:
- Clear (not pink) juices when the thigh is pierced
- Legs move easily in their sockets
- Skin is golden brown and crisp
Nutritional Information
For those watching their nutrition, here’s an approximate breakdown per serving (based on 6 servings from a 4.5-pound chicken with vegetables):
| Nutrient | Amount per Serving |
|---|---|
| Calories | 420 |
| Protein | 38g |
| Fat | 24g |
| Saturated Fat | 8g |
| Carbohydrates | 12g |
| Fiber | 2g |
| Sodium | 650mg |
| Potassium | 520mg |
| Vitamin A | 70% DV |
| Vitamin C | 25% DV |
| Calcium | 6% DV |
| Iron | 15% DV |
Values are approximate and will vary based on specific ingredients and portions.
Storage and Leftovers
One of the joys of this recipe is how wonderfully the leftovers work for next-day meals. Here’s how to store and repurpose them:
Storage Guidelines
- Refrigerate leftover chicken and vegetables in airtight containers within 2 hours of cooking
- Properly stored, leftovers will keep for 3-4 days
- If you have a large amount left, consider freezing portions for up to 3 months
Leftover Ideas
I love transforming the leftovers into:
- Chicken and vegetable soup: Add broth and simmer with any additional vegetables
- Chicken salad: Dice the meat and mix with mayonnaise, herbs, and crunchy celery
- Warm sandwiches: Layer thin slices of chicken with roasted garlic spread on crusty bread
- Chicken and vegetable hash: Chop everything and crisp in a skillet with a fried egg on top
Don’t forget about that roasted garlic! It keeps well in the refrigerator for about a week and makes an excellent spread for bread or flavoring for other dishes.
Step-by-Step Video Guide
For visual learners, I’ve created a detailed video walkthrough of this recipe. In the video, I demonstrate each step from preparation to plating, with special attention to:
- Properly preparing the chicken and creating the herb butter
- Techniques for getting crispy skin while maintaining juicy meat
- How to tell when the chicken is perfectly done
- Carving tips for beautiful presentation
The video companion to this article provides additional insights and shows exactly how the dish should look at each stage.
Common Questions and Answers
Over the years, I’ve received many questions about this recipe. Here are the most frequently asked, along with my answers:
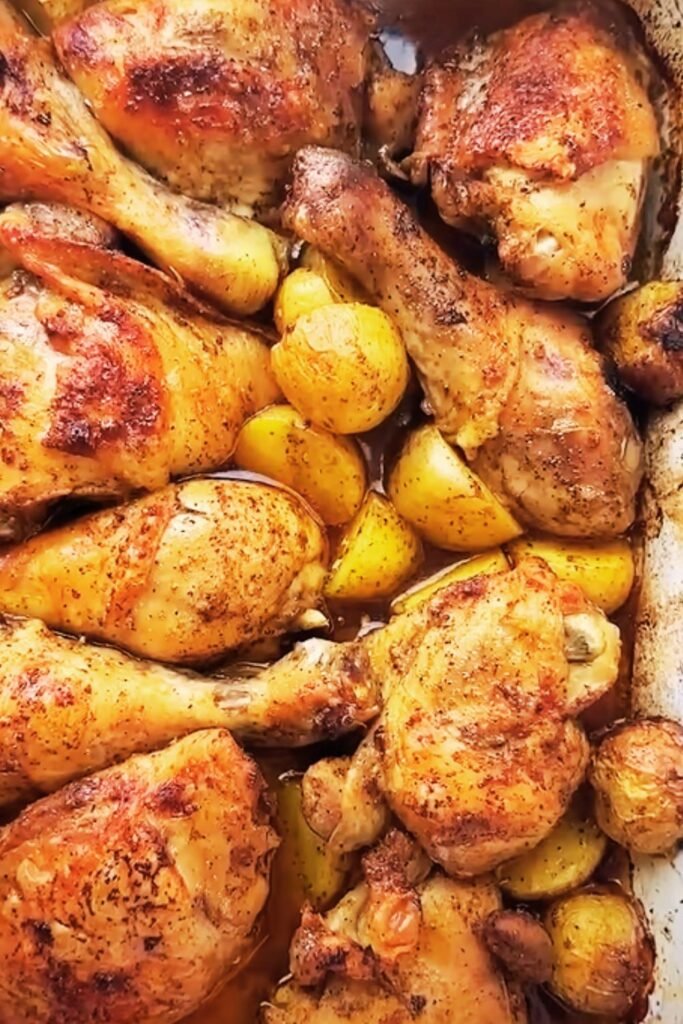
Q: Can I use chicken pieces instead of a whole chicken? Yes! Chicken pieces work beautifully with this recipe. I recommend bone-in, skin-on pieces for the best flavor. Adjust cooking time accordingly – breast pieces typically need about 35-45 minutes total, while thighs and drumsticks take 45-55 minutes.
Q: Is there a substitute for Herbs de Provence? Absolutely. If you don’t have this specific blend, use a combination of dried thyme, rosemary, oregano, and marjoram. The proportions I provided earlier work well, but feel free to adjust to your taste preferences.
Q: Can I make this dish ahead of time? While it’s best freshly made, you can prepare the herb butter and season the chicken up to 24 hours in advance. Keep the prepared chicken covered in the refrigerator and bring to room temperature for 30 minutes before roasting.
Q: My chicken skin isn’t getting crispy. What am I doing wrong? Three common issues: 1) The chicken wasn’t thoroughly dried before seasoning, 2) Your oven temperature might be too low, or 3) The chicken was basted too frequently, keeping the skin wet. Remember to start with a high-temperature oven and don’t overdo the basting.
Q: How can I tell if the chicken is cooked through without a thermometer? Pierce the thickest part of the thigh with a knife or skewer. If the juices run clear (not pink) and the leg moves easily in its socket, the chicken is likely done. However, a thermometer is always the most reliable method.
Q: What can I use instead of butter for a dairy-free version? You can use all olive oil instead of butter. The flavor profile will be slightly different but still delicious. Consider adding a bit more herbs to compensate for the flavor butter provides.
Q: My vegetables are cooking faster than the chicken. How do I prevent this? Cut the vegetables into larger pieces, or add them to the pan after the chicken has been roasting for 15-20 minutes. Alternatively, you can cover just the vegetables with a small piece of foil if they’re browning too quickly.
Q: Can I add other vegetables to the roasting pan? Definitely! Bell peppers, parsnips, turnips, and fennel are all excellent additions. Just ensure all vegetables are cut to a similar size for even cooking.
Recipe Variations to Try
One of the reasons I love this recipe is its versatility. Here are some variations I’ve experimented with over the years:
Lemon-Herb Variation
Increase the lemon to two whole lemons – one for the cavity and one sliced in the roasting pan. Add 1 tablespoon of lemon zest to the herb butter for a bright, citrusy version.
Provençal Summer Version
During summer months, add cherry tomatoes and sliced zucchini to the roasting pan for the last 20 minutes of cooking. Finish with a sprinkle of fresh basil.
Mushroom Lover’s Adaptation
Add 8 ounces of mixed mushrooms (quartered if large) to the vegetable mix. After roasting, deglaze the pan with 1/4 cup of dry white wine before making the gravy for a more complex flavor.
Root Vegetable Celebration
Swap the standard vegetables for a colorful mix of sweet potatoes, parsnips, turnips, and golden beets for a hearty fall or winter meal.
The History Behind French Garlic Chicken
This dish draws inspiration from several traditional French recipes, particularly “Poulet à l’Ail” from the Provence region. In southern France, garlic is not just an ingredient but practically a way of life. Some traditional versions use up to 40 cloves of garlic!
The technique of roasting whole garlic heads alongside chicken until they become soft and sweet has been practiced in French country kitchens for generations. What was once a practical farmhouse dish – making use of abundant garlic and herbs growing in kitchen gardens – has become beloved worldwide for its incredible flavor and simplicity.
In traditional French cooking, this dish would typically be served family-style, with everyone at the table spreading the roasted garlic onto bread and enjoying the communal experience of the meal. I try to honor this tradition whenever I serve it, encouraging everyone to squeeze out the sweet garlic cloves and savor each bite.
Final Thoughts
There’s something deeply satisfying about preparing a meal that connects us to cooking traditions from around the world. This French Garlic Chicken recipe manages to be both simple and sophisticated – accessible enough for weeknight cooking yet impressive enough for special occasions.
What I love most about this dish is how it transforms humble ingredients into something truly magnificent. The chicken becomes a vehicle for the aromatic herbs and garlic, while the vegetables roast in the flavorful drippings, creating a complete meal in one pan.
Whether you’re cooking for family, entertaining guests, or simply treating yourself to a special meal, this recipe delivers exceptional results with minimal effort. The combination of crispy skin, juicy meat, sweet roasted garlic, and herb-infused vegetables creates a harmonious meal that feels like a celebration of good food and the joy of sharing it.
I hope you’ll give this recipe a try and experience the magic of French country cooking in your own kitchen. Bon appétit!
Leave a Reply