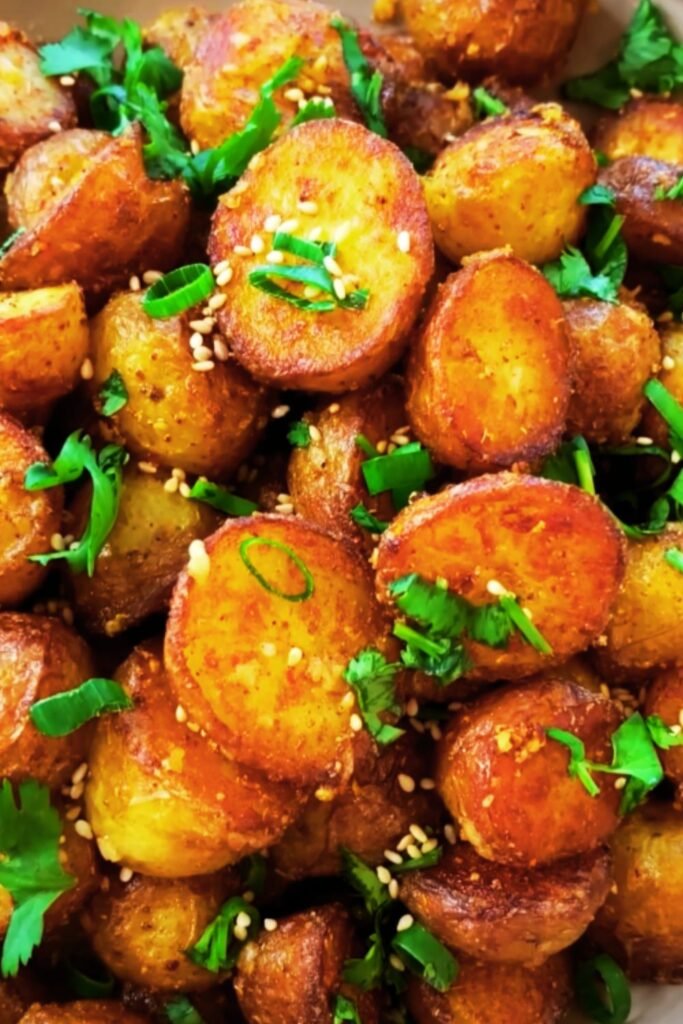
Crispy Smashed Creamer Potatoes: The Ultimate Side Dish
There’s something magical about the perfect potato side dish. As a devoted home cook who has tested countless potato recipes over the years, I can confidently say that smashed creamer potatoes rank among the absolute best. The contrast between the crispy, seasoned exterior and the buttery-soft interior creates a texture and flavor experience that elevates any meal they accompany.
When I first discovered this technique years ago, it completely transformed how I approach potato preparation. What makes this method so special is its beautiful simplicity combined with spectacular results. Today, I’m sharing my perfected recipe that guarantees those crave-worthy, golden-brown edges and tender centers every single time.
What Are Creamer Potatoes?
Before diving into the recipe, let’s understand what makes creamer potatoes the ideal candidate for smashing:
Creamer potatoes : Small, young potatoes harvested before reaching full maturity, typically 1-2 inches in diameter with thin, delicate skins.
Baby potatoes : Often used interchangeably with creamers, though sometimes slightly larger; both work wonderfully for smashing.
New potatoes : Early-harvested potatoes of any variety that haven’t developed thick skins; excellent for this recipe when small enough.
The beauty of creamer potatoes lies in their naturally buttery texture and concentrated flavor. Their small size ensures they cook quickly and evenly, while their thin skins crisp up beautifully when exposed to high heat. For smashing purposes, their petite stature creates the perfect ratio of crispy exterior to creamy interior.
The Science Behind Perfect Smashed Potatoes
Understanding a few key principles helps achieve consistently outstanding results:
- Proper boiling technique: Starting potatoes in cold water allows them to cook evenly from the inside out. Adding salt to the cooking water seasons the potatoes internally.
- The importance of thorough drying: Moisture is the enemy of crispiness. Allowing boiled potatoes to steam-dry removes excess moisture that would otherwise prevent proper browning.
- The two-temperature roasting method: An initial high-temperature roast creates those coveted crispy edges, while a slightly lower finishing temperature ensures the interior remains perfectly tender.
- Fat distribution: Using a combination of olive oil and butter provides both flavor and the right smoking point for achieving golden-brown perfection.
When these principles align, the result is nothing short of potato nirvana. Let’s get started with everything you’ll need.
Ingredients & Equipment
For the Base Recipe:
- 2 pounds creamer potatoes (approximately 20-24 small potatoes)
- 3 tablespoons kosher salt (for the boiling water)
- 4 tablespoons extra virgin olive oil, divided
- 2 tablespoons unsalted butter, melted
- 4 cloves garlic, minced
- 2 teaspoons fresh rosemary, finely chopped
- 2 teaspoons fresh thyme leaves
- 1 teaspoon flaky sea salt
- 1/2 teaspoon freshly ground black pepper
- 1/4 teaspoon smoked paprika (optional)
Equipment Needed:
- Large pot for boiling
- Colander for draining
- Clean kitchen towel for drying
- Two large baking sheets
- Parchment paper
- Flat-bottomed glass or measuring cup (for smashing)
- Small mixing bowl (for herb-oil mixture)
- Pastry brush (optional)
Step-by-Step Instructions
Phase 1: Preparing and Boiling the Potatoes
- Select and clean your potatoes: Choose potatoes of similar size to ensure even cooking. Thoroughly wash them under cold running water, scrubbing gently to remove any dirt from the skins.
- Prepare your boiling pot: Fill a large pot with cold water, enough to cover the potatoes by at least 1 inch. Add 3 tablespoons of kosher salt to the water.
- Boil with care: Place the cleaned potatoes in the cold, salted water and bring to a gentle boil over medium-high heat. Reduce to a simmer once boiling begins.
- Test for doneness: After about 15-20 minutes (depending on size), test by inserting a paring knife into the largest potato. It should slide in easily but with slight resistance – you want them tender but not falling apart.
- Drain properly: Carefully pour the potatoes into a colander, allowing all excess water to drain completely.

Phase 2: The Crucial Drying and Smashing
- Steam dry: Allow the drained potatoes to rest in the colander for 5 minutes, letting steam escape. This step is crucial for achieving crispiness later.
- Prepare your baking sheets: Line two large baking sheets with parchment paper and preheat your oven to 450°F (232°C).
- Oil the sheets: Drizzle 1 tablespoon of olive oil on each prepared baking sheet, spreading it evenly with a brush or your fingertips.
- Arrange for smashing: Transfer the potatoes to the oiled baking sheets, leaving about 2 inches between each potato to ensure proper crisping.
- The smashing technique: Using the flat bottom of a drinking glass, measuring cup, or potato masher, gently press down on each potato until it’s flattened to about 1/2-inch thickness. Apply even pressure to avoid breaking them apart completely.
- Allow to cool slightly: Let the smashed potatoes cool for about 5 minutes. This helps their structure set before adding toppings and roasting.
Phase 3: Seasoning and Roasting to Perfection
- Prepare your flavor blend: In a small bowl, mix the remaining 2 tablespoons of olive oil with the melted butter, minced garlic, chopped rosemary, and thyme leaves.
- Apply the seasoning: Using a pastry brush or spoon, generously coat each smashed potato with the herb-oil mixture, ensuring the garlic and herbs are distributed evenly.
- Final seasoning: Sprinkle each potato with sea salt, freshly ground black pepper, and smoked paprika (if using).
- First roasting stage: Place the baking sheets in the preheated oven and roast for 20 minutes at 450°F (232°C).
- Finishing stage: Reduce the oven temperature to 425°F (218°C) and continue roasting for another 15-20 minutes, until the edges are deeply golden brown and visibly crispy.
- Rest briefly: Allow the smashed potatoes to rest on the baking sheets for 3-5 minutes before serving. This helps the exterior maintain its crispness.
Flavor Variations to Explore
The beauty of smashed creamer potatoes lies in their versatility. Here are some of my favorite flavor profiles to experiment with:
Parmesan-Herb Variation
- Add 1/3 cup freshly grated Parmesan cheese during the last 5 minutes of roasting
- Sprinkle with 1 tablespoon fresh parsley after removing from oven
Spicy Southwest
- Replace standard herbs with 1 teaspoon chili powder and 1/2 teaspoon ground cumin
- Add 1/4 teaspoon cayenne pepper for heat
- Finish with fresh cilantro and lime zest
Mediterranean Style
- Include 1 tablespoon za’atar seasoning in your herb-oil mixture
- Finish with crumbled feta cheese and lemon zest
Ranch-Inspired
- Mix 1 teaspoon each of dried dill, dried parsley, garlic powder, and onion powder
- Serve with a dollop of sour cream mixed with fresh chives
Troubleshooting Common Issues
Even experienced cooks encounter challenges. Here’s how to address common problems:
| Issue | Possible Cause | Solution |
|---|---|---|
| Potatoes falling apart when smashed | Overcooked during boiling | Reduce boiling time; test frequently with a knife |
| Not crispy enough exterior | Insufficient drying after boiling | Ensure potatoes are thoroughly dried; extend initial high-heat roasting time |
| Burnt garlic taste | Adding garlic too early | Mix garlic with oil-herb mixture halfway through roasting time |
| Soggy bottoms | Overcrowding the baking sheet | Use two sheets with adequate spacing between potatoes |
| Uneven cooking | Potatoes of vastly different sizes | Select similarly sized potatoes or adjust cooking time for different sizes |
| Bland flavor | Insufficient salt in boiling water | Use the full recommended amount of salt in the boiling water |
Make-Ahead and Storage Tips
Smashed potatoes are at their absolute best fresh from the oven, but busy schedules sometimes require advance preparation:
Make-Ahead Options:
- Boil and refrigerate: Complete the boiling step up to 24 hours ahead. Refrigerate whole, unsmashed potatoes in an airtight container.
- Boil and smash: Boil, dry, and smash the potatoes up to 4 hours ahead. Cover with plastic wrap at room temperature before proceeding with oiling and seasoning.
- Fully prepare and reheat: In a pinch, completely prepare the potatoes and reheat in a 375°F (190°C) oven for 10-12 minutes. Note that they won’t be quite as crispy as freshly made.
Storage Guidelines:
- Refrigerator: Store leftover smashed potatoes in an airtight container for up to 3 days.
- Freezer: While not ideal, you can freeze fully cooked smashed potatoes for up to 1 month. Wrap individually in plastic wrap, then foil.
- Reheating: For the crispiest results, reheat refrigerated potatoes on a baking sheet in a 375°F (190°C) oven for 10-15 minutes. Avoid microwave reheating which makes them soggy.
Perfect Serving Suggestions
Smashed creamer potatoes complement nearly any main dish but shine particularly well with these pairings:
Protein Pairings
- Roasted chicken with lemon and herbs
- Grilled steak with chimichurri sauce
- Baked salmon with dijon glaze
- Slow-roasted pork tenderloin
- Grilled portobello mushrooms for a vegetarian option
Side Dish Companions
- Simple garden salad with vinaigrette
- Steamed green beans with almonds
- Roasted asparagus with lemon
- Honey-glazed carrots
- Creamed spinach
Sauce Options
- Garlic aioli
- Herb-infused Greek yogurt
- Classic ketchup (for the kids at heart)
- Truffle mayo
- Chimichurri
Nutrition Information
For those monitoring their nutritional intake, here’s the approximate nutritional breakdown per serving (assuming the recipe serves 4):
| Nutrient | Amount per Serving |
|---|---|
| Calories | 285 |
| Total Fat | 18g |
| Saturated Fat | 5g |
| Cholesterol | 15mg |
| Sodium | 425mg |
| Total Carbohydrates | 28g |
| Dietary Fiber | 3g |
| Sugars | 1g |
| Protein | 4g |
| Vitamin C | 30% DV |
| Potassium | 18% DV |
| Vitamin B6 | 12% DV |
These values will vary based on specific potato size and exact quantities of oils and seasonings used.
Why This Recipe Works: A Deeper Dive
After years of testing and refining this recipe, I’ve identified several key factors that contribute to its success:
The Cold Water Start
Beginning the cooking process in cold water allows the potatoes to heat gradually, ensuring even cooking from exterior to center. This prevents the common problem of potatoes that are overcooked on the outside while remaining firm in the middle.
The Salt Factor
The seemingly excessive amount of salt in the boiling water (3 tablespoons) serves a crucial purpose. Potatoes absorb water as they cook, and properly salted water seasons them internally, preventing the bland core that often plagues potato dishes.
The Two-Stage Roasting Method
Starting with high heat (450°F) creates immediate browning and helps develop those crispy edges everyone loves. Reducing the temperature for the second half of roasting allows the interiors to become perfectly tender without burning the exteriors.
The Fat Combination
The mixture of olive oil and butter provides the perfect balance of flavor and function. Butter contributes unmatched richness and promotes browning, while olive oil prevents the butter from burning at high temperatures while adding its own distinctive flavor notes.
The Proper Spacing
Giving each potato adequate room on the baking sheet ensures proper air circulation, which is essential for developing crispiness. Crowded potatoes steam each other, resulting in soggy exteriors.
Frequently Asked Questions
Q: Can I use other potato varieties if I can’t find creamer potatoes?
A: Yes! While creamer potatoes are ideal due to their size and texture, you can substitute small red potatoes, fingerlings, or even cut larger Yukon Golds into 2-inch pieces. Cooking times may need slight adjustment.
Q: Is it necessary to leave the skins on?
A: Absolutely! The skins contribute significantly to both nutrition and texture. They contain valuable fiber and nutrients, and they’re what creates those irresistibly crispy edges.
Q: My potatoes stuck to the pan. What went wrong?
A: This typically happens when the parchment paper is omitted or there’s insufficient oil on the baking sheet. Be sure to line your sheets with parchment and use the recommended amount of oil before arranging the potatoes.
Q: Can I use dried herbs instead of fresh?
A: Yes, but reduce the quantities by about two-thirds. For example, use 3/4 teaspoon dried rosemary instead of 2 teaspoons fresh. Add dried herbs to the oil mixture about 10 minutes before applying to allow them to rehydrate slightly.
Q: How do I know when the potatoes are properly boiled?
A: Test with a paring knife—it should slide in fairly easily but with slight resistance. You want them tender enough to smash without crumbling but not so soft they fall apart.
Q: Can I make these in an air fryer?
A: Absolutely! After boiling and smashing, air fry at 400°F (204°C) for about 12-15 minutes. You may need to work in batches depending on your air fryer’s capacity.
Q: Are smashed potatoes the same as mashed potatoes?
A: Not at all! Smashed potatoes maintain their individual form and develop crispy exteriors through roasting, while mashed potatoes are completely broken down into a smooth or chunky puree.
Beyond the Basic Recipe: Creative Applications
The humble smashed potato can transform into so much more with a little creativity:
Smashed Potato Bar for Entertaining
Create a build-your-own smashed potato station for your next gathering:
- Prepare a large batch of basic smashed potatoes
- Offer an array of toppings in small bowls:
- Crumbled bacon
- Chopped scallions
- Shredded cheese varieties
- Sour cream
- Caramelized onions
- Roasted garlic
- Various herb mixes
Smashed Potato “Nachos”
Transform smashed potatoes into a delightful appetizer:
- Arrange fully cooked smashed potatoes on a serving platter
- Top with melted cheese, black beans, diced tomatoes, jalapeños, and avocado
- Finish with a drizzle of lime crema and cilantro
Breakfast Smashed Potatoes
Start your day with this hearty variation:
- Prepare smashed potatoes as directed
- Top each with a fried egg
- Sprinkle with chopped chives and cracked black pepper
- Optional: add a small dollop of cream cheese or goat cheese
Final Thoughts
Smashed creamer potatoes represent everything I love about simple, elevated home cooking. They transform an ordinary ingredient into something extraordinary through thoughtful technique rather than complicated processes. The contrast between the golden, herb-encrusted exterior and the buttery-soft interior creates a textural experience that few other potato preparations can match.
What I appreciate most about this recipe is its adaptability. Whether you’re serving a weeknight family dinner or hosting a sophisticated dinner party, these potatoes fit the occasion perfectly. The basic technique remains the same, while the endless flavor combinations keep the dish perpetually interesting.
I encourage you to master the fundamental method first, then explore the variations that appeal to your palate. Once you’ve experienced truly perfect smashed creamer potatoes, I promise you’ll find yourself making them again and again. They may just become your signature side dish—the one guests request by name whenever you’re cooking for them.
Remember, the key to potato perfection lies in respecting each stage of the process: gentle boiling, thorough drying, careful smashing, generous seasoning, and patient roasting. Follow these principles, and crispy, irresistible smashed creamer potatoes will be yours to enjoy.
Leave a Reply