Moederdag Cupcakes: Sweet Treats to Celebrate Mom
Mother’s Day (or Moederdag, as we call it in Dutch traditions) is that special time of year when we shower our moms with love and appreciation. And what better way to say “I love you” than with homemade treats? As someone who’s been baking for family celebrations for over 15 years, I’ve perfected these Mother’s Day cupcakes that never fail to bring tears of joy to my mom’s eyes. Today, I’m sharing my heart-warming recipe that combines delicate flavors with beautiful decorations to create a memorable gift for the most important woman in your life.
Why These Cupcakes Are Perfect for Mother’s Day
When I first started baking for my mother, I quickly learned that desserts with personal touches mean more than store-bought alternatives. These cupcakes aren’t just treats; they’re edible expressions of love. The recipe I’ve developed over the years incorporates delicate flavors that most mothers adore—vanilla, subtle hints of floral notes, and a not-too-sweet frosting that complements afternoon tea perfectly.
What makes these cupcakes special is their versatility. You can customize them with your mom’s favorite flavors, colors, and decorations. Whether your mother prefers classic vanilla, adores chocolate, or enjoys fruity notes, this base recipe can be adapted while maintaining its light, moist texture.
Essential Ingredients for Perfect Cupcakes
Before we dive into the baking process, let’s talk about what makes these cupcakes stand out. Quality ingredients make all the difference between an ordinary cupcake and one that melts in your mouth.
For the Vanilla Cupcakes:
- Cake flour: Creates a finer, softer crumb than all-purpose flour
- Unsalted butter: Room temperature for proper creaming
- Granulated sugar: Provides sweetness without overwhelming the delicate flavors
- Eggs: Room temperature for better incorporation
- Vanilla bean paste: Offers deeper flavor than extract (though extract works too)
- Buttermilk: Adds tenderness and slight tanginess
- Baking powder & baking soda: For perfect rise
- Salt: Enhances all flavors
For the Buttercream Frosting:
- Unsalted butter: The foundation of silky frosting
- Powdered sugar: Sifted to prevent lumps
- Heavy cream: Creates smoothness and pipe-ability
- Vanilla extract: Complements the cupcake flavor
- Salt: A pinch balances sweetness
- Food coloring: Natural options preferred for subtle spring colors
Step-by-Step Baking Process
I’ve made these cupcakes countless times, refining the process to ensure perfect results. Follow these steps carefully for cupcakes that are light, moist, and simply irresistible.
Preparing the Cupcake Batter
- Preheat and prepare: Set your oven to 175°C (350°F) and line a 12-cup muffin tin with pretty paper liners.
- Sift dry ingredients: In a medium bowl, sift together 256g cake flour, 1½ teaspoons baking powder, ¼ teaspoon baking soda, and ½ teaspoon salt.
- Cream butter and sugar: In a stand mixer, beat 113g room-temperature butter with 200g granulated sugar until light and fluffy, about 3-4 minutes. Don’t rush this step—it incorporates air for a lighter texture.
- Add eggs: Beat in 2 large eggs, one at a time, ensuring each is fully incorporated before adding the next.
- Incorporate vanilla: Add 2 teaspoons of vanilla bean paste and mix until combined.
- Alternate dry ingredients and buttermilk: With the mixer on low, add the dry ingredients in three parts, alternating with 120ml buttermilk (beginning and ending with dry ingredients).
- Don’t overmix: Stop mixing as soon as the ingredients are combined. Overmixing develops gluten, resulting in tough cupcakes.
Baking the Cupcakes to Perfection
- Fill the cups: Divide the batter evenly among the cupcake liners, filling each about ⅔ full.
- Bake strategically: Place the tin in the center of the oven and bake for 18-20 minutes until a toothpick inserted comes out clean.
- Check early: Start checking at 16 minutes—overbaking leads to dry cupcakes.
- Cool properly: Allow cupcakes to cool in the tin for 5 minutes, then transfer to a wire rack to cool completely before frosting.
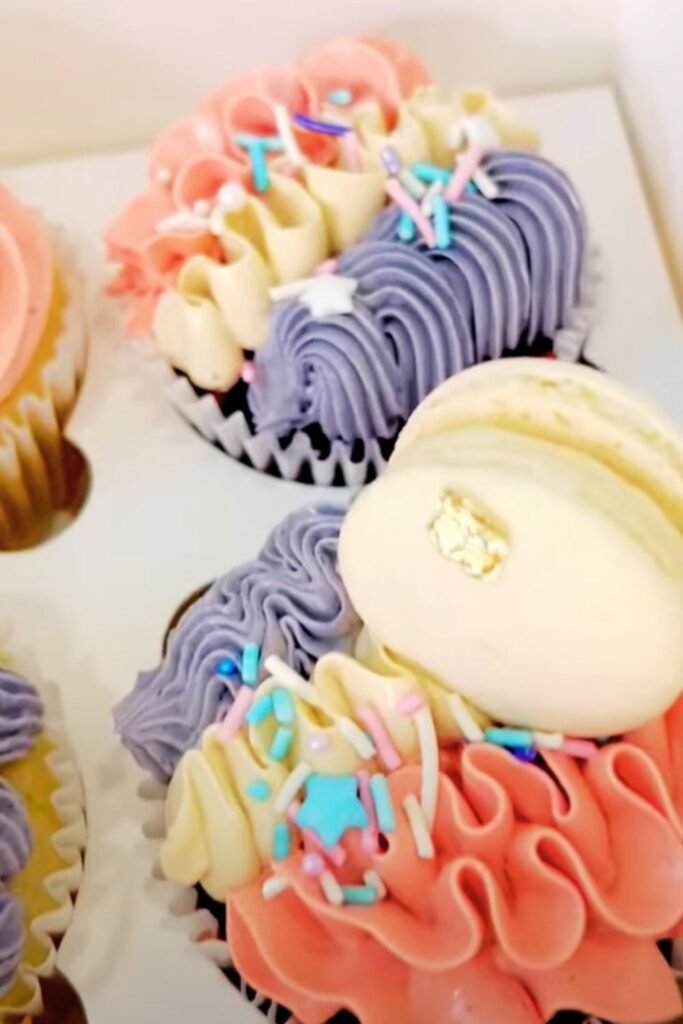
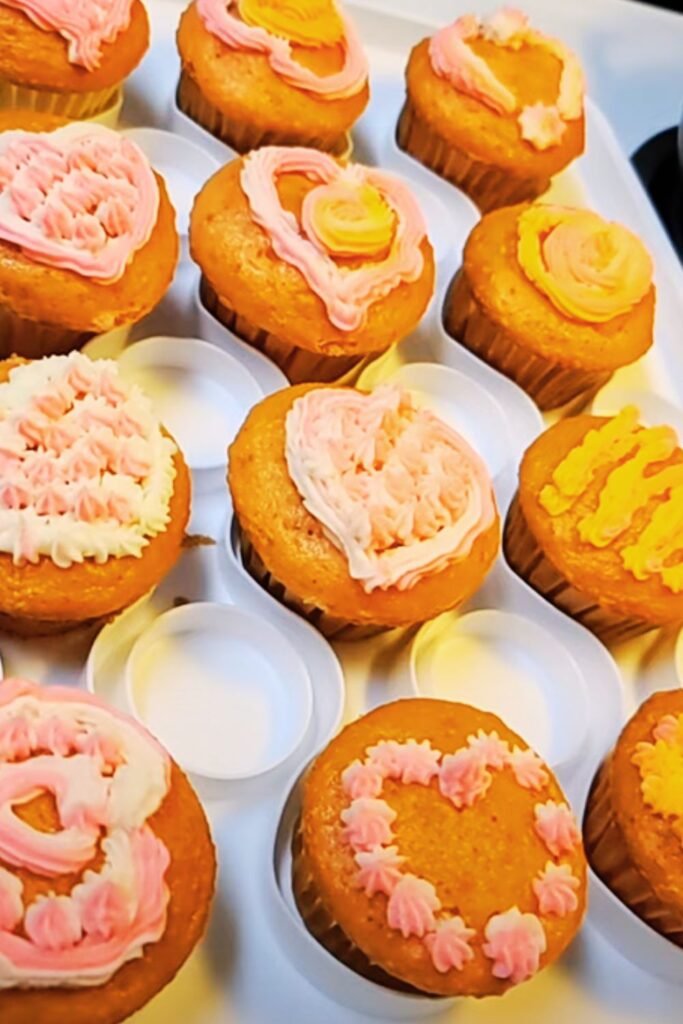
Creating Stunning Buttercream Decorations
The visual appeal of these Mother’s Day cupcakes comes from the beautiful buttercream flowers. Even if you’re new to piping, I’ve broken down the process to make it approachable.
Making Silky Buttercream Frosting
- Beat the butter: In a stand mixer with the paddle attachment, beat 226g room-temperature unsalted butter until creamy and pale, about 3-4 minutes.
- Add sugar gradually: With the mixer on low, slowly add 500g sifted powdered sugar, ½ cup at a time, allowing each addition to incorporate before adding more.
- Loosen with cream: Add 2-3 tablespoons of heavy cream and 2 teaspoons of vanilla extract.
- Whip to perfection: Increase the speed to medium-high and beat for 3-5 minutes until light and fluffy.
- Adjust consistency: If too thick, add a tiny bit more cream; if too thin, add more powdered sugar.
Coloring and Preparing for Piping
For Mother’s Day, I love creating a palette of soft spring colors. Here’s how I achieve beautiful results:
- Divide the frosting: Separate into bowls based on how many colors you want.
- Color gradually: Add food coloring a tiny bit at a time—remember, you can always add more, but you can’t take it away.
- Create a color palette: For a spring theme, I recommend soft pinks, lavenders, yellows, and mint greens.
- Prepare piping bags: Fit piping bags with various tips—my favorites are:
- Wilton 1M for classic rosettes
- Wilton 104 for petal flowers
- Wilton 352 for leaf details
- Small round tip for centers and details
Piping Techniques for Flower Designs
Even beginners can create impressive designs with these techniques:
Simple Rosettes
- Hold the bag perpendicular to the cupcake
- Start in the center
- Apply even pressure while moving in a spiral outward
- Release pressure and pull away gently
Chrysanthemum Flowers
- Start at the center
- Pipe a continuous ruffle while rotating the cupcake
- Work outward in circles
Hydrangea Clusters
- Use a small star tip
- Pipe small stars close together
- Vary colors slightly for dimension
Finishing Touches
- Add small leaf details between flowers
- Pipe tiny dots in contrasting colors for flower centers
- Sprinkle with edible pearl dust for subtle shimmer
Flavor Variations to Suit Mom’s Taste
One of the reasons I love this recipe is its adaptability. Here are some variations I’ve created over the years to suit different preferences:
Flavor Combinations Table
| Base Cupcake | Flavor Addition | Complementary Frosting | Special Touch |
|---|---|---|---|
| Vanilla | 2 tsp lemon zest | Lemon buttercream | Candied lemon peel |
| Vanilla | Replace 30g flour with cocoa | Chocolate ganache | Chocolate curls |
| Vanilla | 1 tbsp Earl Grey tea leaves (ground) | Honey buttercream | Lavender buds |
| Vanilla | 150g fresh raspberries, folded in | Vanilla-rose buttercream | Freeze-dried raspberry dust |
| Vanilla | 1 tsp almond extract | Vanilla-almond buttercream | Toasted sliced almonds |
| Vanilla | 1 tbsp orange zest | Orange blossom buttercream | Candied orange slices |
Subtle Infusions for Sophisticated Flavors
For a more mature palate, consider these elegant flavor infusions:
- Infused milks: Heat the buttermilk with lavender, rose petals, or cardamom pods, then strain and cool before using.
- Flavored sugars: Rub citrus zest into the sugar before creaming with butter.
- Extract combinations: Try ¼ teaspoon each of vanilla and almond extracts for complex flavor.
- Spice blends: Add a pinch of cinnamon, cardamom, and nutmeg for a chai-inspired cupcake.
Presentation Ideas for Mother’s Day
The presentation of your cupcakes can elevate them from mere desserts to heartfelt gifts. Here are my favorite ways to present Mother’s Day cupcakes:
Beautiful Display Options
- Tiered stand: Arrange cupcakes on a vintage or elegant tiered stand with fresh flowers between levels.
- Gift box: Place cupcakes in paper cups inside a beautiful box lined with tissue paper.
- Individual packages: Wrap each cupcake in transparent cellophane tied with ribbon and a handwritten note.
- Cupcake bouquet: Arrange cupcakes in a flower pot using floral foam to hold them in place, creating an edible “bouquet.”
Thoughtful Additions
- Add a handwritten card sharing a memory of your mother
- Include her favorite tea or coffee as an accompaniment
- Pair with a small keepsake like a teacup or special plate
- Create a custom “coupon” for future mother-daughter/son activities
Making Ahead and Storage Tips
One question I often get is whether these cupcakes can be made ahead of time. The answer is yes, with some planning:
Make-Ahead Schedule
| Component | How Far Ahead | Storage Method | Notes |
|---|---|---|---|
| Baked cupcakes | Up to 1 day | Room temperature in airtight container | Cover loosely to prevent condensation |
| Baked cupcakes | Up to 1 month | Freezer in airtight container | Thaw overnight in refrigerator |
| Buttercream | Up to 3 days | Refrigerator in airtight container | Bring to room temperature and re-whip before using |
| Decorated cupcakes | Up to 2 days | Refrigerator in container | Bring to room temperature 1 hour before serving |
Proper Storage Techniques
For the freshest results, follow these storage guidelines:
- Unfrosted cupcakes: Store at room temperature in an airtight container for up to 2 days.
- Frosted cupcakes: If using perishable fillings or frostings (like whipped cream), refrigerate immediately.
- Buttercream-frosted cupcakes: Can stay at cool room temperature (below 24°C/75°F) for up to 2 days.
- Freezing: Place unfrosted cupcakes in a single layer on a baking sheet to freeze solid, then transfer to freezer bags.
Common Pitfalls and How to Avoid Them
Over my years of baking, I’ve encountered and solved many common cupcake problems. Here’s what to watch for:
Troubleshooting Guide
| Problem | Possible Cause | Solution |
|---|---|---|
| Cupcakes sink in the middle | Oven too hot or underbaking | Check oven temperature with separate thermometer; test with toothpick |
| Cupcakes stick to liners | Low-fat recipe or removing while hot | Use good quality liners; let cool completely before unwrapping |
| Dry cupcakes | Overbaking or too much flour | Reduce baking time; measure flour correctly by spooning into cups |
| Dense cupcakes | Overmixing batter or cold ingredients | Mix just until combined; ensure all ingredients are room temperature |
| Buttercream separates | Adding liquid too quickly | Add cream gradually; ensure butter is proper temperature |
| Frosting too soft to pipe | Butter too warm or too much liquid | Chill briefly; add more powdered sugar gradually |
Serving Suggestions and Complementary Treats
These cupcakes are delightful on their own, but for a complete Mother’s Day experience, consider these serving ideas:
Perfect Pairings
- Tea service: Match flavored cupcakes with complementary teas (Earl Grey with lavender cupcakes, chamomile with honey-almond)
- Coffee selection: Light roast coffee highlights vanilla notes; medium roast pairs with chocolate variations
- Fruit platter: Fresh berries and sliced fruits provide refreshing contrast
- Sparkling juices: Rose lemonade or elderflower sparkling water adds festive elegance
Complete Mother’s Day Menu
For a full afternoon tea experience, complement your cupcakes with:
- Finger sandwiches with cucumber, egg salad, or smoked salmon
- Scones with clotted cream and jam
- Fresh fruit skewers with honey-yogurt dip
- Chocolate-dipped strawberries
- Assorted nuts and chocolates
Personalization Ideas for Different Moms
Every mom is unique, and personalizing these cupcakes shows your thoughtfulness. Here are ideas for different mom personalities:
For the Garden-Loving Mom
- Decorate with edible flowers like pansies or violets
- Create buttercream succulents
- Use herb-infused buttercream (lavender, mint, or basil)
For the Elegant Mom
- Simple, sophisticated designs in monochromatic colors
- Gold or silver edible shimmer
- Rose water or orange blossom flavoring
For the Fun-Loving Mom
- Bright, vibrant colors
- Funfetti cupcake interior
- Unexpected flavor combinations like strawberry-basil
For the Health-Conscious Mom
- Reduce sugar in both cupcake and frosting
- Incorporate whole grain flour (25% of total)
- Use natural food colorings from fruit and vegetable powders
Questions and Answers
Here are answers to questions I frequently receive about these Mother’s Day cupcakes:
Q: Can I make these cupcakes gluten-free? Yes! Replace the cake flour with a high-quality gluten-free flour blend that contains xanthan gum. I recommend adding an extra egg yolk for moisture and extending the baking time by 2-3 minutes.
Q: How do I prevent my buttercream from melting in warm weather? For warm weather stability, replace about 25% of the butter with vegetable shortening. Also, keep decorated cupcakes refrigerated until about 30 minutes before serving, and avoid direct sunlight.
Q: My mom is diabetic. Can I make these with less sugar? Absolutely. You can reduce the sugar in the cupcake batter by up to 25% without affecting the texture significantly. For the frosting, consider a stabilized whipped cream with a sugar substitute instead of traditional buttercream.
Q: I don’t have piping tips. How can I still make these look special? No worries! Spread frosting with an offset spatula for a rustic look, then press the frosted top gently into a shallow dish of sprinkles, edible pearls, or crushed freeze-dried fruits. Even a simple swirl made with the back of a spoon can look elegant.
Q: How far in advance can I make these for Mother’s Day? I recommend baking the cupcakes no more than two days ahead. Store unfrosted cupcakes in an airtight container at room temperature. Frost them the morning of Mother’s Day for the freshest presentation.
Q: My buttercream looks curdled. What happened? This usually happens when the butter is too cold or when liquid is added too quickly. Let your mixture come to room temperature, then continue beating until smooth. If needed, warm the bowl slightly by wrapping a hot towel around its base while mixing.
The Emotional Value of Homemade Treats
In my family, baking has always been more than just creating something sweet—it’s about showing love through effort and care. When I hand my mother these cupcakes each year, I’m not just giving her dessert; I’m giving her a piece of my heart.
The tradition started when I was young, making lopsided cupcakes with my grandmother’s help. Even though those early attempts weren’t perfect, my mother’s face would light up as if I’d presented her with treasure. Now, years later, I’ve perfected the technique, but that look of joy remains the same.
I encourage you to approach this recipe not just as a set of instructions, but as an opportunity to create a meaningful experience. The time you spend measuring, mixing, and decorating becomes infused in the cupcakes themselves, making them taste all the sweeter.
Final Words of Encouragement
Baking these Mother’s Day cupcakes might seem challenging if you’re new to decorating, but remember that your mom will treasure your effort regardless of how “professional” the results look. Start simple, be patient with yourself, and enjoy the process.
I still remember my first attempt at piping buttercream flowers—they looked more like colorful blobs than petals! But with practice and patience, I improved, and you will too. The most important ingredient in these cupcakes isn’t listed in the recipe—it’s the love and intention you put into making them.
So preheat your oven, gather your ingredients, and create a sweet memory that will last far longer than the cupcakes themselves. Your mom deserves this delicious expression of appreciation, and I’m confident that with this guide, you’ll make Mother’s Day cupcakes that will become a cherished tradition in your family too.
Leave a Reply