Have you ever craved the perfect chicken nugget? Crispy on the outside, juicy on the inside, and actually made with real chicken? I know I have! After countless attempts at creating restaurant-quality nuggets at home, I finally cracked the code with my air fryer. These homemade air fryer chicken nuggets have become a weekly staple in my household—they’re healthier than deep-fried versions but don’t sacrifice an ounce of flavor or that satisfying crunch we all love.
Today, I’m sharing my ultimate recipe that’s been refined over dozens of batches. Whether you’re cooking for picky children or satisfying your own nostalgic cravings, these nuggets deliver that perfect golden exterior while keeping the chicken tender and flavorful. The best part? They’re ready in just 20 minutes with minimal cleanup!
Why You’ll Love These Air Fryer Chicken Nuggets
- Healthier option: Uses significantly less oil than traditional deep-fried nuggets
- Quick cooking time: Ready in about 20 minutes from start to finish
- Kid-approved: Even the pickiest eaters love these nuggets
- Versatile: Customize with your favorite seasonings and dipping sauces
- Budget-friendly: Much more economical than store-bought or restaurant nuggets
- Real ingredients: You control exactly what goes into your food
- Crispy perfection: The air fryer creates that ideal crunchy exterior every time
Ingredients You’ll Need
For the absolute best air fryer chicken nuggets, quality ingredients make all the difference:
For the Chicken Mixture:
- 1 pound boneless, skinless chicken breasts (or thighs for more flavor)
- 1 teaspoon garlic powder
- 1 teaspoon onion powder
- 1 teaspoon paprika (sweet or smoked)
- ½ teaspoon dried oregano
- ½ teaspoon salt
- ¼ teaspoon black pepper
- 1 large egg
- 2 tablespoons mayonnaise (helps keep the chicken moist)
For the Coating:
- 1 cup panko breadcrumbs
- ¼ cup regular breadcrumbs
- ½ cup grated parmesan cheese (optional but recommended)
- 2 tablespoons olive oil (for tossing with breadcrumbs)
- Cooking spray (olive oil or avocado oil spray works best)
Equipment Needed
Before diving into the recipe, ensure you have these tools on hand:
- Air fryer (any model works, but 5-6 quart capacity is ideal)
- Food processor or sharp knife
- Mixing bowls (2-3 of varying sizes)
- Measuring cups and spoons
- Baking sheet or plate (for breading process)
- Kitchen tongs
- Meat thermometer (optional but recommended)
Detailed Instructions
Step 1: Prepare the Chicken

I’ve found that starting with the right chicken preparation makes all the difference in the final texture of your nuggets. Here’s my foolproof method:
- Pat the chicken breasts dry with paper towels to remove excess moisture.
- Cut the chicken into roughly 1-inch chunks.
- Place the chicken pieces in a food processor and pulse 5-7 times until chopped but not pasty. You want some texture!
- If you don’t have a food processor, you can finely chop the chicken with a sharp knife or use ground chicken instead.
Step 2: Season and Mix the Chicken
Creating a well-seasoned chicken mixture ensures your nuggets are flavorful throughout, not just on the coating:
- In a medium bowl, combine the processed chicken, garlic powder, onion powder, paprika, dried oregano, salt, pepper, egg, and mayonnaise.
- Mix thoroughly until all ingredients are well incorporated. The mixture will be slightly sticky.
- Cover and refrigerate for 15 minutes (if time allows) to help the flavors meld and make the mixture easier to handle.
Step 3: Prepare the Coating
The secret to exceptionally crispy nuggets lies in preparing the breadcrumb mixture correctly:
- In a shallow dish, combine the panko breadcrumbs, regular breadcrumbs, and grated parmesan cheese.
- Drizzle 2 tablespoons of olive oil over the breadcrumb mixture and use your fingers to work it through until the breadcrumbs are evenly coated. This pre-toasting effect helps achieve that golden-brown color.
- Season the breadcrumb mixture with a pinch of salt and pepper to taste.
Step 4: Form and Coat the Nuggets
For consistent cooking and that perfect nugget shape:
- Remove the chicken mixture from the refrigerator.
- With slightly damp hands (to prevent sticking), scoop about 1½ tablespoons of the chicken mixture and form into a nugget shape. I aim for nuggets about ½-inch thick for optimal cooking.
- Press each nugget firmly into the breadcrumb mixture, flipping to coat all sides well.
- Place breaded nuggets on a plate or baking sheet while you finish forming the rest.
- For extra crispiness, press additional breadcrumbs onto any areas that look thinly coated.
Step 5: Preheat and Prepare Air Fryer
Setting up your air fryer correctly ensures even cooking and maximum crispiness:
- Preheat your air fryer to 390°F (199°C) for 3-5 minutes.
- Once preheated, lightly spray the air fryer basket with cooking spray.
- Alternatively, you can use a perforated parchment paper liner for easier cleanup, but still spray it lightly.
Step 6: Air Fry to Perfection

The air frying technique is what makes these nuggets special:
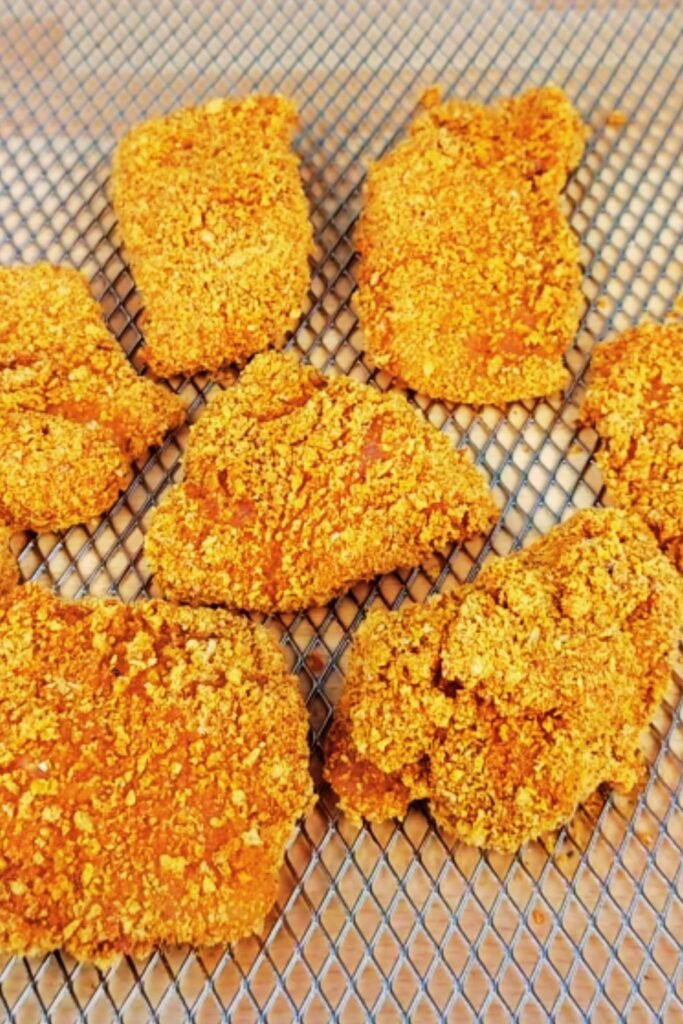
- Place the nuggets in the air fryer basket in a single layer with a little space between each one. Don’t overcrowd!
- Lightly spray the tops of the nuggets with cooking spray for that extra golden color.
- Cook at 390°F for 5 minutes.
- Open the air fryer, carefully flip each nugget with tongs, and spray the other side lightly.
- Continue cooking for another 4-5 minutes until golden brown and the internal temperature reaches 165°F (74°C).
- If cooking in batches, keep the first batch warm in an oven set to 200°F (93°C).
Nutritional Information
Understanding the nutritional profile helps you include these nuggets in a balanced meal plan:
| Nutrient | Amount per Serving (5 nuggets) |
|---|---|
| Calories | 285 |
| Protein | 26g |
| Total Fat | 14g |
| Saturated Fat | 3.5g |
| Carbohydrates | 15g |
| Dietary Fiber | 0.8g |
| Sugars | 0.5g |
| Sodium | 490mg |
| Cholesterol | 105mg |
| Calcium | 120mg |
| Iron | 1.5mg |
Values are approximate and may vary based on specific ingredients used.
Storage and Reheating Instructions
These nuggets maintain their quality surprisingly well when stored properly:
To Store:
- Refrigerate: Place cooled nuggets in an airtight container for up to 3 days.
- Freeze: Arrange cooled nuggets on a baking sheet and freeze until solid (about 2 hours), then transfer to a freezer bag or container. They’ll keep for up to 3 months.
To Reheat:
- From refrigerated: Air fry at 350°F (177°C) for 3-4 minutes until heated through and crispy again.
- From frozen: Air fry at 350°F (177°C) for 6-8 minutes until heated through and crispy.
- Oven method: Bake on a wire rack over a baking sheet at 400°F (204°C) for 8-10 minutes.
- Avoid microwaving as it makes the coating soggy.
Serving Suggestions
Complete your meal with these complementary sides and sauces:
Dipping Sauces:
- Honey mustard (mix 2 parts honey with 1 part Dijon mustard)
- Homemade ranch (buttermilk, mayonnaise, herbs)
- BBQ sauce (sweet or spicy)
- Buffalo sauce for a kick
- Sweet chili sauce for an Asian-inspired twist
- Homemade ketchup with a hint of honey
Side Dishes:
- Air fryer sweet potato fries
- Fresh vegetable sticks with hummus
- Crispy green salad with light vinaigrette
- Homemade coleslaw
- Corn on the cob
- Fresh fruit slices for a sweet contrast
Recipe Variations
Customize these nuggets to suit your preferences and dietary needs:
Gluten-Free Version:
- Substitute regular breadcrumbs with gluten-free breadcrumbs or crushed rice cereal
- Ensure all seasonings and additives are certified gluten-free
Extra Crunchy Coating:
- Add 2 tablespoons of crushed corn flakes to the breadcrumb mixture
- Double-dip nuggets (in egg wash, then breadcrumbs) for an extra-thick coating
Flavor Variations:
- Mexican-inspired: Add 1 teaspoon of cumin and ½ teaspoon of chili powder to the chicken mixture
- Italian-style: Mix 1 tablespoon of Italian seasoning into the breadcrumbs
- Spicy: Add ¼-½ teaspoon of cayenne pepper to the breadcrumbs
- Ranch-flavored: Mix 1 tablespoon of dry ranch seasoning into the chicken mixture
- Lemon-pepper: Add 1 teaspoon of lemon zest and extra black pepper to the breadcrumbs
Pro Tips for Perfect Air Fryer Chicken Nuggets
After making countless batches, I’ve discovered these secrets that make all the difference:
- Don’t skip the mayo in the chicken mixture—it keeps the nuggets juicy on the inside while they get crispy outside.
- Pre-toasting the breadcrumbs with olive oil before coating helps achieve that golden color without needing to spray as much oil during cooking.
- Work in small batches rather than overcrowding the air fryer, which can lead to uneven cooking and less crispy results.
- Slightly dampen your hands when forming the nuggets to prevent the chicken mixture from sticking.
- Let the formed nuggets sit for 5 minutes before air frying to help the coating adhere better.
- Flip gently during cooking to avoid dislodging the breading.
- Check internal temperature with a meat thermometer to ensure food safety (165°F/74°C) without overcooking.
- Allow 1-2 minutes of rest time after cooking for the juices to redistribute throughout the nugget.
Kid-Friendly Cooking Tips
Getting children involved makes mealtime more fun and encourages better eating habits:
- Let kids help mix the seasonings into the chicken (with clean hands, of course!)
- Create a “nugget assembly line” where kids can help form and bread the nuggets
- Have a nugget-tasting contest with different dipping sauces
- Create fun shapes with the chicken mixture (stars, hearts, letters)
- Let older children help operate the air fryer under supervision
- Turn dinner into an educational moment about healthier alternatives to fast food
Frequently Asked Questions
Can I use chicken thighs instead of breasts? Absolutely! Chicken thighs have more fat and flavor, making them an excellent choice for juicier nuggets. The cooking time remains the same, but you might find the nuggets even more tender.
Why did my breadcrumb coating fall off during cooking? This usually happens if the chicken mixture is too wet or if the nuggets weren’t pressed firmly into the breadcrumbs. Try chilling the formed nuggets for 10 minutes before air frying to help the coating adhere better.
Can I use regular flour instead of breadcrumbs? While you can use flour for the coating, it won’t give you the same crispy texture that breadcrumbs provide. If using flour, consider adding cornstarch (1 part cornstarch to 3 parts flour) to improve crispiness.
How do I know when the nuggets are done cooking? The nuggets should be golden brown on the outside and reach an internal temperature of 165°F (74°C). If you don’t have a thermometer, cut one open—the inside should be white with no pink remaining.
Can I make these nuggets if I don’t have an air fryer? Yes! Bake them in a conventional oven at 425°F (218°C) on a wire rack over a baking sheet for about 15-18 minutes, flipping halfway through. They won’t be quite as crispy but still delicious.
How can I make these nuggets even healthier? Use whole wheat breadcrumbs, reduce the amount of salt, and consider using an oil spray made with avocado or olive oil. You can also incorporate finely minced vegetables like bell peppers or carrots into the chicken mixture.
Why are my nuggets dry? Overcooking is usually the culprit. Chicken breast can dry out quickly, so watch the cooking time carefully. The mayo in the mixture helps prevent dryness, but you could also try using ground chicken thighs which have more fat.
Can I make chicken strips instead of nuggets? Definitely! Form the mixture into strips instead of nuggets. You may need to increase the cooking time by 1-2 minutes depending on thickness.
Why Homemade is Better Than Store-Bought
When comparing these homemade nuggets to frozen or fast-food options, the benefits become clear:
| Aspect | Homemade Air Fryer Nuggets | Store-Bought/Fast Food Nuggets |
|---|---|---|
| Ingredient Quality | 100% real chicken pieces | Often contains fillers and by-products |
| Oil Content | Minimal oil used (1-2 tbsp total) | Deep-fried in cups of oil |
| Sodium Content | Controllable (approx. 490mg per serving) | Often 800mg+ per equivalent serving |
| Preservatives | None | Multiple preservatives for shelf stability |
| Flavor Customization | Unlimited options | Fixed flavors |
| Cost | $3-4 per batch (4 servings) | $3-5 for a single serving |
| Nutritional Value | Higher protein, lower fat | Higher fat, often lower protein |
| Freshness | Made minutes before eating | Could be months old (frozen) |
Time-Saving Preparation Tips
For those busy weeknights when you need dinner on the table quickly:
- Prep ahead: Mix and form the nuggets up to 24 hours in advance, keep refrigerated and cook when needed.
- Freeze uncooked: Make a double batch and freeze half (uncooked) for later use.
- Prepare the breadcrumb mixture in bulk and store in an airtight container for up to a month.
- Use pre-ground chicken to skip the food processor step (though texture will be slightly different).
- Make a nugget meal prep by cooking a large batch, then portioning with sides into containers for quick lunches.
The Science Behind Perfect Air Fryer Cooking
Understanding the science helps you achieve better results:
The air fryer works by circulating very hot air around your food at high speed, creating a convection effect. This rapid air movement causes the Maillard reaction (browning of proteins) on the surface of the food much quicker than a conventional oven.
For chicken nuggets specifically:
- The optimal temperature of 390°F (199°C) is hot enough to quickly crisp the exterior without drying out the interior
- Adding fat (in this case, mayonnaise) to the chicken mixture helps maintain moisture during cooking
- Pre-coating the breadcrumbs with olive oil helps them brown more effectively in the dry heat environment
- The thickness of the nuggets (ideally ½-inch) ensures they cook through just as the exterior becomes perfectly crisp
Final Thoughts
After years of experimentation, I can confidently say these air fryer chicken nuggets rival any restaurant version I’ve tried. The combination of real, quality ingredients with the perfect cooking method results in nuggets that are satisfyingly crispy, wonderfully juicy, and completely customizable to your taste preferences.
Whether you’re looking for a crowd-pleasing appetizer, a kid-friendly dinner, or just satisfying your own comfort food cravings, this recipe delivers results that will make you wonder why you ever bought the frozen version. Plus, knowing exactly what goes into your food brings peace of mind that’s worth far more than the minimal extra effort.
Give these homemade air fryer chicken nuggets a try, and I’m confident they’ll become a regular part of your meal rotation—just as they have in mine!