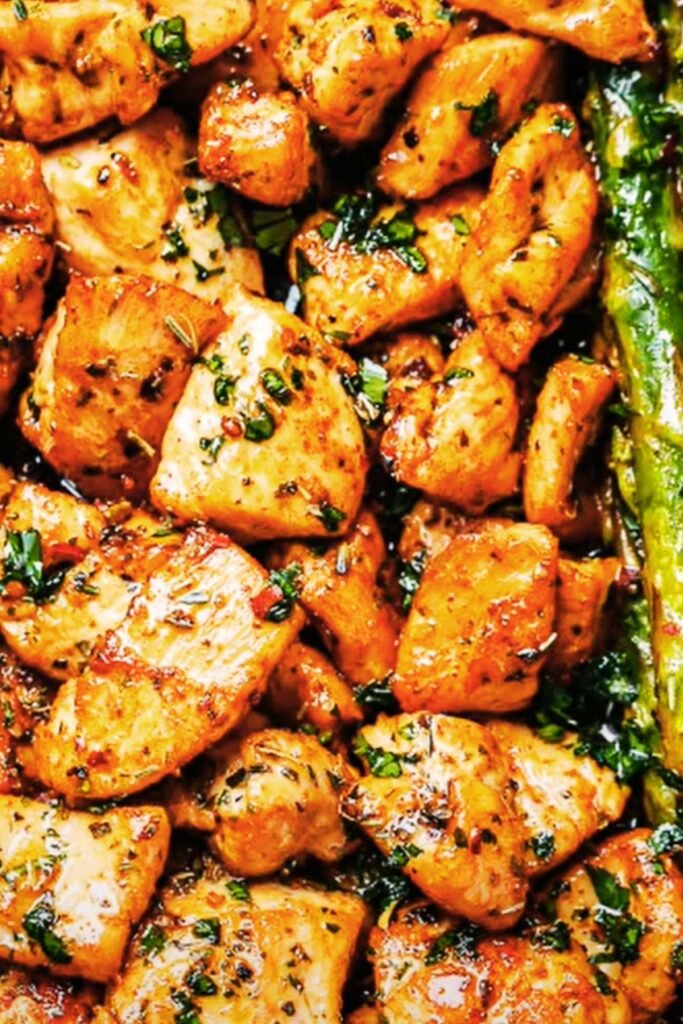
There’s something magical about the combination of garlic and butter. When you add that duo to a perfectly baked chicken breast, you’ve got a winner of a dinner that’s both impressive and incredibly simple to make. Today, I’m sharing my foolproof method for creating the juiciest, most flavorful garlic butter baked chicken breast you’ll ever taste.
As someone who has prepared this dish countless times for family gatherings, weeknight dinners, and even casual dinner parties, I can confidently say this recipe has never disappointed. The chicken turns out tender and moist every single time, while the garlic butter creates a flavor explosion that will have everyone asking for seconds.
Why You’ll Love This Recipe
Before we dive into the details, let me tell you why this garlic butter baked chicken breast recipe deserves a permanent spot in your meal rotation:
- Incredibly Juicy: Say goodbye to dry, boring chicken breasts forever
- Perfect for Any Occasion: Fancy enough for guests, simple enough for Monday night
- Budget-Friendly: Chicken breast is one of the most economical protein options
- Versatile: Pairs with virtually any side dish you can imagine
- Ready in 30 Minutes: Perfect for busy weeknights when time is limited
- Meal Prep Friendly: Keeps well in the refrigerator for quick lunches and dinners
- Naturally Low-Carb: Great for those watching their carbohydrate intake
The Secret to Perfect Baked Chicken Breast
Let’s address the elephant in the room – chicken breasts have a reputation for turning out dry and bland. After years of testing different methods, I’ve discovered the foolproof formula for juicy chicken every time:
- Brine the chicken: Even a quick 15-minute brine makes a world of difference
- Don’t skimp on butter: The fat helps keep the chicken moist while adding flavor
- High-then-low temperature method: Start hot to seal in juices, then reduce heat to cook through
- Use a meat thermometer: The only way to ensure chicken is perfectly cooked
- Allow for resting time: This redistributes the juices throughout the meat
Trust me on these steps, and you’ll never serve dry chicken again!
Key Ingredients

Here’s what you’ll need to create this mouth-watering dish:
| Ingredient | Amount | Notes |
|---|---|---|
| Chicken breasts | 4 (about 2 pounds) | Look for similar-sized pieces for even cooking |
| Unsalted butter | 6 tablespoons | Use high-quality butter for best flavor |
| Fresh garlic | 6 cloves | Minced or pressed |
| Fresh herbs | 2 tablespoons | Thyme, rosemary, parsley (choose your favorites) |
| Lemon | 1 medium | You’ll use both zest and juice |
| Kosher salt | 2 teaspoons for brine, plus more to taste | Diamond Crystal preferred |
| Black pepper | 1 teaspoon | Freshly ground |
| Olive oil | 1 tablespoon | For initial searing |
| Chicken broth | 1/4 cup | Low sodium preferred |
| Paprika | 1/2 teaspoon | Regular or smoked both work well |
| Garlic powder | 1/2 teaspoon | In addition to fresh garlic for depth of flavor |
| Italian seasoning | 1 teaspoon | Optional but recommended |
Equipment Needed
- Baking dish: 9×13 inch works perfectly
- Small saucepan: For making the garlic butter
- Meat thermometer: Essential for perfect doneness
- Aluminum foil: For tenting during rest period
- Cutting board and sharp knife: For preparation
- Measuring spoons and cups: For accurate measurements
Step-by-Step Instructions
Preparing the Chicken
- Brine the chicken: In a large bowl, dissolve 2 teaspoons of kosher salt in 4 cups of warm water. Submerge chicken breasts and let sit for 15-30 minutes at room temperature.
- Prepare the oven: Preheat your oven to 425°F (220°C).
- Dry and season: Remove chicken from brine, rinse under cold water, and pat thoroughly dry with paper towels. Place on a plate and season both sides with salt, pepper, paprika, and garlic powder.
- Prepare baking dish: Lightly oil a 9×13 inch baking dish.
Making the Garlic Butter

- Melt the butter: In a small saucepan over medium-low heat, melt 6 tablespoons of butter.
- Add aromatics: When butter is melted, add minced garlic, chopped herbs, lemon zest, 1 tablespoon of lemon juice, and a pinch of salt. Stir for 1-2 minutes until fragrant but not browned.
- Set aside: Remove from heat and let the flavors infuse while you prepare the chicken.
Cooking Process
| Step | Temperature | Time | Internal Temperature |
|---|---|---|---|
| Initial sear | Stovetop medium-high | 2-3 minutes per side | N/A |
| First bake | 425°F (220°C) | 5 minutes | Around 125°F (52°C) |
| Second bake | 375°F (190°C) | 10-15 minutes | 165°F (74°C) |
| Resting period | Counter (tented) | 5-10 minutes | Rises 5°F during rest |
- Sear the chicken: Heat olive oil in a large skillet over medium-high heat. Sear chicken breasts for 2-3 minutes on each side until golden brown.
- Transfer to baking dish: Place seared chicken in the prepared baking dish.
- Apply garlic butter: Pour two-thirds of the garlic butter mixture over the chicken, ensuring each breast is well coated.
- First bake: Place in the preheated 425°F oven and bake for 5 minutes.
- Lower temperature: Without opening the oven, reduce temperature to 375°F and continue baking for 10-15 minutes, until internal temperature reaches 165°F. Cooking time will vary based on the thickness of your chicken breasts.
- Rest the chicken: Remove from oven, baste with remaining garlic butter, and tent loosely with foil. Let rest for 5-10 minutes before serving.
- Serve and enjoy: Slice chicken against the grain and drizzle with the sauce from the baking dish.
Pro Tips for Success
After making this recipe dozens of times, I’ve gathered these valuable tips:
- Room temperature butter: For the garlic butter mixture, room temperature butter will incorporate herbs and seasonings more evenly
- Don’t overcrowd the pan: When searing, give each chicken breast enough space
- Butterfly thick breasts: If your chicken breasts are very thick, butterfly them for more even cooking
- Reserve some sauce: Keep a little garlic butter aside for a final drizzle just before serving
- Check temperature early: Start checking internal temperature a few minutes before the suggested cooking time
- Brine substitution: If short on time, you can use a dry brine (just salt) for 15 minutes instead of the water brine
Nutrition Information
For those keeping track of nutritional content, here’s the breakdown per serving (one chicken breast with sauce):
| Nutrient | Amount | % Daily Value* |
|---|---|---|
| Calories | 385 | – |
| Total Fat | 24g | 31% |
| Saturated Fat | 13g | 65% |
| Cholesterol | 165mg | 55% |
| Sodium | 520mg | 23% |
| Total Carbohydrates | 3g | 1% |
| Dietary Fiber | 0g | 0% |
| Sugars | 0g | – |
| Protein | 36g | 72% |
| Vitamin A | 625IU | 13% |
| Vitamin C | 5mg | 8% |
| Calcium | 30mg | 3% |
| Iron | 1.2mg | 7% |
*Percent Daily Values are based on a 2,000 calorie diet
Variations to Try
One of the things I love most about this recipe is how versatile it is. Here are some delicious variations to explore:
Herb Variations
- Mediterranean: Use oregano, basil, and a touch of mint
- French Provincial: Herbes de Provence with extra thyme and lavender
- Italian: Heavy on the basil, oregano, and rosemary
- Spicy: Add red pepper flakes or cayenne to the butter mixture
Flavor Boosters
- Parmesan Crusted: Add 1/4 cup of grated Parmesan to the butter mixture
- Mustard Infused: Stir 1 tablespoon of Dijon mustard into the garlic butter
- White Wine: Replace the chicken broth with white wine for added depth
- Creamy Finish: Add 2 tablespoons of heavy cream to the sauce after baking

Make Ahead and Storage Tips
Make Ahead
- Prep components: You can make the garlic butter up to 3 days ahead and store in the refrigerator. Bring to room temperature before using.
- Pre-season chicken: Brine and season the chicken up to 8 hours ahead, then store covered in the refrigerator until ready to cook.
Storage
- Refrigeration: Store leftover chicken in an airtight container with some of the sauce for up to 4 days.
- Freezing: Freeze fully cooled chicken for up to 3 months. Thaw overnight in the refrigerator.
Reheating
- Oven method: Reheat in a 300°F oven with a splash of chicken broth until warmed through (about 15-20 minutes).
- Microwave: For quick reheating, use 50% power in 30-second intervals until warmed through.
- Stovetop: Slice chicken and warm gently in a skillet with a bit of butter or olive oil.
| Storage Method | Temperature | Duration | Notes |
|---|---|---|---|
| Refrigerator | 36-40°F (2-4°C) | 3-4 days | Keep in sauce to maintain moisture |
| Freezer | 0°F (-18°C) | Up to 3 months | Wrap tightly to prevent freezer burn |
| Countertop | Room temperature | Maximum 2 hours | Food safety guideline |
Serving Suggestions
This garlic butter chicken breast pairs beautifully with all sorts of side dishes. Here are some of my favorite combinations:
Starches
- Creamy mashed potatoes
- Buttered egg noodles
- Garlic rice pilaf
- Crusty artisan bread for soaking up the sauce
- Roasted baby potatoes with herbs
Vegetables
- Roasted asparagus
- Steamed broccoli
- Sautéed green beans with almonds
- Honey glazed carrots
- Simple garden salad with vinaigrette
Complete Meal Ideas
- Comfort Food Classic: Serve with mashed potatoes and roasted Brussels sprouts
- Light and Fresh: Pair with a quinoa salad and steamed vegetables
- Mediterranean Style: Serve with orzo pasta, olives, and roasted bell peppers
- Family Favorite: Accompany with mac and cheese and a simple green vegetable
Common Problems and Solutions
Even experienced cooks sometimes encounter issues. Here’s how to troubleshoot common problems:
| Problem | Possible Cause | Solution |
|---|---|---|
| Chicken is dry | Overcooked | Use a meat thermometer and remove at 165°F precisely |
| Butter burns in oven | Oven too hot | Reduce temperature or cover dish with foil for part of cooking time |
| Garlic tastes bitter | Garlic was browned too much | Cook garlic in butter just until fragrant, not browned |
| Chicken cooking unevenly | Breasts are different sizes | Pound chicken to even thickness before cooking |
| Sauce is too thin | Not enough reduction | After removing chicken, simmer sauce on stovetop to reduce if desired |
| Chicken sticks to pan when searing | Pan not hot enough before adding chicken | Make sure pan is properly heated before adding chicken |
Questions and Answers
Q: Can I use bone-in chicken breasts for this recipe?
A: Yes, you can use bone-in chicken breasts, but you’ll need to adjust the cooking time. Bone-in breasts typically take 35-45 minutes at 375°F to reach 165°F internally. The flavor is often even better with bone-in chicken!
Q: Is there a dairy-free alternative for the butter?
A: Absolutely! You can substitute olive oil or a good-quality dairy-free butter alternative. The flavor profile will be slightly different but still delicious. Use the same amount as called for in the recipe.
Q: Can I use chicken thighs instead of breasts?
A: Chicken thighs work wonderfully with this recipe and are naturally more juicy. If using boneless thighs, reduce the cooking time slightly and check temperature after 10-12 minutes at 375°F. Bone-in thighs will take about 30-35 minutes.
Q: How can I tell when the chicken is done without a meat thermometer?
A: While a thermometer is the most reliable method, you can also check by making a small cut into the thickest part of the breast. The meat should be opaque white throughout with no pink areas, and the juices should run clear. However, this method may release some of the precious juices.
Q: Can I make this in an air fryer?
A: Yes! Prepare the chicken as directed, then cook in an air fryer at 375°F for about 10-12 minutes, depending on thickness. Brush with garlic butter before and halfway through cooking.
Q: What herbs work best with this recipe?
A: Thyme, rosemary, parsley, and chives all work beautifully. I find that woody herbs like thyme and rosemary stand up well to the cooking process, while tender herbs like parsley and chives are best added at the end for freshness.
Q: Can I skip the stovetop searing step?
A: You can, but searing helps develop flavor and creates a nice crust. If skipping this step, increase the initial high-temperature baking time to 8-10 minutes before reducing the heat.
Q: My family doesn’t like garlic. Can I still make this recipe?
A: Certainly! You can create a herb butter instead, omitting the garlic entirely. Lemon, herbs, and butter alone create a wonderful flavor profile. You might want to add a small amount of finely minced shallot for depth.
Why This Recipe Works
After many iterations and experiments, I’ve found that the success of this recipe comes down to a few key principles:
- The brine: This simple step ensures the chicken stays moist throughout cooking
- Compound butter: By infusing butter with garlic, herbs, and lemon, we create a flavor-packed coating that bastes the chicken as it cooks
- Two-temperature cooking method: The initial high heat seals in juices, while the lower temperature gently brings the chicken to the perfect doneness
- Resting period: This often-skipped step allows the juices to redistribute throughout the meat
- Balance of flavors: The combination of garlic, butter, herbs, and lemon creates a perfect harmony where no single element overwhelms
These techniques can be applied to many chicken dishes, but they come together perfectly in this garlic butter baked chicken breast recipe.
Final Thoughts
This garlic butter baked chicken breast recipe has become one of my signature dishes for good reason. It strikes that perfect balance between everyday simplicity and special-occasion worthy flavor. The techniques you’ll learn here – brining, making compound butter, and the two-temperature baking method – are valuable skills that will improve many of your chicken dishes going forward.
What I love most about this recipe is its reliability. Even on my busiest days, I can pull this together and know that dinner will be delicious. The ingredients are pantry staples that I always have on hand, and the actual hands-on time is minimal.
Whether you’re cooking for your family on a Tuesday night or hosting friends for dinner, this garlic butter baked chicken breast will not disappoint. The combination of juicy chicken and rich, aromatic garlic butter creates a dish that feels indulgent while actually being quite simple.
Give this recipe a try, and I’m confident it will earn a permanent spot in your cooking repertoire!