There’s something absolutely magical about individual desserts that makes every bite feel special and personal. When I first discovered the art of making mini Biscoff cheesecakes, I knew I had stumbled upon dessert gold. These petite masterpieces combine the rich, caramelized cookie flavor of Biscoff with the creamy decadence of classic cheesecake, all perfectly portioned for guilt-free indulgence.
My journey with mini Biscoff cheesecakes began during a particularly stressful week when I needed comfort food that wouldn’t leave me with a whole cake tempting me from the refrigerator. The individual portions proved to be the perfect solution, and the Biscoff flavor added that distinctive European touch that elevated these treats beyond ordinary cheesecake.
Understanding the Magic Behind Biscoff
Biscoff Cookie Spread: A smooth, creamy spread made from caramelized European biscuits, offering notes of cinnamon, nutmeg, and brown butter
Speculoos: The traditional Belgian cookie that inspired Biscoff, characterized by its distinctive spiced flavor profile
Caramelization: The cooking process that gives Biscoff its signature deep, complex flavor through controlled browning of sugars
Mini Cheesecake Format: Individual-sized cheesecakes that eliminate cutting concerns while providing perfect portion control
The beauty of mini Biscoff cheesecakes lies in their versatility and the way they showcase the cookie spread’s unique flavor profile. Unlike traditional cheesecakes that can sometimes feel overwhelming, these individual portions allow you to savor every layer without commitment to a massive slice.
Essential Ingredients and Their Roles
Creating exceptional mini Biscoff cheesecakes requires understanding how each ingredient contributes to the final result. I’ve learned through countless batches that quality ingredients make a noticeable difference in both texture and flavor.
Crust Components
The foundation of any great cheesecake starts with the crust, and for Biscoff cheesecakes, I prefer using actual Biscoff cookies rather than graham crackers. The cookies provide an authentic flavor base that complements rather than competes with the filling.
| Ingredient | Quantity | Purpose | Tips |
|---|---|---|---|
| Biscoff Cookies | 1½ cups crushed | Provides flavor base and structure | Crush to fine crumbs but leave some texture |
| Unsalted Butter | 4 tablespoons melted | Binds crumbs together | Should be melted but not hot |
| Granulated Sugar | 2 tablespoons | Adds sweetness and helps binding | Optional if cookies are sweet enough |
| Salt | Pinch | Enhances overall flavor | Balances sweetness |
Cheesecake Filling Essentials
The filling represents the heart of these mini desserts, and achieving the perfect texture requires attention to ingredient temperature and mixing technique.
| Ingredient | Quantity | Purpose | Temperature |
|---|---|---|---|
| Cream Cheese | 24 oz (3 packages) | Primary base, provides structure | Room temperature |
| Biscoff Spread | ½ cup | Signature flavor | Room temperature |
| Granulated Sugar | ⅔ cup | Sweetens and affects texture | Room temperature |
| Large Eggs | 3 whole | Binding and structure | Room temperature |
| Vanilla Extract | 1 teaspoon | Enhances flavors | Any temperature |
| Heavy Cream | ¼ cup | Adds richness and smoothness | Room temperature |
Step-by-Step Preparation Method
My approach to mini Biscoff cheesecakes emphasizes technique over complexity. Each step builds upon the previous one, creating layers of flavor and texture that make these desserts truly special.
Preparing the Crust
The crust preparation sets the tone for the entire dessert. I’ve found that taking time with this foundation pays dividends in the final result.
Equipment Setup: Preheat your oven to 325°F and line a standard 12-cup muffin tin with paper liners. The paper liners make removal much easier and create a professional presentation.
Cookie Processing: Place Biscoff cookies in a food processor and pulse until you achieve fine crumbs with some small pieces remaining. The texture should resemble coarse sand with occasional pebbles. Over-processing creates powder that doesn’t hold together well.
Butter Integration: Drizzle melted butter over the cookie crumbs while the processor runs briefly. The mixture should hold together when pressed but not feel soggy. If it seems too dry, add butter one teaspoon at a time.
Portion and Press: Divide the crust mixture evenly among the muffin cups, using about 2 tablespoons per cup. Press firmly with the back of a spoon or small measuring cup to create an even, compact base.
Initial Baking: Bake the crusts for 8-10 minutes until they appear set and slightly darkened. This pre-baking ensures the crust maintains its structure under the weight of the filling.
Creating the Perfect Filling
The filling technique makes the difference between amateur and professional results. Temperature control and mixing method are crucial for achieving that signature smooth, creamy texture.
Cream Cheese Preparation: Ensure cream cheese reaches room temperature before beginning. Cold cream cheese creates lumps that are difficult to eliminate. I often cut the cream cheese into small cubes and let it sit for about an hour.
Initial Mixing: Beat cream cheese in a large bowl using an electric mixer on medium speed until completely smooth and fluffy, approximately 3-4 minutes. Scrape down the bowl sides frequently to ensure even mixing.
Biscoff Integration: Add the Biscoff spread and mix until fully incorporated. The spread should distribute evenly throughout the cream cheese without streaks or lumps.
Sugar Addition: Gradually add sugar while continuing to beat. The mixture should become noticeably lighter in color and texture.
Egg Incorporation: Add eggs one at a time, mixing just until each is incorporated. Overmixing after adding eggs can create a dense texture or cause cracking during baking.
Final Touches: Mix in vanilla extract and heavy cream until just combined. The final mixture should be smooth, creamy, and pourable.
Baking Techniques for Perfect Results
Proper baking technique determines whether your mini cheesecakes achieve that perfect creamy texture or suffer from common problems like cracking, sinking, or graininess.
Temperature and Timing Considerations
| Baking Stage | Temperature | Time | Visual Cues |
|---|---|---|---|
| Initial Bake | 325°F | 18-20 minutes | Centers slightly jiggly |
| Cooling Phase | Oven off, door cracked | 10 minutes | Gradual temperature reduction |
| Room Temperature | Ambient | 1 hour | Complete cooling |
| Refrigeration | 35-40°F | Minimum 4 hours | Firm, set texture |
Water Bath Method
While not absolutely necessary for mini cheesecakes, I sometimes use a water bath for exceptionally creamy results. Place the muffin tin in a larger roasting pan and add hot water halfway up the sides of the muffin cups. This gentle, moist heat prevents the surface from drying out and reduces cracking risk.
Filling the Cups: Divide the filling evenly among the prepared crusts, filling each cup about ¾ full. The filling will puff slightly during baking but shouldn’t overflow if properly portioned.
Baking Process: Bake for 18-20 minutes until the centers are almost set but still slightly jiggly when gently shaken. The edges should appear firm and set.
Cooling Strategy: Turn off the oven and crack the door open, allowing the cheesecakes to cool gradually for 10 minutes. This prevents thermal shock that often causes cracking.
Topping and Presentation Options
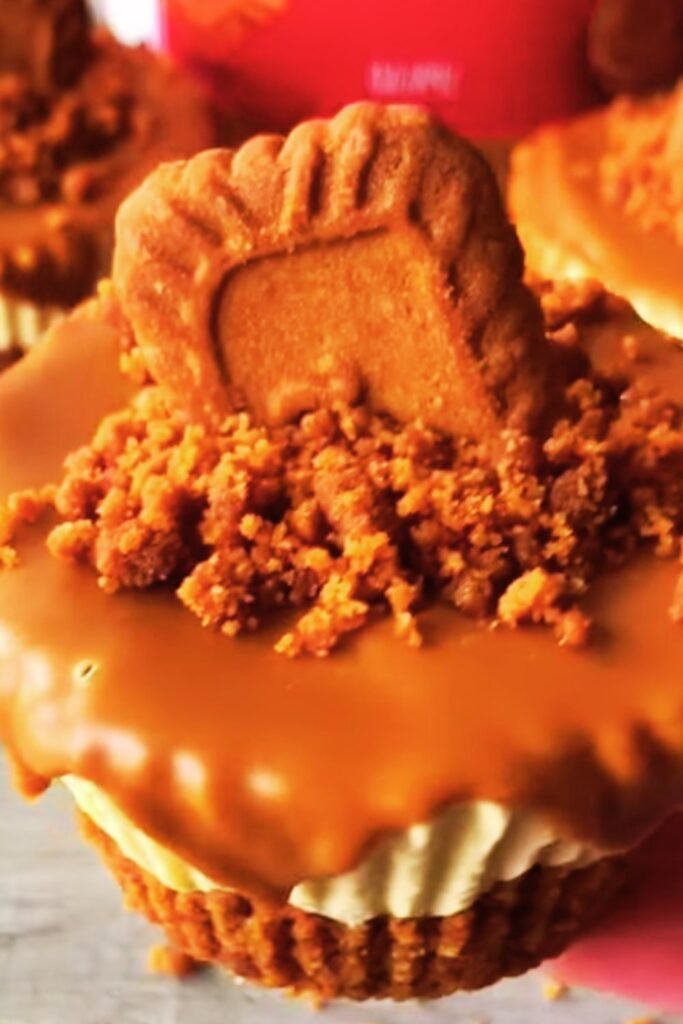
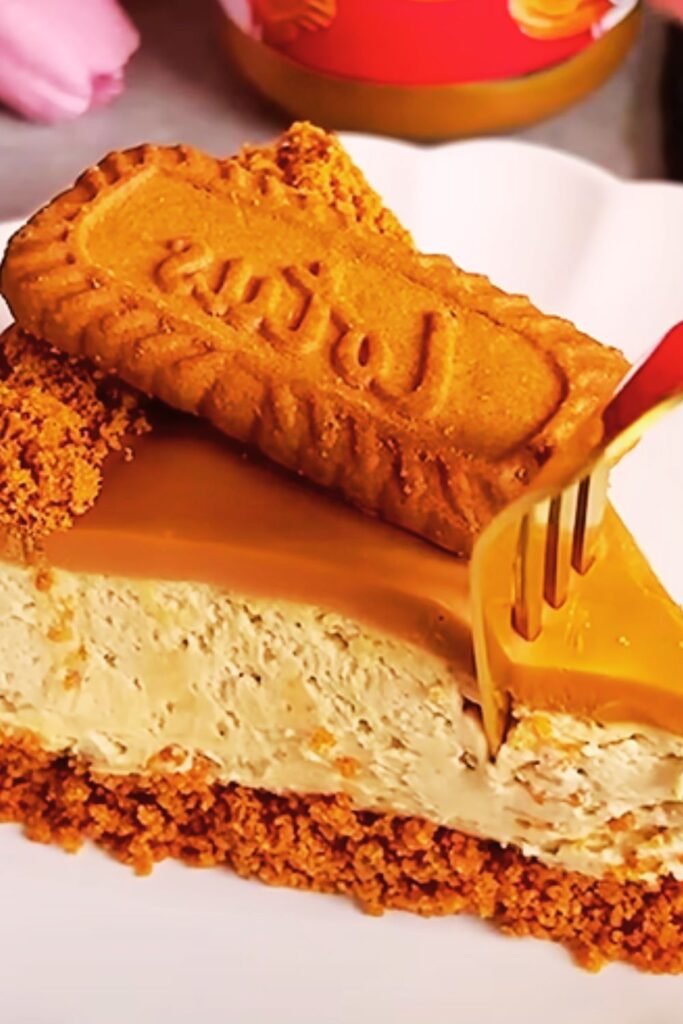
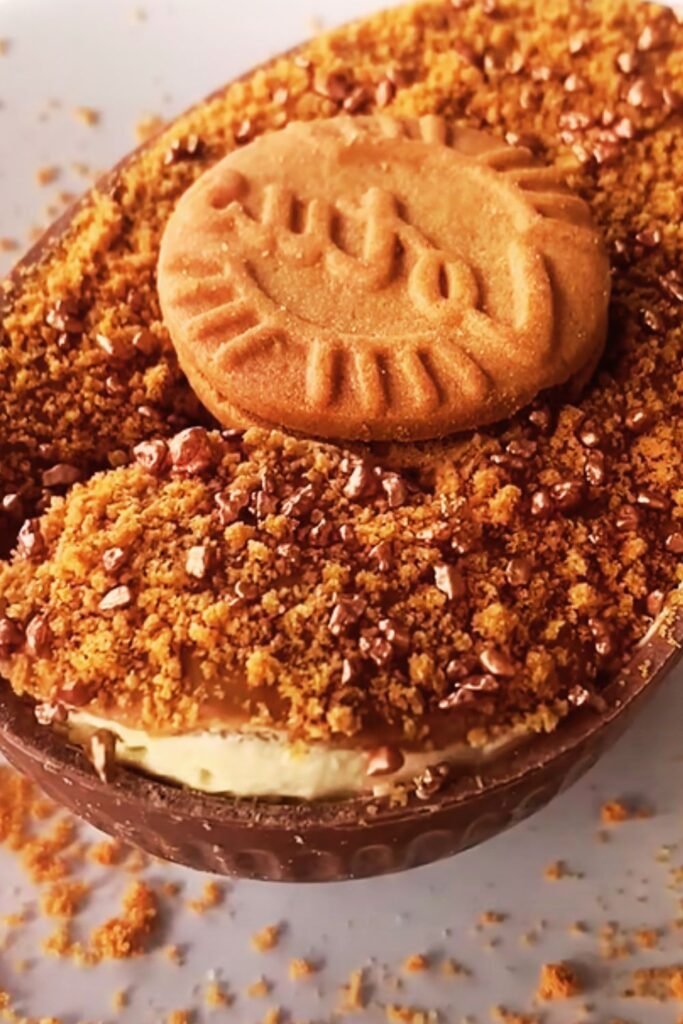
The beauty of mini Biscoff cheesecakes lies not only in their flavor but also in their presentation potential. I’ve experimented with numerous topping combinations, each adding its own character to these delightful desserts.
Classic Biscoff Toppings
Whipped Cream with Biscoff Drizzle: Light, airy whipped cream provides textural contrast while a drizzle of melted Biscoff spread adds visual appeal and extra flavor punch.
Crushed Cookie Garnish: Finely crushed Biscoff cookies sprinkled over the surface create textural interest and reinforce the dessert’s signature flavor.
Caramel Sauce: A drizzle of salted caramel sauce complements the Biscoff flavor profile beautifully, adding another layer of complexity.
Creative Variations
| Topping Style | Components | Flavor Profile | Difficulty |
|---|---|---|---|
| Chocolate Ganache | Heavy cream, dark chocolate | Rich, sophisticated | Medium |
| Berry Compote | Mixed berries, sugar, lemon | Fresh, bright | Easy |
| Espresso Cream | Whipped cream, espresso powder | Coffee-forward | Easy |
| Candied Nuts | Pecans, sugar, cinnamon | Crunchy, spiced | Medium |
Storage and Serving Guidelines
Proper storage ensures your mini Biscoff cheesecakes maintain their perfect texture and flavor for days after preparation. I’ve learned that these desserts actually improve with time as the flavors meld and develop.
Storage Recommendations
Refrigeration: Store covered mini cheesecakes in the refrigerator for up to 5 days. Use an airtight container or cover the muffin tin with plastic wrap to prevent absorption of other flavors.
Freezing: These mini cheesecakes freeze exceptionally well for up to 3 months. Wrap individually in plastic wrap, then place in a freezer-safe container. Thaw in the refrigerator overnight before serving.
Serving Temperature: Remove from refrigerator 15-20 minutes before serving to allow them to come slightly closer to room temperature for optimal flavor and texture.
Portion Planning
| Occasion | Servings per Person | Total Needed for 12 People |
|---|---|---|
| Casual Dessert | 1 mini cheesecake | 12 pieces |
| Dinner Party | 1-2 mini cheesecakes | 15-18 pieces |
| Holiday Gathering | 2 mini cheesecakes | 24 pieces |
| Potluck Contribution | Variable | 18-24 pieces |
Troubleshooting Common Issues
Through my experience making hundreds of mini Biscoff cheesecakes, I’ve encountered and solved virtually every problem that can arise. Understanding these solutions saves time, ingredients, and frustration.
Texture Problems
Cracked Surfaces: Usually caused by overbaking or rapid temperature changes. Ensure gradual cooling and don’t overbake. Cracks can be covered with toppings if they occur.
Dense Texture: Often results from overmixing after adding eggs or using cold ingredients. Mix just until combined and ensure all ingredients reach room temperature.
Grainy Consistency: Typically caused by undissolved sugar or poorly mixed cream cheese. Beat cream cheese thoroughly before adding other ingredients and ensure sugar completely dissolves.
Flavor Issues
Insufficient Biscoff Flavor: Increase Biscoff spread to ¾ cup or add crushed cookies to the filling. The spread’s flavor intensifies during chilling.
Overly Sweet: Balance with a pinch of salt in the filling or serve with unsweetened whipped cream.
Bland Overall Taste: Enhance with additional vanilla extract or a small amount of almond extract.
Nutritional Considerations and Modifications
Understanding the nutritional profile of mini Biscoff cheesecakes helps with portion planning and allows for modifications to meet dietary needs.
Standard Nutritional Profile
| Component | Per Mini Cheesecake | Daily Value % |
|---|---|---|
| Calories | 285 | 14% |
| Fat | 18g | 23% |
| Saturated Fat | 11g | 55% |
| Carbohydrates | 26g | 9% |
| Sugar | 20g | Variable |
| Protein | 6g | 12% |
| Sodium | 195mg | 8% |
Dietary Modifications
Reduced Sugar: Substitute ⅓ of the sugar with sugar substitute designed for baking. The texture may be slightly different but still acceptable.
Gluten-Free: Use gluten-free cookies for the crust. Many brands offer gluten-free versions of speculoos-style cookies.
Lower Fat: Substitute part of the cream cheese with Greek yogurt, though this will affect texture and tanginess.
Ingredient substitutions for dietary modifications
Seasonal Variations and Special Occasions
Mini Biscoff cheesecakes adapt beautifully to seasonal ingredients and special occasion requirements. I love experimenting with these variations throughout the year.
Seasonal Adaptations
Spring: Add lemon zest to the filling and top with fresh berries for a bright, fresh flavor profile.
Summer: Incorporate fresh peach puree into the filling or serve with macerated summer fruits.
Fall: Enhance with pumpkin spice or add a layer of apple butter between the crust and filling.
Winter: Include eggnog flavoring or top with cranberry sauce for holiday gatherings.
Holiday Presentations
| Holiday | Modification | Presentation |
|---|---|---|
| Valentine’s Day | Add raspberry swirl | Heart-shaped cookie garnish |
| Easter | Lemon version | Pastel-colored toppings |
| Halloween | Pumpkin spice blend | Orange-tinted whipped cream |
| Christmas | Eggnog flavoring | Cinnamon dust, holly garnish |
| New Year’s | Champagne addition | Gold leaf decoration |
Serving Suggestions and Pairings
The versatility of mini Biscoff cheesecakes makes them suitable for various serving situations, from casual family dinners to elegant dinner parties.
Beverage Pairings
Coffee: The Biscoff flavor complements coffee beautifully, especially espresso or cappuccino.
Tea: Earl Grey or chai tea provides aromatic contrast to the sweet, spiced flavors.
Milk: Classic pairing that balances the richness while highlighting the cookie flavors.
Sparkling Water: Cleanses the palate between bites, preventing flavor fatigue.
Complementary Desserts
When serving as part of a dessert spread, mini Biscoff cheesecakes pair well with lighter options like fruit salads, sorbet, or simple cookies. The richness of the cheesecakes balances beautifully against fresh, acidic fruits.
Advanced Techniques and Professional Tips
After years of perfecting my mini Biscoff cheesecake technique, I’ve developed several advanced methods that elevate these desserts from good to exceptional.
Layering Techniques
Swirl Patterns: Create marble effects by dropping small amounts of melted Biscoff spread onto the filling surface and swirling with a toothpick.
Dual Layers: Create a bottom layer with extra Biscoff spread, then top with regular filling for intensified flavor gradients.
Crust Variations: Mix crushed cookies with chopped nuts or add coconut flakes for texture complexity.
Professional Presentation
Uniform Sizing: Use a digital scale to ensure consistent portion sizes across all mini cheesecakes.
Clean Edges: Run a thin knife around each cheesecake before cooling to prevent sticking and ensure clean removal.
Garnish Consistency: Apply toppings with consistent patterns and amounts for professional appearance.
Q&A Section
Q. How long do mini Biscoff cheesecakes need to chill before serving? A. I recommend chilling for at least 4 hours, though overnight chilling produces the best texture and allows flavors to fully develop. The longer chilling time ensures the filling sets completely and achieves that perfect creamy consistency.
Q. Can I make these without a muffin tin? A. Absolutely! You can use individual ramekins, small springform pans, or even make them in a regular cake pan and cut into squares. Just adjust the baking time accordingly – smaller portions bake faster, while larger formats need more time.
Q. Why did my cheesecakes crack on top? A. Cracking usually results from overbaking or rapid temperature changes. Make sure to bake just until the centers are slightly jiggly, and allow gradual cooling in the oven with the door cracked open. Using room temperature ingredients also helps prevent cracking.
Q. Can I substitute the Biscoff spread with something else? A. While Biscoff spread creates the signature flavor, you can substitute with peanut butter, almond butter, or even Nutella. Each will create a different flavor profile, but the technique remains the same. Cookie butter alternatives work particularly well.
Q. How do I know when the mini cheesecakes are done baking? A. The edges should be set and firm, while the centers remain slightly jiggly when gently shaken. They’ll continue cooking from residual heat during the cooling process. Overbaking creates a dense, dry texture.
Q. Can I make the crust with different cookies? A. Definitely! Graham crackers work well for a more traditional approach, while vanilla wafers create a lighter flavor. Gingersnaps add spice, and chocolate cookies provide richness. Adjust sugar accordingly based on your cookie choice’s sweetness.
Q. What’s the best way to remove them from the muffin tin? A. Paper liners make removal easiest – just peel them away when ready to serve. Without liners, run a thin knife around the edges while slightly warm, then cool completely before attempting removal.
Q. Can I double the recipe? A. Yes, this recipe doubles well. You’ll need two muffin tins or can bake in batches. The baking time remains the same, but you might need to rotate the pans halfway through for even baking.
Q. How far in advance can I make these? A. Mini Biscoff cheesecakes actually improve with time and can be made up to 3 days ahead. Store covered in the refrigerator and add toppings just before serving for the best presentation.
Q. Why is my filling lumpy despite following the recipe? A. Lumpy filling usually results from cold cream cheese or insufficient mixing. Ensure all ingredients reach room temperature before mixing, and beat the cream cheese thoroughly until completely smooth before adding other ingredients.
Q. Can I use low-fat cream cheese? A. While possible, low-fat cream cheese creates a different texture – less rich and creamy. If using reduced-fat versions, you might need to adjust the recipe slightly and expect a tangier, less indulgent result.
Q. What’s the secret to getting smooth, professional-looking tops? A. Tap the muffin tin gently on the counter after filling to release air bubbles, and avoid opening the oven door during baking. The gradual cooling process also helps maintain smooth surfaces.
These mini Biscoff cheesecakes represent the perfect intersection of convenience and indulgence. They offer all the satisfaction of traditional cheesecake with the added benefits of portion control and sophisticated flavor. Whether you’re hosting a dinner party, bringing dessert to a potluck, or simply treating yourself to something special, these individual desserts deliver consistent results that never fail to impress.
The combination of caramelized cookie flavor, creamy texture, and elegant presentation makes these mini cheesecakes a standout choice for any dessert repertoire. With proper technique and quality ingredients, you’ll create desserts that rival those from the finest bakeries, all from the comfort of your own kitchen.