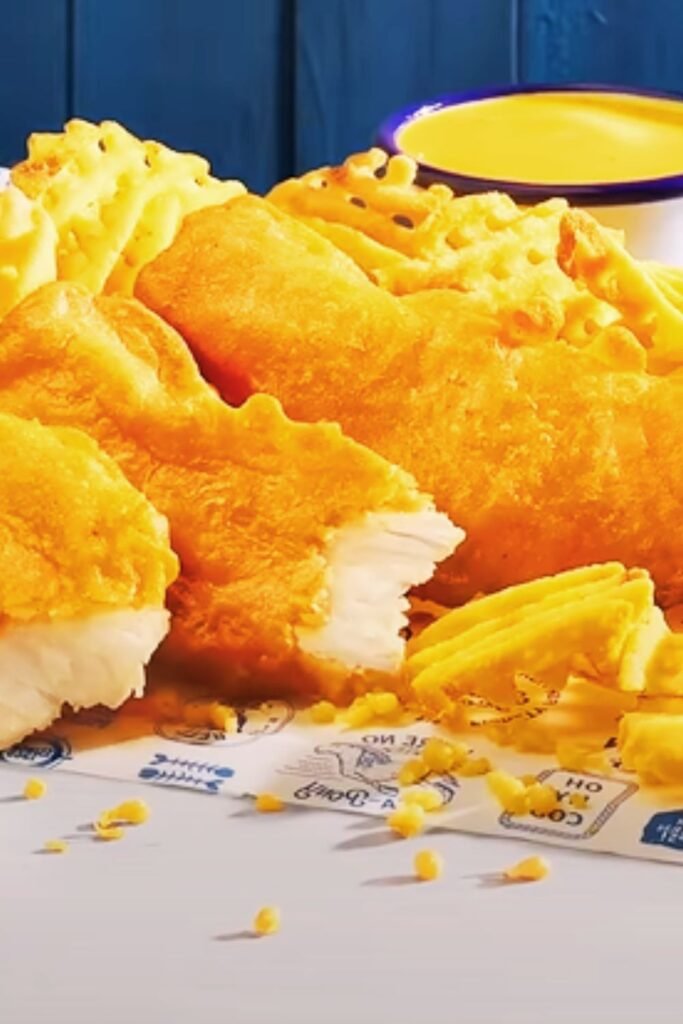
I’ve been fascinated by Long John Silver’s distinctive batter for years. That golden, crispy exterior that shatters at first bite, revealing tender fish or chicken inside, has captured the hearts of countless seafood lovers since the chain’s inception in 1969. After extensive research and countless kitchen experiments, I’m excited to share everything I’ve learned about recreating this legendary batter in your own kitchen.
The secret behind Long John Silver’s success lies not just in their seafood selection, but in that unmistakable batter that creates the perfect balance of crunch and flavor. What makes this batter so special is its unique combination of ingredients and technique that creates an exceptionally light yet crispy coating that doesn’t overwhelm the natural flavors of the seafood.
Understanding Long John Silver’s Batter Foundation
Long John Silver’s batter represents a masterclass in achieving the perfect tempura-style coating. The original recipe, developed in the early 1970s, was designed to create maximum crispiness while maintaining a light texture that wouldn’t become soggy quickly under heat lamps.
Key Characteristics of Authentic LJS Batter:
- Light golden color when cooked
- Exceptionally crispy exterior
- Minimal oil absorption
- Stays crispy for extended periods
- Neutral flavor that enhances rather than masks
- Bubbled, textured surface
The science behind this batter involves creating the right balance of proteins, starches, and leavening agents. The carbonation plays a crucial role in creating those characteristic bubbles, while the flour blend provides structure without heaviness.
Essential Ingredients Breakdown
Understanding each ingredient’s role helps you achieve consistent results every time you prepare this batter.
Flour Components:
- All-purpose flour: Provides structure and body
- Cornstarch: Creates extra crispiness and lightness
- Rice flour (optional): Enhances crunchiness
Leavening Agents:
- Baking powder: Creates lift and bubbles
- Carbonated water: Provides immediate bubbling action
- Cold temperature: Slows gluten development
Seasonings:
- Salt: Enhances all flavors
- White pepper: Subtle heat without color
- Garlic powder: Background savory note
- Onion powder: Depth of flavor

My Perfected Long John Silver’s Batter Recipe
After dozens of attempts, I’ve developed this recipe that closely mimics the original. The key is in the proportions and technique.
Ingredients Table
| Ingredient | Amount | Purpose | Notes |
|---|---|---|---|
| All-purpose flour | 1 cup | Structure base | Sift for best results |
| Cornstarch | 1/4 cup | Crispiness enhancer | Creates lighter texture |
| Baking powder | 1 1/2 teaspoons | Leavening agent | Use fresh for best lift |
| Salt | 1 teaspoon | Flavor enhancement | Sea salt preferred |
| White pepper | 1/4 teaspoon | Subtle heat | Black pepper changes color |
| Garlic powder | 1/4 teaspoon | Savory depth | Not garlic salt |
| Onion powder | 1/4 teaspoon | Flavor complexity | Fine powder works best |
| Cold club soda | 1 cup | Liquid base | Must be very cold |
| Ice cubes | 3-4 pieces | Temperature control | Remove before coating |
Step-by-Step Preparation Method
Dry Ingredient Preparation:
- Sift all dry ingredients together twice to ensure even distribution
- This step is crucial for preventing lumps and ensuring smooth coating
- Set aside in a large mixing bowl
Liquid Preparation: 4. Chill club soda in refrigerator for at least 2 hours before use 5. Add ice cubes to club soda 10 minutes before mixing 6. The colder the liquid, the better the final texture
Mixing Technique: 7. Remove ice cubes from club soda 8. Pour cold club soda into dry ingredients all at once 9. Whisk quickly but gently – don’t overmix 10. Stop mixing as soon as ingredients are just combined 11. Small lumps are perfectly acceptable and actually preferred
Critical Timing: 12. Use batter immediately after mixing 13. Don’t let batter sit for more than 5 minutes 14. Carbonation dissipates quickly, reducing effectiveness
Temperature and Timing Mastery
Temperature control separates amateur attempts from professional-quality results. I’ve learned that every aspect of temperature matters significantly.
Oil Temperature Guidelines
| Stage | Temperature Range | Visual Cues | Results |
|---|---|---|---|
| Initial heating | 350°F (175°C) | Oil shimmers slightly | Preparation stage |
| Optimal frying | 375°F (190°C) | Small bubbles form around test drop | Perfect crispiness |
| Recovery time | 365-375°F | Temperature drops with food addition | Maintain heat |
| Finishing temperature | 370°F (188°C) | Golden brown achievement | Ready to drain |
Temperature Monitoring Tips:
- Use a reliable thermometer
- Check temperature between batches
- Allow oil to recover between additions
- Never exceed 380°F to prevent burning
Batter Temperature Science
Cold batter hitting hot oil creates the signature texture through rapid steam formation. Here’s what I’ve discovered about optimal temperatures:
Batter Temperature Effects:
- 32-38°F: Creates maximum bubbling and crispiness
- 40-45°F: Good results but less dramatic texture
- 50°F and above: Soggy, heavy coating results
Maintaining Cold Batter:
- Keep mixing bowl in refrigerator until ready to use
- Work in small batches to prevent warming
- Consider placing bowl over ice water during extended use
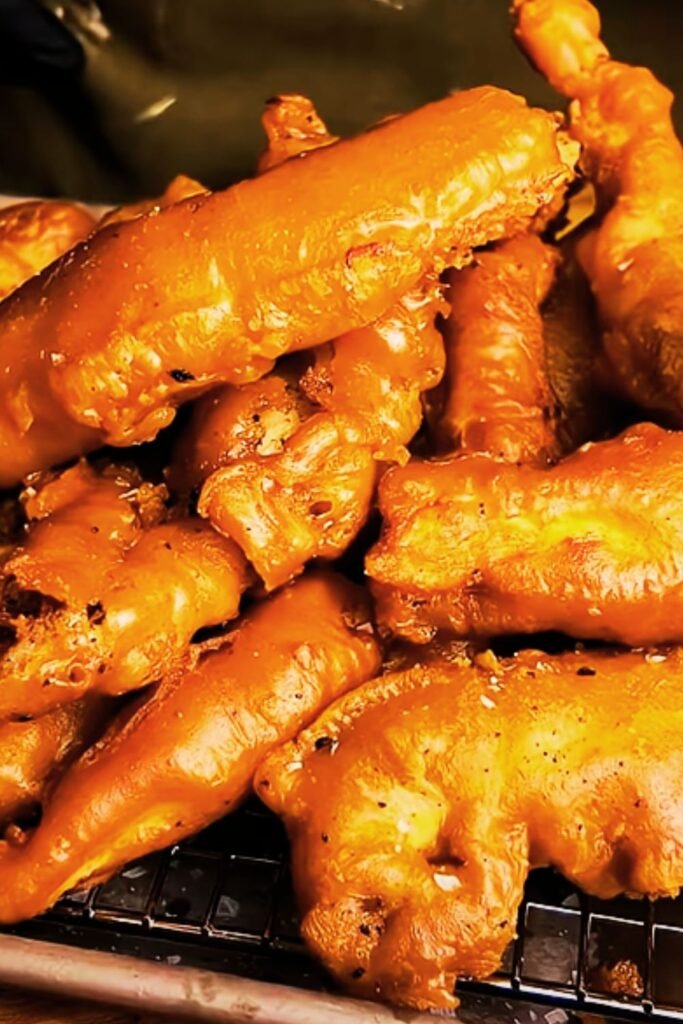
Advanced Coating Techniques
The application method dramatically affects the final product. I’ve refined these techniques through extensive practice.
Pre-Coating Preparation
Fish/Seafood Preparation:
- Pat completely dry with paper towels
- Light dusting of flour helps batter adhere
- Season lightly with salt 10 minutes before coating
- Bring to room temperature for even cooking
Dredging Station Setup:
- Station 1: Seasoned flour for initial dusting
- Station 2: Prepared batter in wide, shallow bowl
- Station 3: Hot oil ready for immediate frying
- Station 4: Wire cooling rack over paper towels
Professional Coating Method
The Dip and Shake Technique:
- Dredge seafood lightly in seasoned flour
- Shake off excess flour completely
- Immerse fully in batter using tongs or fork
- Allow excess batter to drip off for 2-3 seconds
- Immediately transfer to hot oil
Common Coating Mistakes to Avoid:
- Over-flouring creates thick, heavy coating
- Allowing batter to drip too long
- Disturbing pieces immediately after adding to oil
- Overcrowding the frying vessel
Frying Perfection Guide
Achieving restaurant-quality results requires understanding the frying process completely.
Oil Selection and Management
| Oil Type | Smoke Point | Flavor Impact | Cost | Recommendation |
|---|---|---|---|---|
| Vegetable oil | 400°F | Neutral | Low | Excellent choice |
| Canola oil | 400°F | Very neutral | Medium | My preferred option |
| Peanut oil | 450°F | Slight nutty | High | Professional grade |
| Corn oil | 450°F | Light corn | Medium | Good alternative |
| Sunflower oil | 440°F | Mild | Medium | Quality option |
Oil Depth Requirements:
- Minimum 3 inches for proper submersion
- 4-5 inches optimal for even cooking
- Deep enough to prevent pieces from touching bottom
- Maintain consistent level throughout cooking
Frying Timeline and Visual Cues
Phase-by-Phase Cooking:
Initial Submersion (0-30 seconds):
- Vigorous bubbling begins immediately
- Batter starts setting around edges
- Don’t move or disturb pieces
Early Development (30 seconds – 1 minute):
- Bubbling moderates slightly
- Light golden color begins developing
- Edges start becoming crispy
Mid-Cooking (1-2 minutes):
- Golden color deepens
- Bubbling continues steadily
- Pieces may float slightly
Final Stage (2-3 minutes total):
- Deep golden brown achieved
- Bubbling significantly reduced
- Coating sounds crispy when tapped
Serving and Storage Solutions
Proper handling after frying maintains that crucial crispiness that makes Long John Silver’s batter so appealing.
Immediate Serving Protocol
Draining Technique:
- Remove from oil using slotted spoon or spider
- Allow brief drain over oil (3-5 seconds)
- Transfer to wire cooling rack immediately
- Never use paper towels directly under hot items
- Season lightly with salt while still hot
Temperature Maintenance:
- Serve within 5-10 minutes for best texture
- Keep in 200°F oven for short holding periods
- Use warming trays for buffet-style service
- Avoid covering, which creates steam and sogginess
Storage and Reheating Methods
While fresh is always best, sometimes storage becomes necessary.
Short-term Storage (2-4 hours):
- Room temperature on wire racks
- Light covering with clean kitchen towel
- Avoid refrigeration if possible
Longer Storage (up to 24 hours):
- Refrigerate in single layer on parchment-lined tray
- Cover loosely to prevent moisture buildup
Reheating for Best Results:
- Preheat oven to 375°F
- Place on wire rack over baking sheet
- Heat 5-8 minutes until crispy
- Check frequently to prevent overcooking
Troubleshooting Common Issues
Even experienced cooks encounter challenges with batter techniques. Here are solutions to the most frequent problems I’ve encountered.
Texture Problems and Solutions
| Problem | Likely Cause | Solution | Prevention |
|---|---|---|---|
| Soggy coating | Oil too cool | Increase temperature to 375°F | Monitor with thermometer |
| Heavy, thick batter | Overmixing | Mix gently, just until combined | Use light hand when whisking |
| Batter won’t stick | Wet surface | Pat dry thoroughly, dust with flour | Proper preparation sequence |
| Uneven browning | Overcrowding | Fry fewer pieces at once | Work in small batches |
| Burnt exterior, raw interior | Oil too hot | Reduce to 375°F, cook longer | Temperature control |
Advanced Problem-Solving
Batter Consistency Issues:
- Too thick: Add cold club soda gradually
- Too thin: Sift in small amount of flour/cornstarch mixture
- Lumpy: Strain through fine-mesh sieve
- Flat (no bubbles): Check baking powder freshness
Oil-Related Challenges:
- Foaming oil: May be too hot or contaminated
- Dark oil: Replace if multiple batches have been cooked
- Splattering: Ensure food is properly dried
- Temperature fluctuation: Allow recovery time between batches
Creative Variations and Applications
While the classic Long John Silver’s batter works wonderfully for fish, I’ve experimented with numerous variations and applications.
Protein Variations
Seafood Applications:
- Cod, haddock, pollock (traditional choices)
- Shrimp (adjust cooking time to 1-2 minutes)
- Scallops (pat extra dry, quick fry)
- Calamari rings (very brief cooking time)
Alternative Proteins:
- Chicken tenders (increase cooking time)
- Pork tenderloin strips
- Firm tofu (for vegetarian option)
- Cheese sticks (freeze first for best results)
Vegetable Applications
The batter works exceptionally well for vegetables, creating restaurant-quality tempura-style results.
Best Vegetable Choices:
- Onion rings (classic pairing)
- Mushrooms (remove excess moisture)
- Zucchini strips
- Bell pepper rings
- Cauliflower florets
- Sweet potato rounds
Nutritional Considerations
Understanding the nutritional impact helps make informed dietary decisions.
Nutritional Breakdown (Per 1/4 Cup Batter)
| Nutrient | Amount | % Daily Value | Notes |
|---|---|---|---|
| Calories | 95 | 5% | Before oil absorption |
| Carbohydrates | 22g | 7% | Primarily from flour |
| Protein | 2g | 4% | From flour proteins |
| Fat | 0.5g | 1% | Minimal before frying |
| Sodium | 480mg | 21% | Can be reduced |
| Fiber | 1g | 4% | Limited amount |
Healthier Modifications:
- Reduce sodium by using less salt
- Substitute part of flour with whole wheat
- Use air fryer at 400°F for 8-10 minutes
- Bake at 425°F on preheated baking sheet
Cost Analysis and Budget Tips
Creating restaurant-quality batter at home provides significant savings while delivering superior freshness.
Cost Breakdown
| Item | Store Cost | Home Cost | Savings | Quality Difference |
|---|---|---|---|---|
| 4-piece fish dinner | $8.99 | $3.50 | $5.49 | Fresher, customizable |
| Family meal (serves 4) | $24.99 | $9.00 | $15.99 | Higher quality ingredients |
| Large shrimp basket | $12.99 | $5.25 | $7.74 | Better shrimp selection |
Money-Saving Tips:
- Buy fish in bulk when on sale, freeze portions
- Make larger batches of dry ingredients, store properly
- Use seasonal vegetables for variety
- Purchase oil in larger quantities for better per-unit cost
Frequently Asked Questions
Q: Can I make the batter ahead of time? No, the batter must be used immediately after mixing. The carbonation and chemical leavening work best when fresh. The club soda loses its effectiveness quickly, and the baking powder begins reacting immediately upon contact with liquid.
Q: Why does my batter turn out heavy instead of light and crispy? Heavy batter usually results from overmixing, which develops too much gluten in the flour. Mix only until ingredients are just combined – lumps are actually preferred over a smooth, overworked batter. Also ensure your club soda is very cold and freshly opened.
Q: What’s the best oil temperature for frying? Maintain oil temperature at 375°F (190°C). This temperature creates the perfect balance – hot enough to quickly set the batter and create crispiness, but not so hot that the outside burns before the inside cooks. Use a reliable thermometer rather than guessing.
Q: How can I keep the coating crispy for longer periods? Place fried items on a wire cooling rack rather than paper towels, which trap steam. Keep them in a 200°F oven if you need to hold them for service. Never cover hot fried foods, as this creates steam that makes the coating soggy.
Q: Can I use regular water instead of club soda? While regular water will work, club soda is essential for achieving the authentic texture. The carbonation creates the characteristic bubbles and lightness that make Long John Silver’s batter special. Cold milk can be substituted as a second choice, but results won’t match the original.
Q: What type of fish works best with this batter? Mild, white fish work best – cod, haddock, pollock, or tilapia are excellent choices. These fish have firm texture that won’t fall apart during frying and neutral flavors that complement rather than compete with the batter. Avoid oily fish like salmon or mackerel.
Q: How do I prevent the batter from sliding off the fish? Ensure the fish is completely dry and lightly dusted with seasoned flour before dipping in batter. The flour creates a base for the batter to adhere to. Also, don’t shake off too much batter – a light coating that covers completely works best.
Q: Can this batter be used for baking instead of frying? The batter is specifically designed for frying and won’t produce the same results when baked. For baked applications, you’d need a different coating approach, such as breadcrumbs or a modified batter with eggs for binding.
Q: How do I know when the oil is ready without a thermometer? Drop a small amount of batter into the oil – it should immediately sizzle and rise to the surface with active bubbling. If it sinks and bubbles slowly, the oil is too cool. If it browns immediately upon contact, the oil is too hot.
Q: Why does my batter sometimes turn out gummy? Gummy texture typically results from using old baking powder, overmixing the batter, or oil that’s not hot enough. Always use fresh baking powder (replace every 6 months), mix gently, and maintain proper oil temperature throughout cooking.
The key to mastering Long John Silver’s batter lies in understanding that it’s as much about technique as ingredients. The magic happens in those crucial moments when cold batter meets hot oil, creating the perfect storm of steam, bubbles, and rapid setting that produces that unmistakable crunch. With practice and attention to detail, you’ll be creating restaurant-quality fried seafood in your own kitchen, customized to your exact preferences and always served at peak freshness.
Remember, cooking is both science and art. While following the recipe precisely will give you excellent results, don’t be afraid to make small adjustments based on your preferences and local ingredients. The most important thing is to maintain the fundamental principles – cold batter, proper oil temperature, and gentle handling – that make this legendary coating so special.